> For the complete documentation index, see [llms.txt](/ko/llms.txt).

This section contains detailed instructions on how to review funds in Bitcoin after a pegout by:
- Convert RBTC - BTC
- Import a key in Electrum
- Import in Electrum if you are using hardware wallets
## Why derive address using Electrum?
During the **pegout** process, the destination address of your BTC is derived from your signature, this enables one to know which address will receive the BTCs, to view the destination address, follow this step by step guide.
## Prerequisites:
- Wallet private key
- [Electrum](https://electrum.org/#download)
- [Rootstock Utils](https://github.com/rsksmart/utils)
## How to view a derived address {#how-to-view-advanced-details}
A derived address is the BTC address derived from the RBTC account. When using the PowPeg app, it is important to know which address you will receive your BTCs
We will learn how to view a derived address using [Metamask](/resources/guides/powpeg-app/pegout/deriving-electrum/#using-metamask) to get a private key. We will also learn how to [convert RBTC - BTC](/resources/guides/powpeg-app/pegout/metamask/) and [Import a Key in Electrum](/resources/guides/powpeg-app/pegout/deriving-electrum/#import-key-in-electrum).
### Getting a wallet private key
#### Using Metamask
**Step 1**: Open the Metamask wallet on your browser, you can find this in the extensions tab in your browser.
**Step 2**: Click on the menu icon by the right
**Step 3**: Choose “Account details”
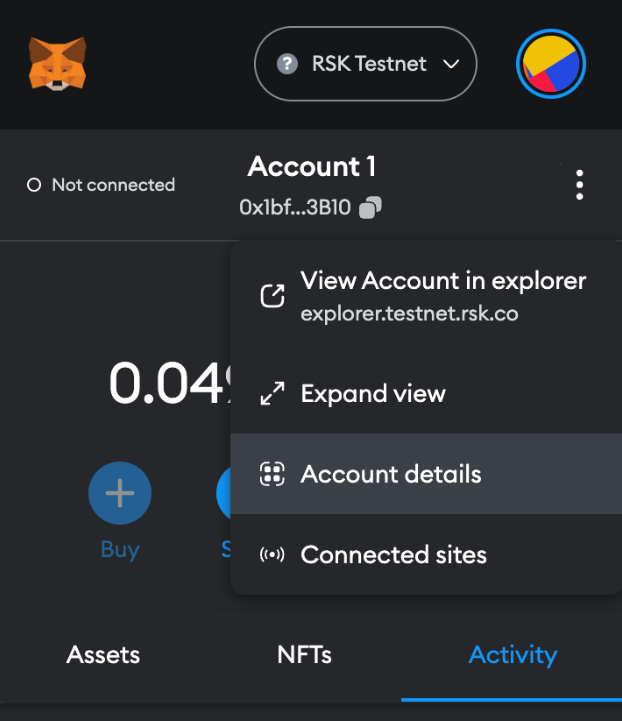
**Step 4**: Then click on the “Export private key” button
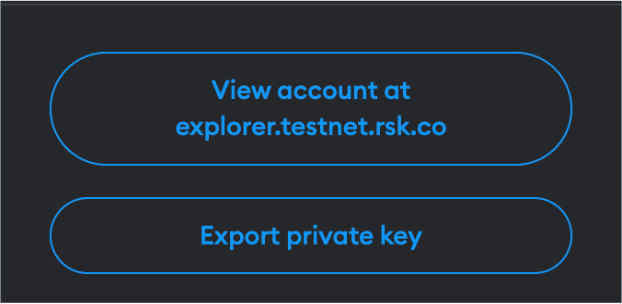
**Step 5**: Fill out wallet password and click on “Confirm”
 **Step 6**: Copy the private key and click on “Done”.
 ### Converting RBTC to BTC {#converting-btc-to-rbtc}
Before converting the funds, we need to convert the private key into a [Wallet Import Format (WIF)](https://learnmeabitcoin.com/technical/wif). A WIF private key is just another way of representing your original private key. If you have a WIF private key, you can always convert it back in to its original format.
For more info on WIF, see the [Bitcoin Wiki](https://en.bitcoin.it/wiki/Wallet_import_format)
#### Using Rootstock Utils (Recommended) {#using-rootstock-utils}
[Rootstock Utils](https://github.com/rsksmart/utils#rsk-utils) is used to convert keys from BTC to Rootstock.
Step 1: Clone the [Rootstock utils project](https://github.com/rsksmart/utils).
Step 2: Follow the steps explained in the [README](https://github.com/rsksmart/utils/blob/master/README.md).
Step 3: Install webpack using the code below;
```js
javascript npm install webpack@4.46.0 -g npm i webpack-cli@3.3.12 -g npm install webpack
```
[Optional] you will need npm to install webpack:
`npm install -–save-dev webpack`
Step 4: Run webpack
`webpack`
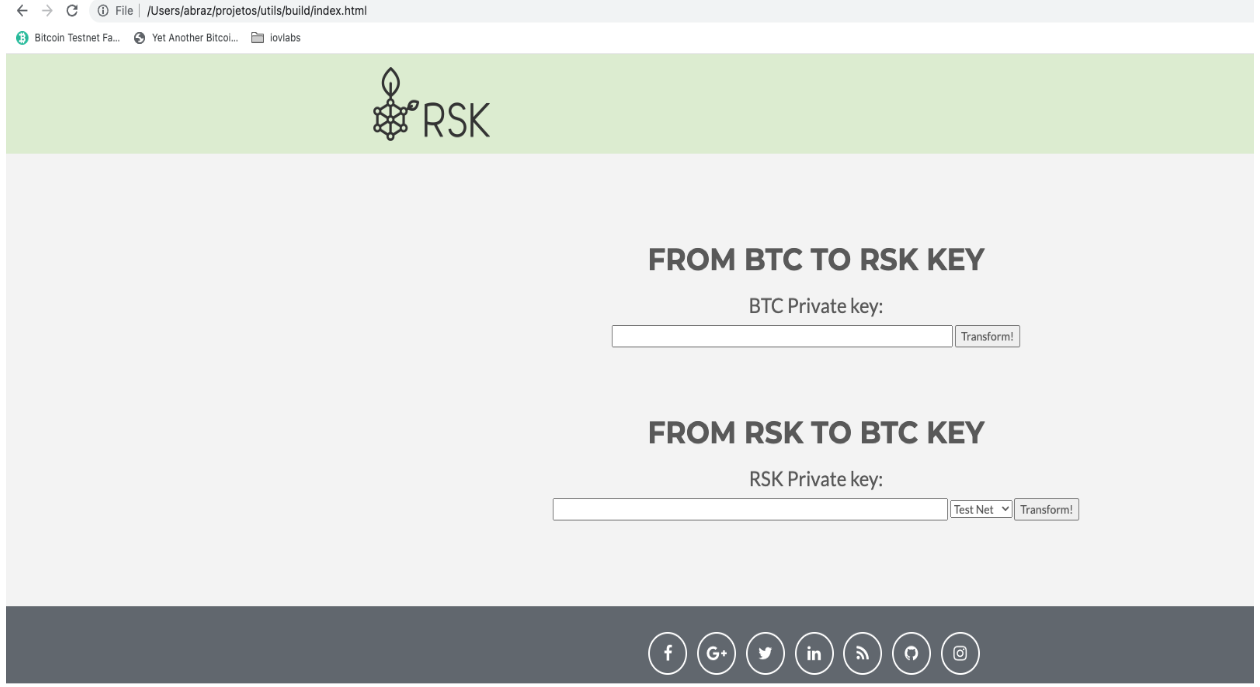
Step 5: Open the file in your browser
`./build/index.html`
Step 6: Open the generated application and add your private key and convert to WIF,
as shown in the image below:
#### Using LearnMeABitcoin
> - IMPORTANT: We discourage users from using websites on the internet, note that if your private key is exposed, your funds will also be exposed, therefore it's recommended that you use the offline option, like [Rootstock utils](#using-rootstock-utils).
Follow the steps below to get started;
Step 1: Visit the url: [https://learnmeabitcoin.com/technical/wif](https://learnmeabitcoin.com/technical/wif)
### Converting RBTC to BTC {#converting-btc-to-rbtc}
Before converting the funds, we need to convert the private key into a [Wallet Import Format (WIF)](https://learnmeabitcoin.com/technical/wif). A WIF private key is just another way of representing your original private key. If you have a WIF private key, you can always convert it back in to its original format.
For more info on WIF, see the [Bitcoin Wiki](https://en.bitcoin.it/wiki/Wallet_import_format)
#### Using Rootstock Utils (Recommended) {#using-rootstock-utils}
[Rootstock Utils](https://github.com/rsksmart/utils#rsk-utils) is used to convert keys from BTC to Rootstock.
Step 1: Clone the [Rootstock utils project](https://github.com/rsksmart/utils).
Step 2: Follow the steps explained in the [README](https://github.com/rsksmart/utils/blob/master/README.md).
Step 3: Install webpack using the code below;
```js
javascript npm install webpack@4.46.0 -g npm i webpack-cli@3.3.12 -g npm install webpack
```
[Optional] you will need npm to install webpack:
`npm install -–save-dev webpack`
Step 4: Run webpack
`webpack`
Step 5: Open the file in your browser
`./build/index.html`
Step 6: Open the generated application and add your private key and convert to WIF,
as shown in the image below:

#### Using LearnMeABitcoin
> - IMPORTANT: We discourage users from using websites on the internet, note that if your private key is exposed, your funds will also be exposed, therefore it's recommended that you use the offline option, like [Rootstock utils](#using-rootstock-utils).
Follow the steps below to get started;
Step 1: Visit the url: [https://learnmeabitcoin.com/technical/wif](https://learnmeabitcoin.com/technical/wif)
 > You will find the [Ruby](https://www.ruby-lang.org/en/) code and a tool to convert the private key into a WIF.
Step 2: Paste the private key gotten in [Getting a wallet private key](#getting-a-wallet-private-key) in the “Private Key” field
Step 3: Choose the network: `Mainnet` or `Testnet`
Step 4: Choose compressed option `true`
Step 5: Copy WIF value
> - IMPORTANT: Using the Ruby code is highly **recommended**
> - This code requires the `checksum.rb` and `base58_encode.rb` functions as shown in the code below.
Download the 'checksum' file [here](https://github.com/in3rsha/learnmeabitcoin-code/blob/master/checksum.rb).
Download the 'base58_encode' file [here](https://github.com/in3rsha/learnmeabitcoin-code/blob/master/base58_encode.rb).
```shell
require_relative 'checksum'
require_relative 'base58_encode'
##### Convert Private Key to WIF
privatekey = "4fd050a8e4fd767f759d75492b9894bc97875e8201873e38443e3f5eae9c8db2f"
extended = "80" + privatekey + "01"
extendedchecksum = extended + checksum(extended)
wif = base58_encode(extendedchecksum)
puts wif
```
## Import key in Electrum
[Electrum](https://electrum.org/#download) is used to verify a derived address, this address will then be used to receive and verify the converted funds (RBTC - BTC) when the pegout process is finished.
Step 1: Download Electrum for your OS from the [website](https://electrum.org/#download).
Follow the steps below to create a new wallet in Electrum and import the **private key**:
> NOTE: If you need to run Electrum in Testnet, execute the following commands:
```
cd /Applications/Electrum.app/Contents/MacOS
./run_electrum --testnet
```
Step 2: Start with the “Create New Wallet” option
Step 3: Fill out a new wallet name and click on the “Next” button
Step 4: Choose “Import Bitcoin addresses or private keys” option and click on “Next” button
Step 5: Fill out the WIF value of the private key and click on “Next” button
Step 6: Create a new wallet password and click on the “Next” button
> You will find the [Ruby](https://www.ruby-lang.org/en/) code and a tool to convert the private key into a WIF.
Step 2: Paste the private key gotten in [Getting a wallet private key](#getting-a-wallet-private-key) in the “Private Key” field
Step 3: Choose the network: `Mainnet` or `Testnet`
Step 4: Choose compressed option `true`
Step 5: Copy WIF value
> - IMPORTANT: Using the Ruby code is highly **recommended**
> - This code requires the `checksum.rb` and `base58_encode.rb` functions as shown in the code below.
Download the 'checksum' file [here](https://github.com/in3rsha/learnmeabitcoin-code/blob/master/checksum.rb).
Download the 'base58_encode' file [here](https://github.com/in3rsha/learnmeabitcoin-code/blob/master/base58_encode.rb).
```shell
require_relative 'checksum'
require_relative 'base58_encode'
##### Convert Private Key to WIF
privatekey = "4fd050a8e4fd767f759d75492b9894bc97875e8201873e38443e3f5eae9c8db2f"
extended = "80" + privatekey + "01"
extendedchecksum = extended + checksum(extended)
wif = base58_encode(extendedchecksum)
puts wif
```
## Import key in Electrum
[Electrum](https://electrum.org/#download) is used to verify a derived address, this address will then be used to receive and verify the converted funds (RBTC - BTC) when the pegout process is finished.
Step 1: Download Electrum for your OS from the [website](https://electrum.org/#download).
Follow the steps below to create a new wallet in Electrum and import the **private key**:
> NOTE: If you need to run Electrum in Testnet, execute the following commands:
```
cd /Applications/Electrum.app/Contents/MacOS
./run_electrum --testnet
```
Step 2: Start with the “Create New Wallet” option
Step 3: Fill out a new wallet name and click on the “Next” button
Step 4: Choose “Import Bitcoin addresses or private keys” option and click on “Next” button
Step 5: Fill out the WIF value of the private key and click on “Next” button
Step 6: Create a new wallet password and click on the “Next” button
 > In this screen, you will see the address to receive the BTC funds.
## Import key in Electrum using Hardware Wallets
[Electrum](https://electrum.org/#download) verifies the Bitcoin address that receives your peg-out funds. After a native peg-out, Trezor Suite cannot show that address because it does not support the custom derivation path. Use Electrum with the same hardware wallet device you used in the [PowPeg App](https://powpeg.rootstock.io/).
Step 1: Download Electrum for your OS from the [website](https://electrum.org/#download).
Follow the steps below to create a new wallet in Electrum and connect to the **hardware wallets**:
> NOTE: If you need to run Electrum in Testnet, execute the following commands:
```
cd /Applications/Electrum.app/Contents/MacOS
./run_electrum --testnet
```
Step 2: Start with the “Create New Wallet” option
Step 3: Fill out the name in “Wallet” field and click on “Next” button
Step 4: Select “Standard wallet” option and click on “Next” button
> In this screen, you will see the address to receive the BTC funds.
## Import key in Electrum using Hardware Wallets
[Electrum](https://electrum.org/#download) verifies the Bitcoin address that receives your peg-out funds. After a native peg-out, Trezor Suite cannot show that address because it does not support the custom derivation path. Use Electrum with the same hardware wallet device you used in the [PowPeg App](https://powpeg.rootstock.io/).
Step 1: Download Electrum for your OS from the [website](https://electrum.org/#download).
Follow the steps below to create a new wallet in Electrum and connect to the **hardware wallets**:
> NOTE: If you need to run Electrum in Testnet, execute the following commands:
```
cd /Applications/Electrum.app/Contents/MacOS
./run_electrum --testnet
```
Step 2: Start with the “Create New Wallet” option
Step 3: Fill out the name in “Wallet” field and click on “Next” button
Step 4: Select “Standard wallet” option and click on “Next” button
 Step 5: Select “Use a hardware device” option and click on “Next” button
 Step 6: Select the hardware wallet and click on “Next” button
> NOTE: The follow screen is an example of usage the Trezor Hardware Wallet
Step 6: Select the hardware wallet and click on “Next” button
> NOTE: The follow screen is an example of usage the Trezor Hardware Wallet
 > NOTE: The follow screen is an example of usage the Ledger Hardware Wallet
 Step 7: Complete the passphrase step when Electrum prompts you. See [Trezor passphrase in Electrum](#trezor-passphrase-in-electrum).
Step 8: Select “legacy (p2pkh)” option, fill out a custom derivation path field and click on “Next” button
```text
Custom derivation path:
Mainnet: m/44'/137'/0'
```
:::note[Derivation path in the PowPeg App]
When you select an account in the PowPeg App, you may see a path such as `m/44'/137'/0'/0/0`. That path identifies your Rootstock (RBTC) account.
Step 7: Complete the passphrase step when Electrum prompts you. See [Trezor passphrase in Electrum](#trezor-passphrase-in-electrum).
Step 8: Select “legacy (p2pkh)” option, fill out a custom derivation path field and click on “Next” button
```text
Custom derivation path:
Mainnet: m/44'/137'/0'
```
:::note[Derivation path in the PowPeg App]
When you select an account in the PowPeg App, you may see a path such as `m/44'/137'/0'/0/0`. That path identifies your Rootstock (RBTC) account.
 In Electrum you use `m/44'/137'/0'` to view the legacy Bitcoin address that receives peg-out funds. The paths differ by purpose. Both are correct for their step. Note that the UI will match your browser language.
:::
In Electrum you use `m/44'/137'/0'` to view the legacy Bitcoin address that receives peg-out funds. The paths differ by purpose. Both are correct for their step. Note that the UI will match your browser language.
:::
 > NOTE: Testnet: m/44'/37310'/0'
 > IMPORTANT: For Ledger it is necessary to approve the custom derivation path in the device
 Step 9: Optionally check “Encrypt wallet file” and click on “Next” button. This password encrypts the Electrum wallet file on your computer. It is not the Trezor BIP39 passphrase from Step 7.
 Step 10: Open the “Addresses” tab in Electrum to view your funds.
 ### Trezor passphrase in Electrum {#trezor-passphrase-in-electrum}
During setup, Electrum may show an **Enter a passphrase** dialog when you connect a Trezor. The BIP39 passphrase is an optional extension to your seed. It is not your Trezor PIN. It is not a password that only locks the Electrum app.
If you enter a passphrase that you do not use on Trezor, Electrum derives a different wallet. Your peg-out funds can look missing even though the Bitcoin transaction succeeded.
### Trezor passphrase in Electrum {#trezor-passphrase-in-electrum}
During setup, Electrum may show an **Enter a passphrase** dialog when you connect a Trezor. The BIP39 passphrase is an optional extension to your seed. It is not your Trezor PIN. It is not a password that only locks the Electrum app.
If you enter a passphrase that you do not use on Trezor, Electrum derives a different wallet. Your peg-out funds can look missing even though the Bitcoin transaction succeeded.
 #### If you do not use a passphrase on Trezor
Leave both passphrase fields empty and click **OK**. Do not type a new password into these fields.
Electrum may still show this dialog if you turned on **Passphrase** in Trezor Suite (**Settings** → **Device** → **Passphrase**). That setting only enables the feature on the device. You can leave the Electrum fields empty unless you already use a BIP39 passphrase wallet.
#### If you use a BIP39 passphrase on Trezor
Enter the same passphrase you use in Trezor Suite or in the PowPeg App when you connect your Trezor. A different passphrase shows a different set of addresses.
#### Electrum in Spanish
In the Spanish Electrum UI, the dialog title refers to a passphrase, but the input labels may say **Contraseña** (password). Treat those fields as the BIP39 passphrase, not as a local Electrum login.
#### If you do not use a passphrase on Trezor
Leave both passphrase fields empty and click **OK**. Do not type a new password into these fields.
Electrum may still show this dialog if you turned on **Passphrase** in Trezor Suite (**Settings** → **Device** → **Passphrase**). That setting only enables the feature on the device. You can leave the Electrum fields empty unless you already use a BIP39 passphrase wallet.
#### If you use a BIP39 passphrase on Trezor
Enter the same passphrase you use in Trezor Suite or in the PowPeg App when you connect your Trezor. A different passphrase shows a different set of addresses.
#### Electrum in Spanish
In the Spanish Electrum UI, the dialog title refers to a passphrase, but the input labels may say **Contraseña** (password). Treat those fields as the BIP39 passphrase, not as a local Electrum login.
 ### Troubleshooting: peg-out completed but balance is zero {#troubleshooting-zero-balance}
Your BTC may have arrived even when Electrum shows a zero balance. Work through these checks in order.
1. Confirm the transaction on a block explorer using the destination Bitcoin address from the [PowPeg status page](https://powpeg.rootstock.io/).
2. Confirm the custom derivation path in Electrum is `m/44'/137'/0'` on Mainnet (see Step 8 above).
3. If you do not use a BIP39 passphrase on Trezor, leave the Electrum passphrase fields empty. See [Trezor passphrase in Electrum](#trezor-passphrase-in-electrum).
4. If you use a passphrase on Trezor, enter the same value in Electrum.
5. If the balance is still wrong, delete the Electrum wallet file and repeat the steps in this section with the correct passphrase and path.
:::warning[Funds are tied to the passphrase]
If you created a peg-out with an empty passphrase but opened Electrum with a passphrase (or the reverse), you are viewing a different wallet. Your BTC is not lost. Find the address on a block explorer and match the passphrase and path you used in the PowPeg App.
:::
### Troubleshooting: peg-out completed but balance is zero {#troubleshooting-zero-balance}
Your BTC may have arrived even when Electrum shows a zero balance. Work through these checks in order.
1. Confirm the transaction on a block explorer using the destination Bitcoin address from the [PowPeg status page](https://powpeg.rootstock.io/).
2. Confirm the custom derivation path in Electrum is `m/44'/137'/0'` on Mainnet (see Step 8 above).
3. If you do not use a BIP39 passphrase on Trezor, leave the Electrum passphrase fields empty. See [Trezor passphrase in Electrum](#trezor-passphrase-in-electrum).
4. If you use a passphrase on Trezor, enter the same value in Electrum.
5. If the balance is still wrong, delete the Electrum wallet file and repeat the steps in this section with the correct passphrase and path.
:::warning[Funds are tied to the passphrase]
If you created a peg-out with an empty passphrase but opened Electrum with a passphrase (or the reverse), you are viewing a different wallet. Your BTC is not lost. Find the address on a block explorer and match the passphrase and path you used in the PowPeg App.
:::