Verify a Smart Contract using the Rootstock Explorer
Contract verification is essential in the Rootstock ecosystem. It allows Rootstock Explorer users to inspect and validate the source code of deployed smart contracts.
The Rootstock Explorer provides a transparent view of the Rootstock blockchain, showing transactions, blocks, and deployed contracts. This transparency, enabled by verification, builds trust and understanding in decentralized applications.
See Rootstock Explorer guides to navigate the explorer and submit dApps.
Key reasons for verifying a smart contract
- Builds trust:
- Verification allows anyone to see the source code of a deployed smart contract, which fosters trust with users and the community.
- Increases transparency:
- Users can audit the code to confirm it performs the actions it claims to, providing confidence in the contract's operations.
- Aids in security:
- By making the code public, it can be reviewed for vulnerabilities, though users should still conduct their own security assessments.
- Enables proper tooling:
- Many development and analysis tools, such as those from Tenderly, require the contract's source code to be verified to function correctly.
- Provides public interaction:
- Verification allows users to interact with the contract on the Rootstock Explorer.
- Confirms code integrity:
- The verification process proves that the bytecode on the blockchain was generated from a specific, known source code, ensuring the contract hasn't been tampered with.
- Helps with compliance:
- Verification is essential for meeting certain compliance and regulatory requirements.
What does verification do?
- Adds a Verified badge to the contract page, confirming that the published source code matches the deployed bytecode.
- Enables human-readable interaction with the contract. It allows users to view and call its functions directly.
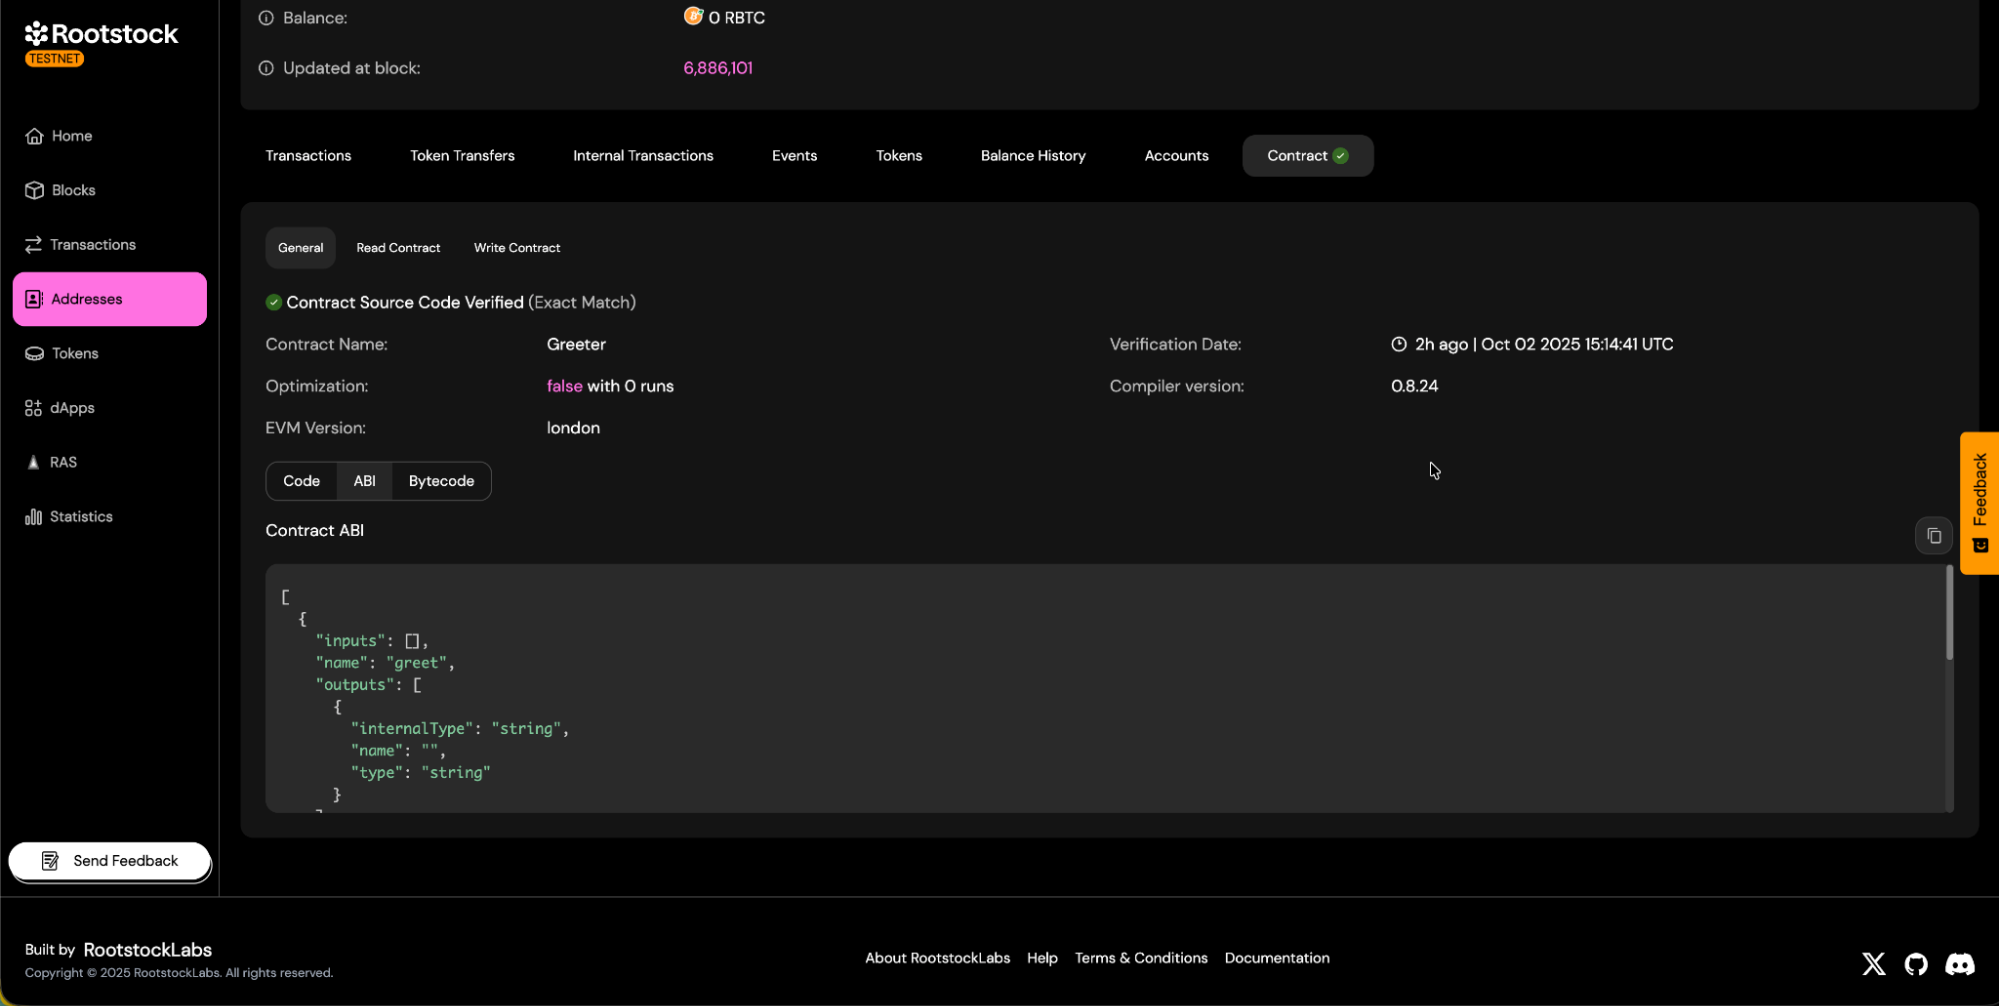
- Allows downloading the contract's Application Binary Interface (ABI).
Prerequisites
- Address of the deployed contract on Rootstock.
- Complete source code of the contract.
- Compiler details:
- Solc (Solidity Compiler) version.
- Number of optimization runs.
- Constructor parameters (if applicable).
- Library addresses (if used).
Getting Started
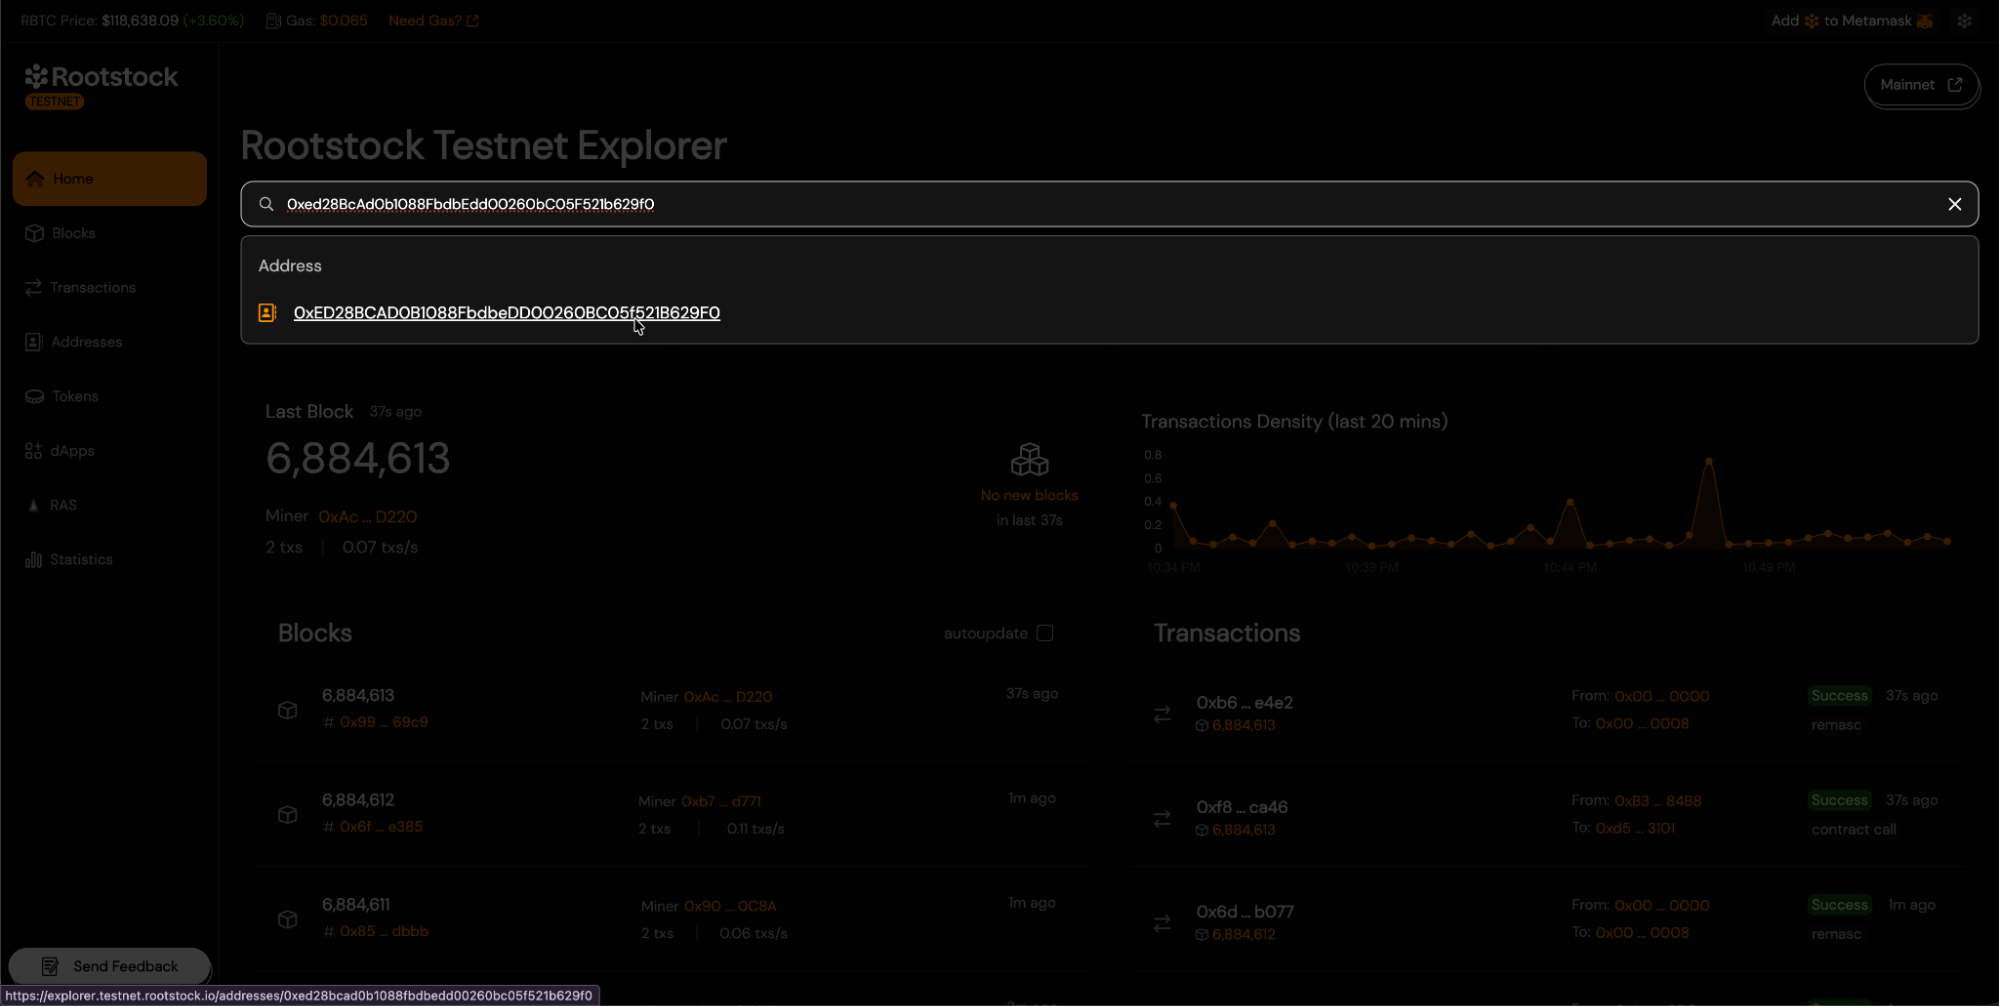
- To start the verification process, visit the Rootstock Explorer Testnet or Rootstock Explorer Mainnet, and find your contract using the search field.
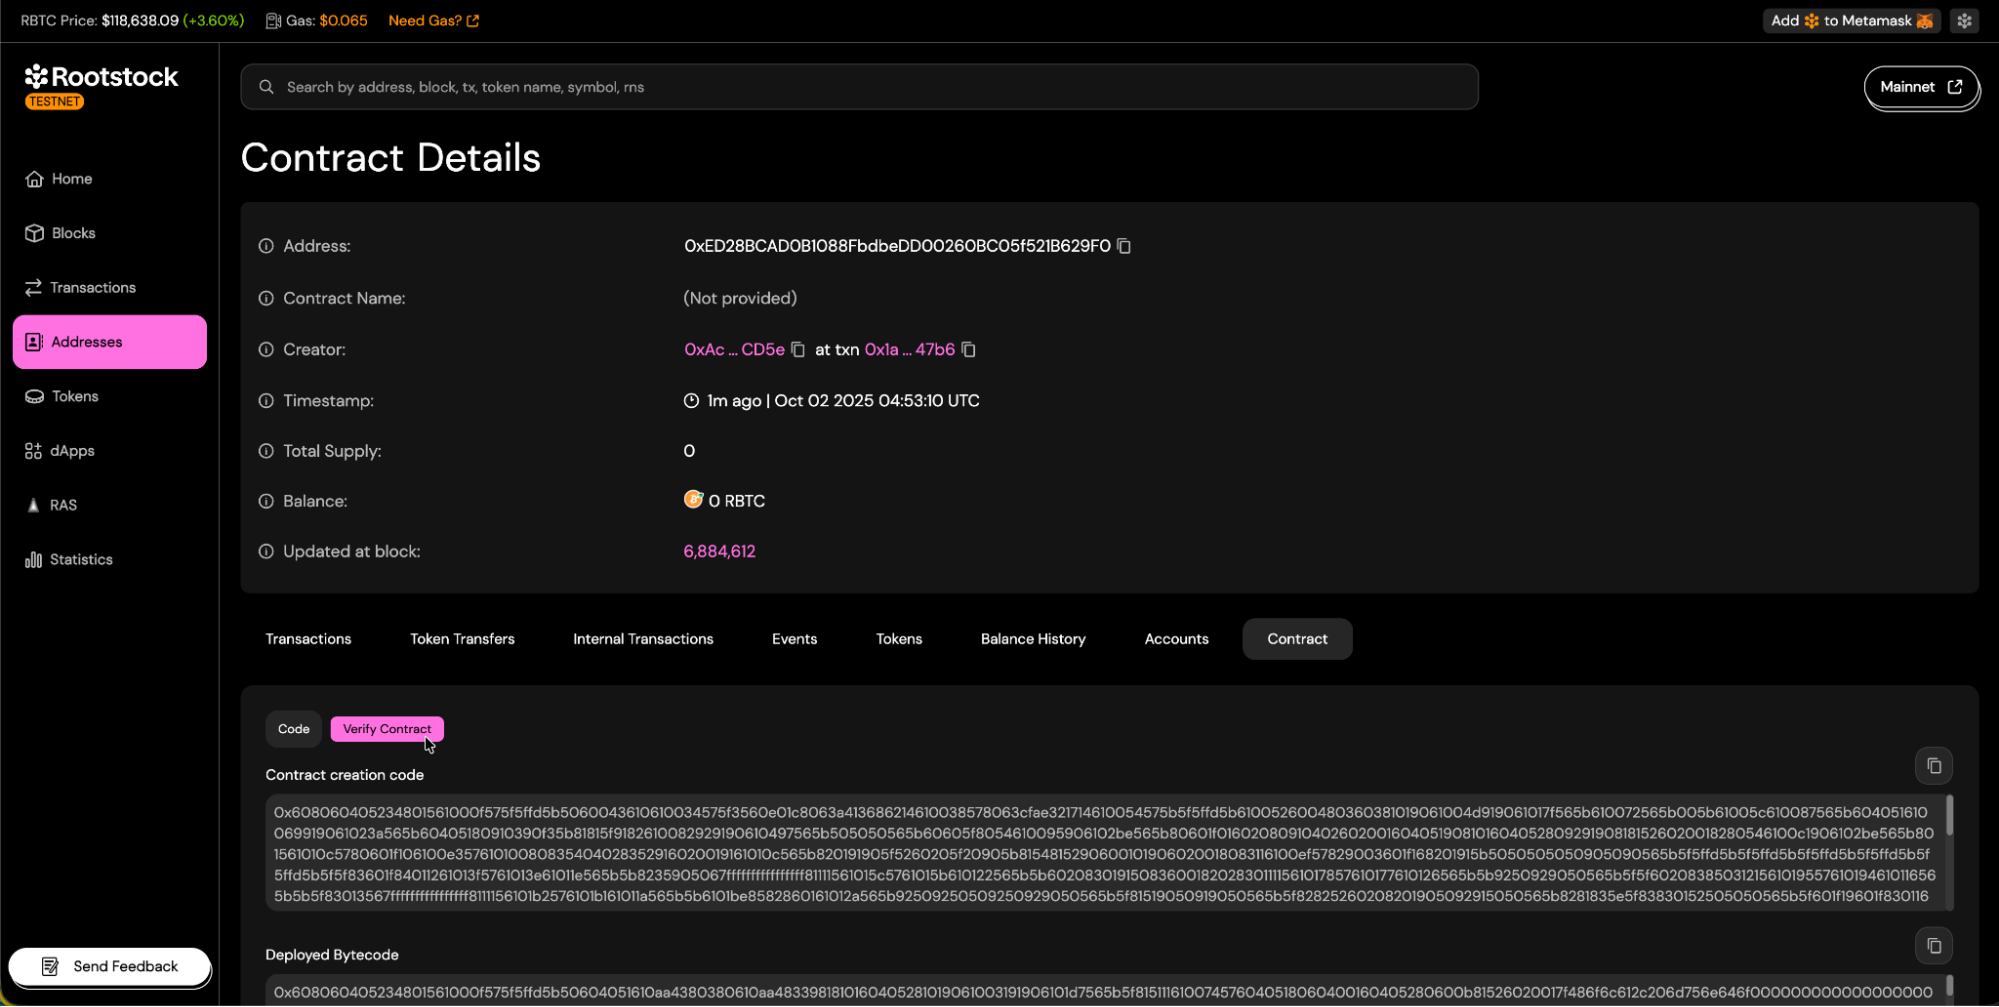
- Once you reach your contract's address view, navigate to the "Contract" tab and click the "Verify Contract" button.
Choosing a Verification Method
Rootstock Explorer offers 5 main methods for contract verification:
1. Single File
The Solidity (Single File) method is intended for verifying contracts that exist entirely within a single .sol file, or where the developer has already flattened all imports into one file. This method recompiles the provided contract and compares the resulting bytecode to the deployed contract on Rootstock.
Follow the steps below to successfully complete the verification process.
-
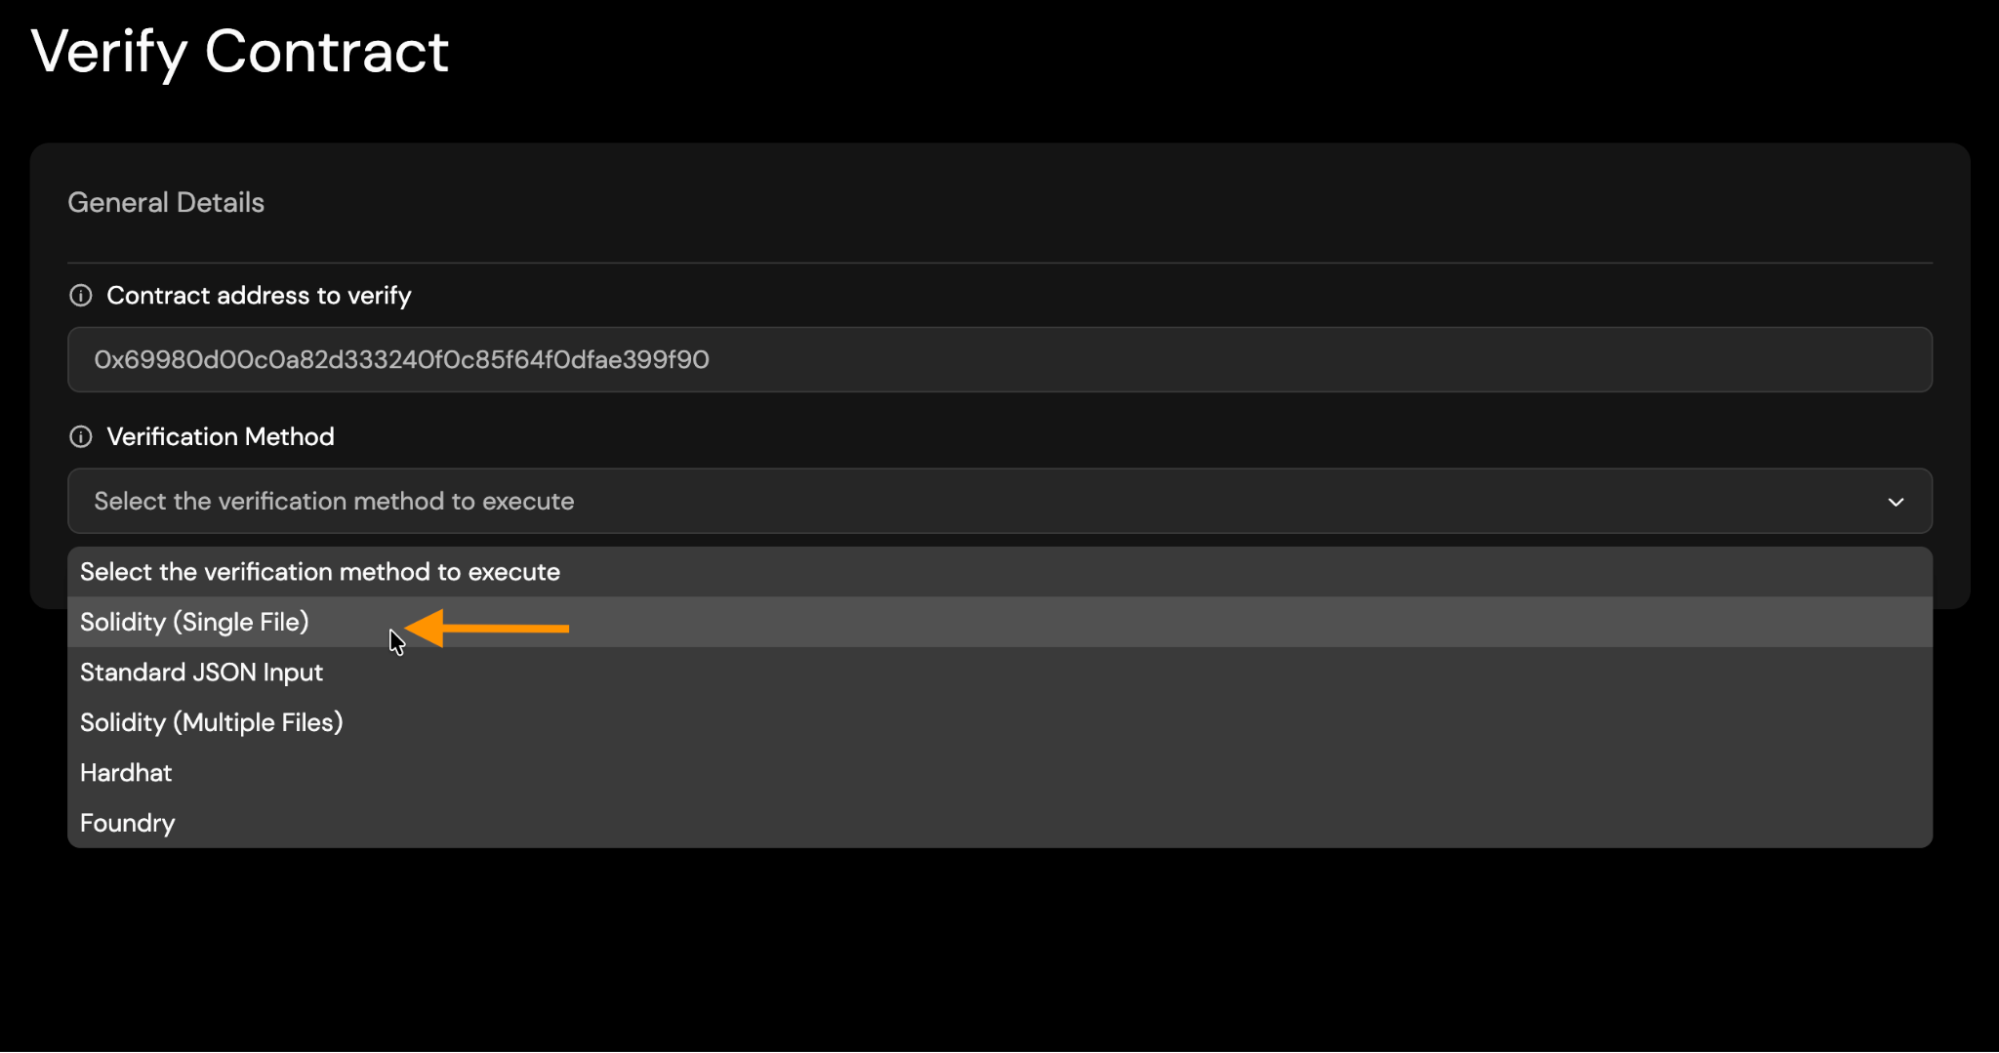
Select Solidity (Single File) Method:
-
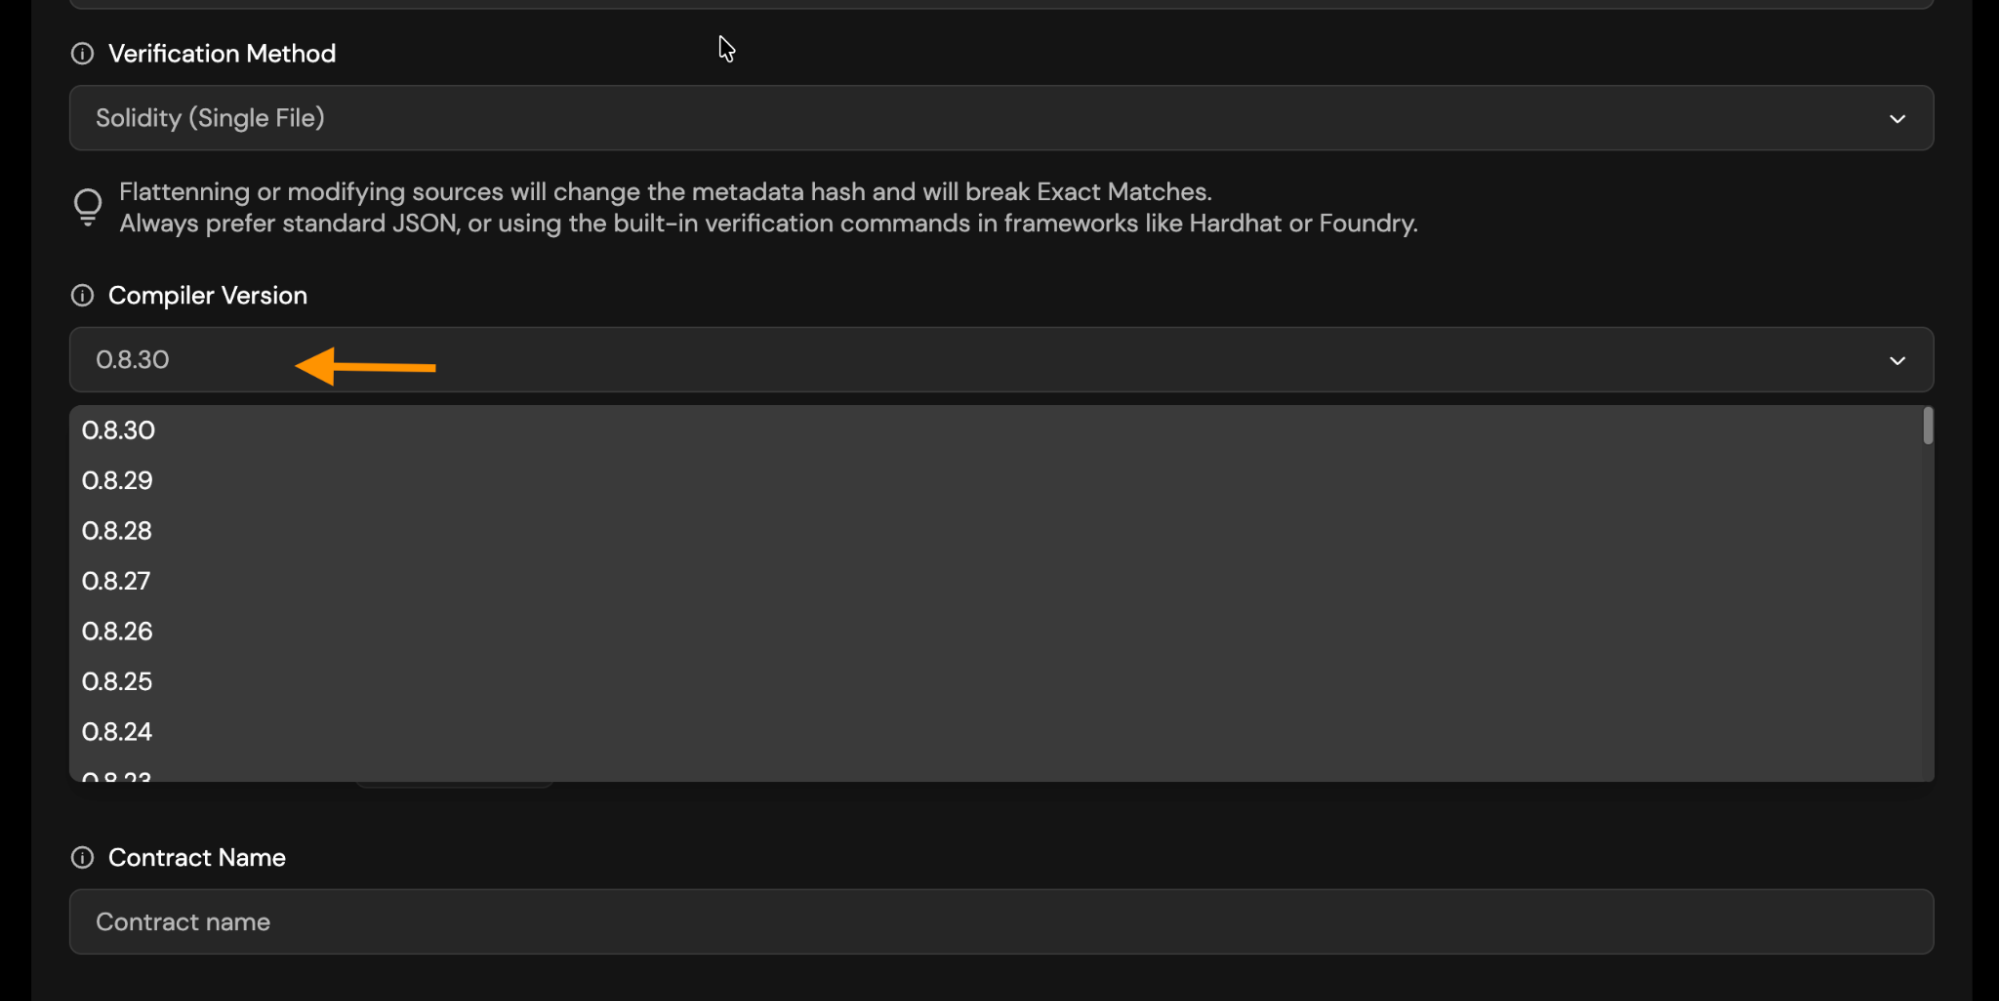
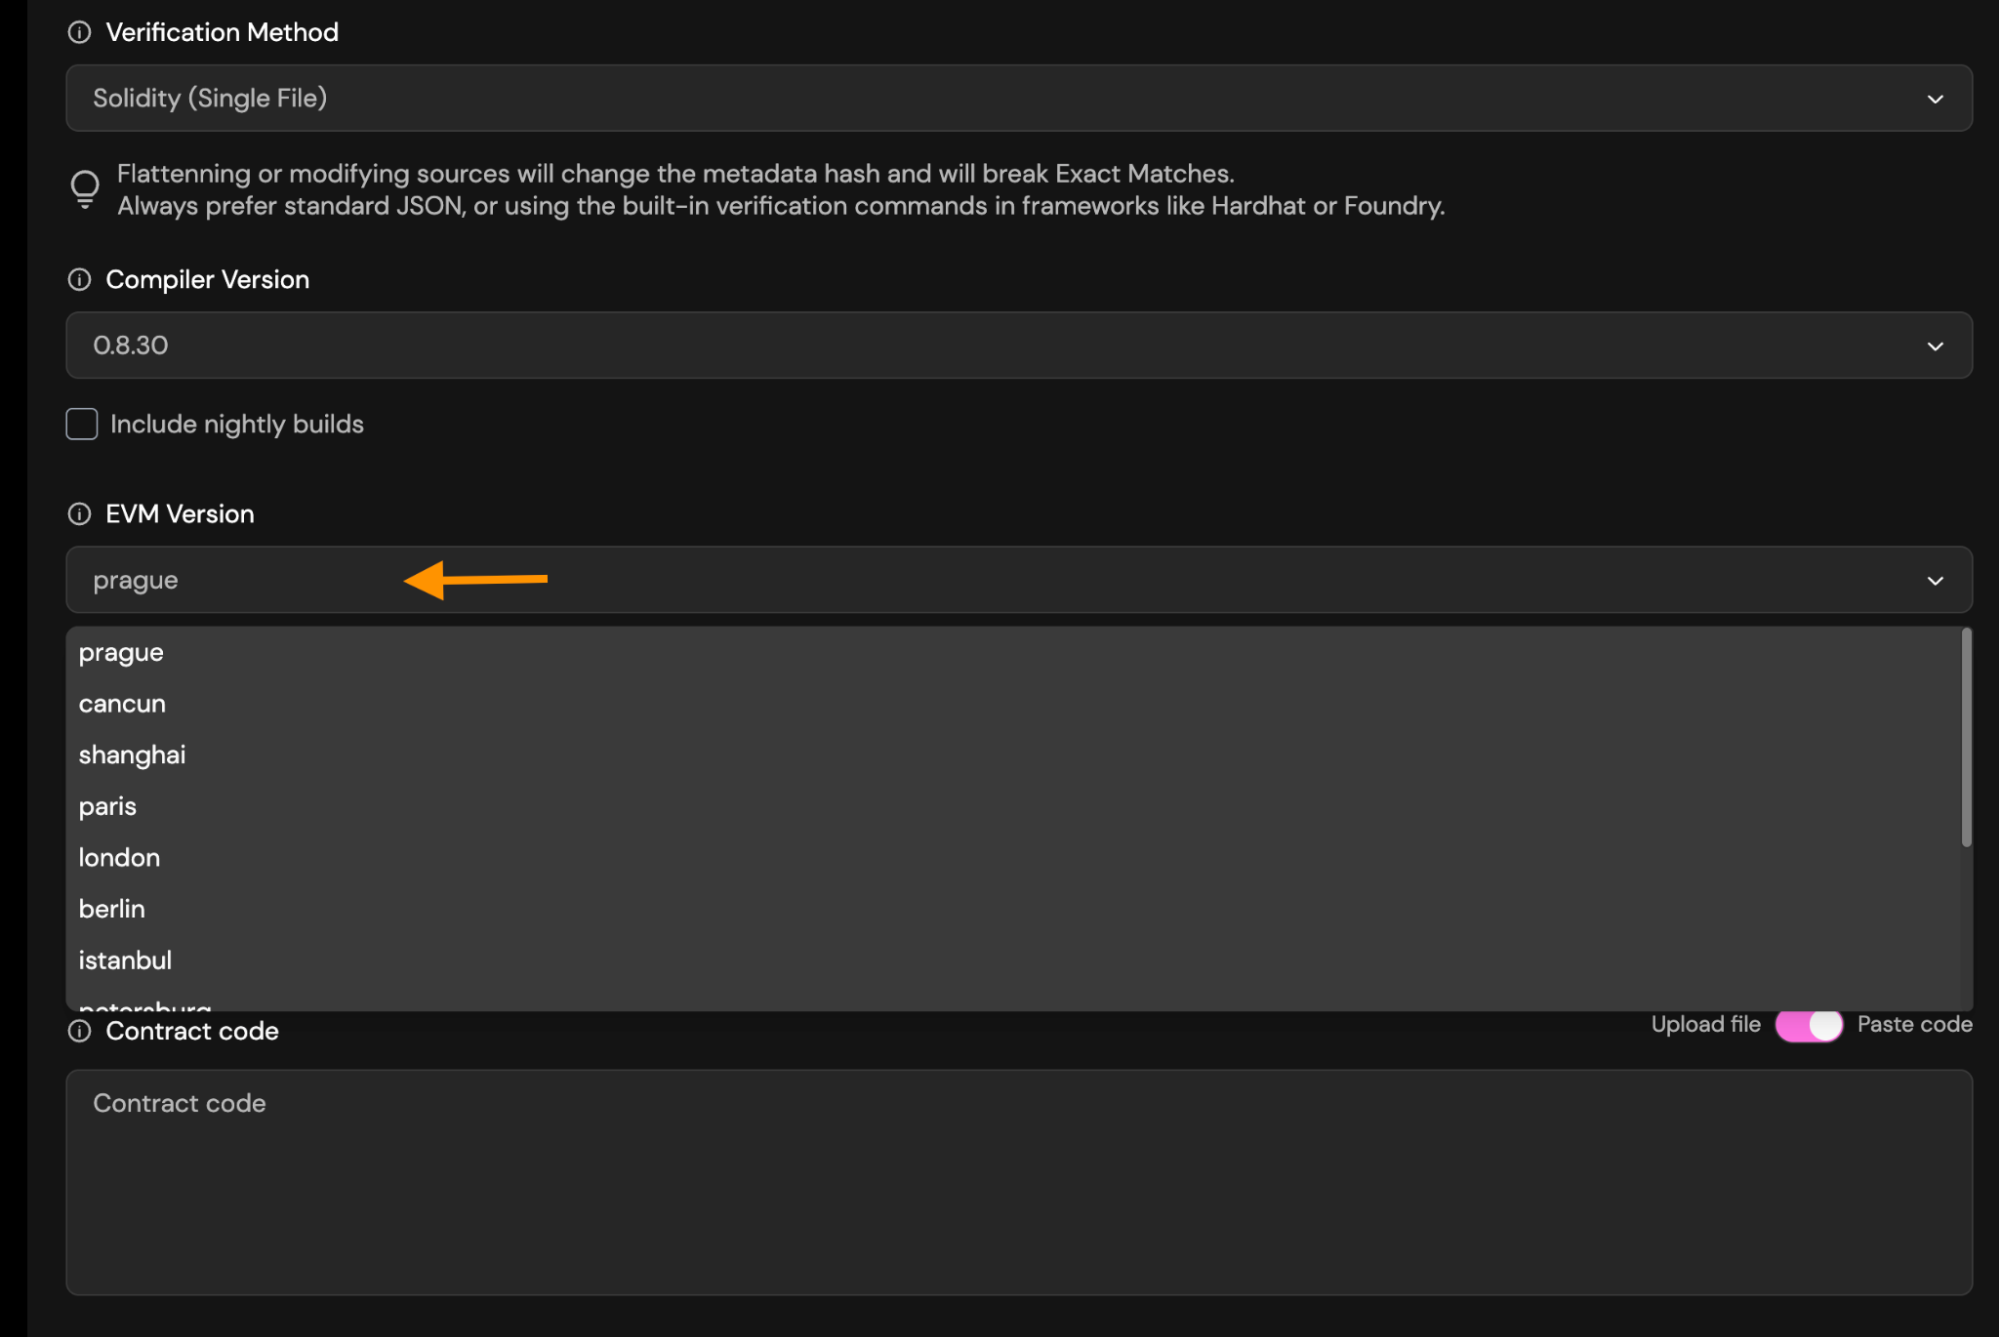
Solc Version: Choose the Solc version you used to compile your contract.
-
EVM Version: Choose the appropriate EVM version.
-
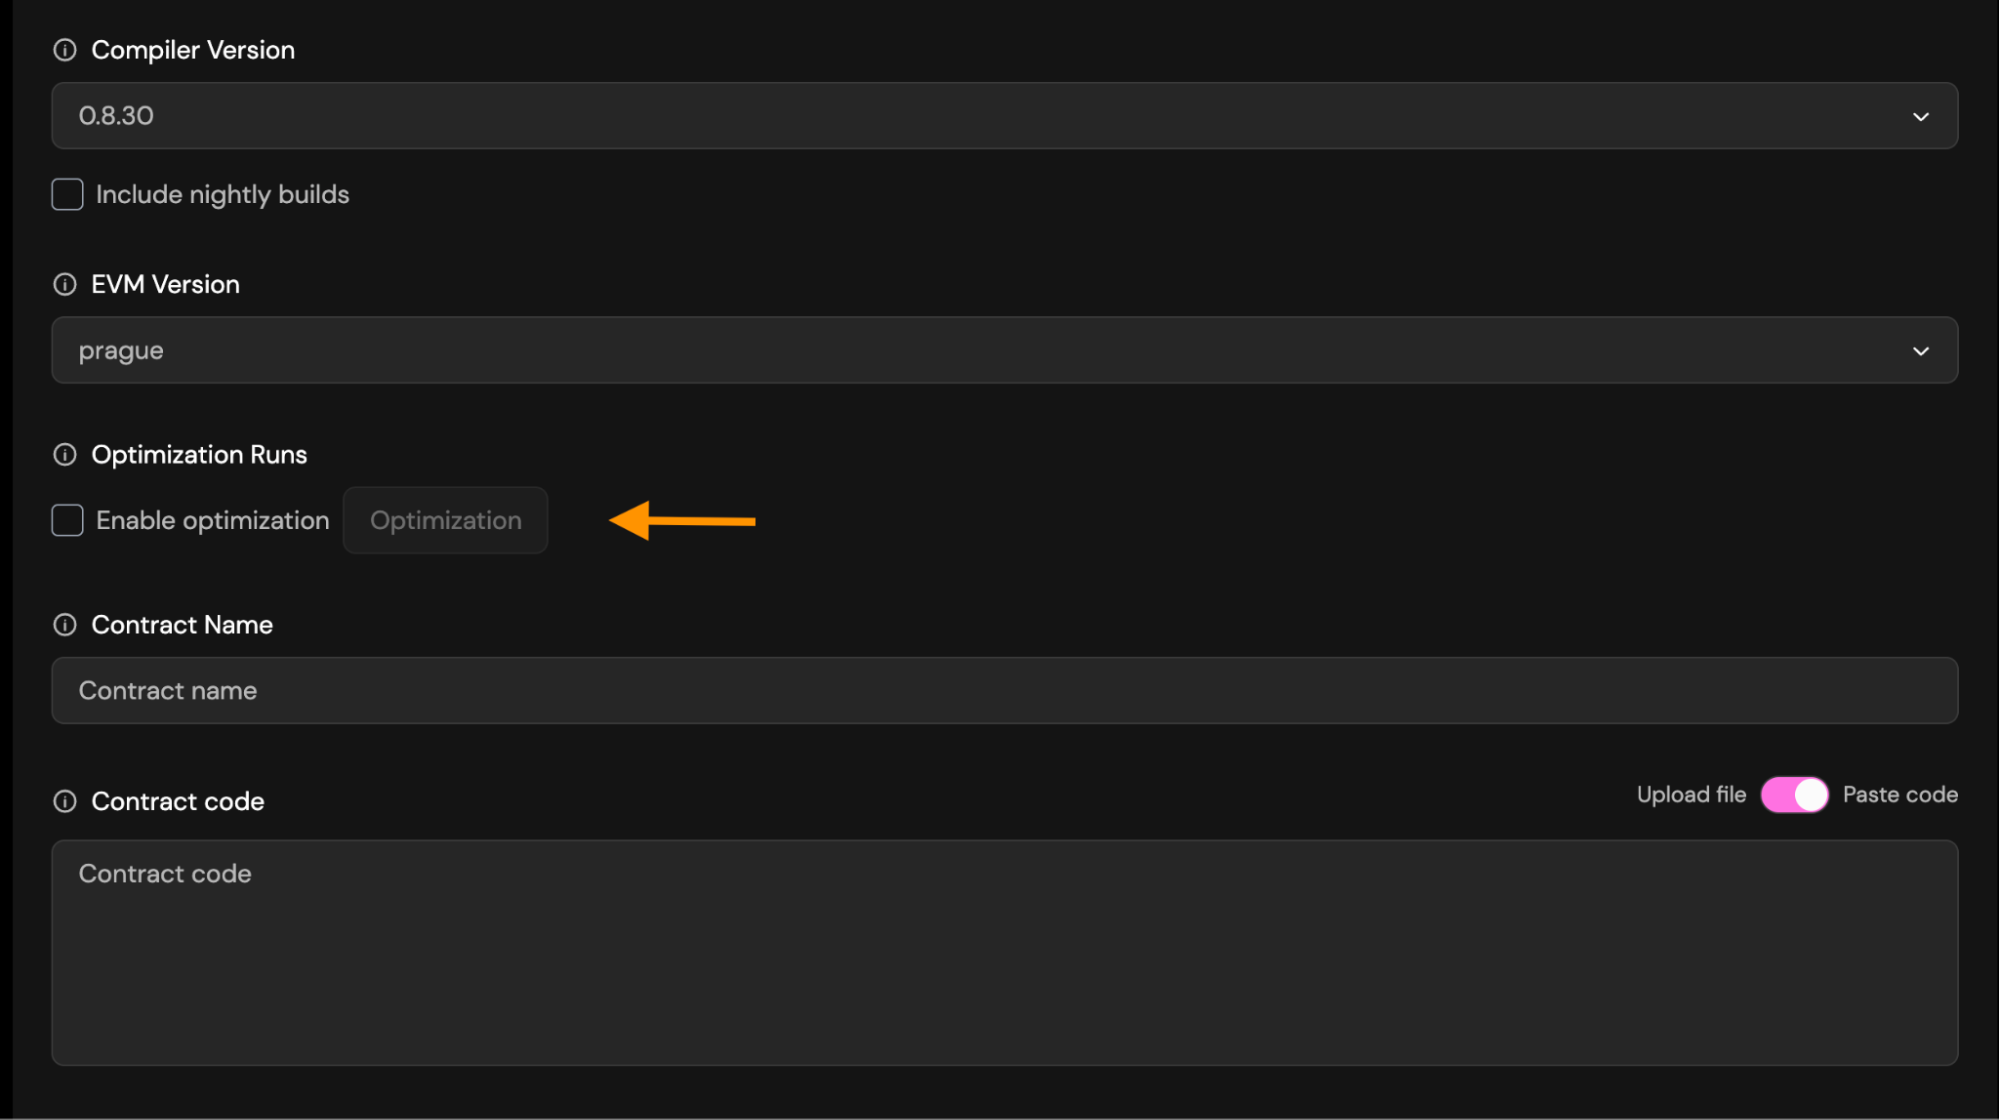
Optimization:
Runstells the Solidity optimizer how many times your contract will be executed. You must use the same runs value in verification that you used when compiling.- If you used optimization run when compiling/deploying, enable it during verification and set the same runs (default 200).
- If you didn't use optimization, leave it disabled and don't enter any runs.
-
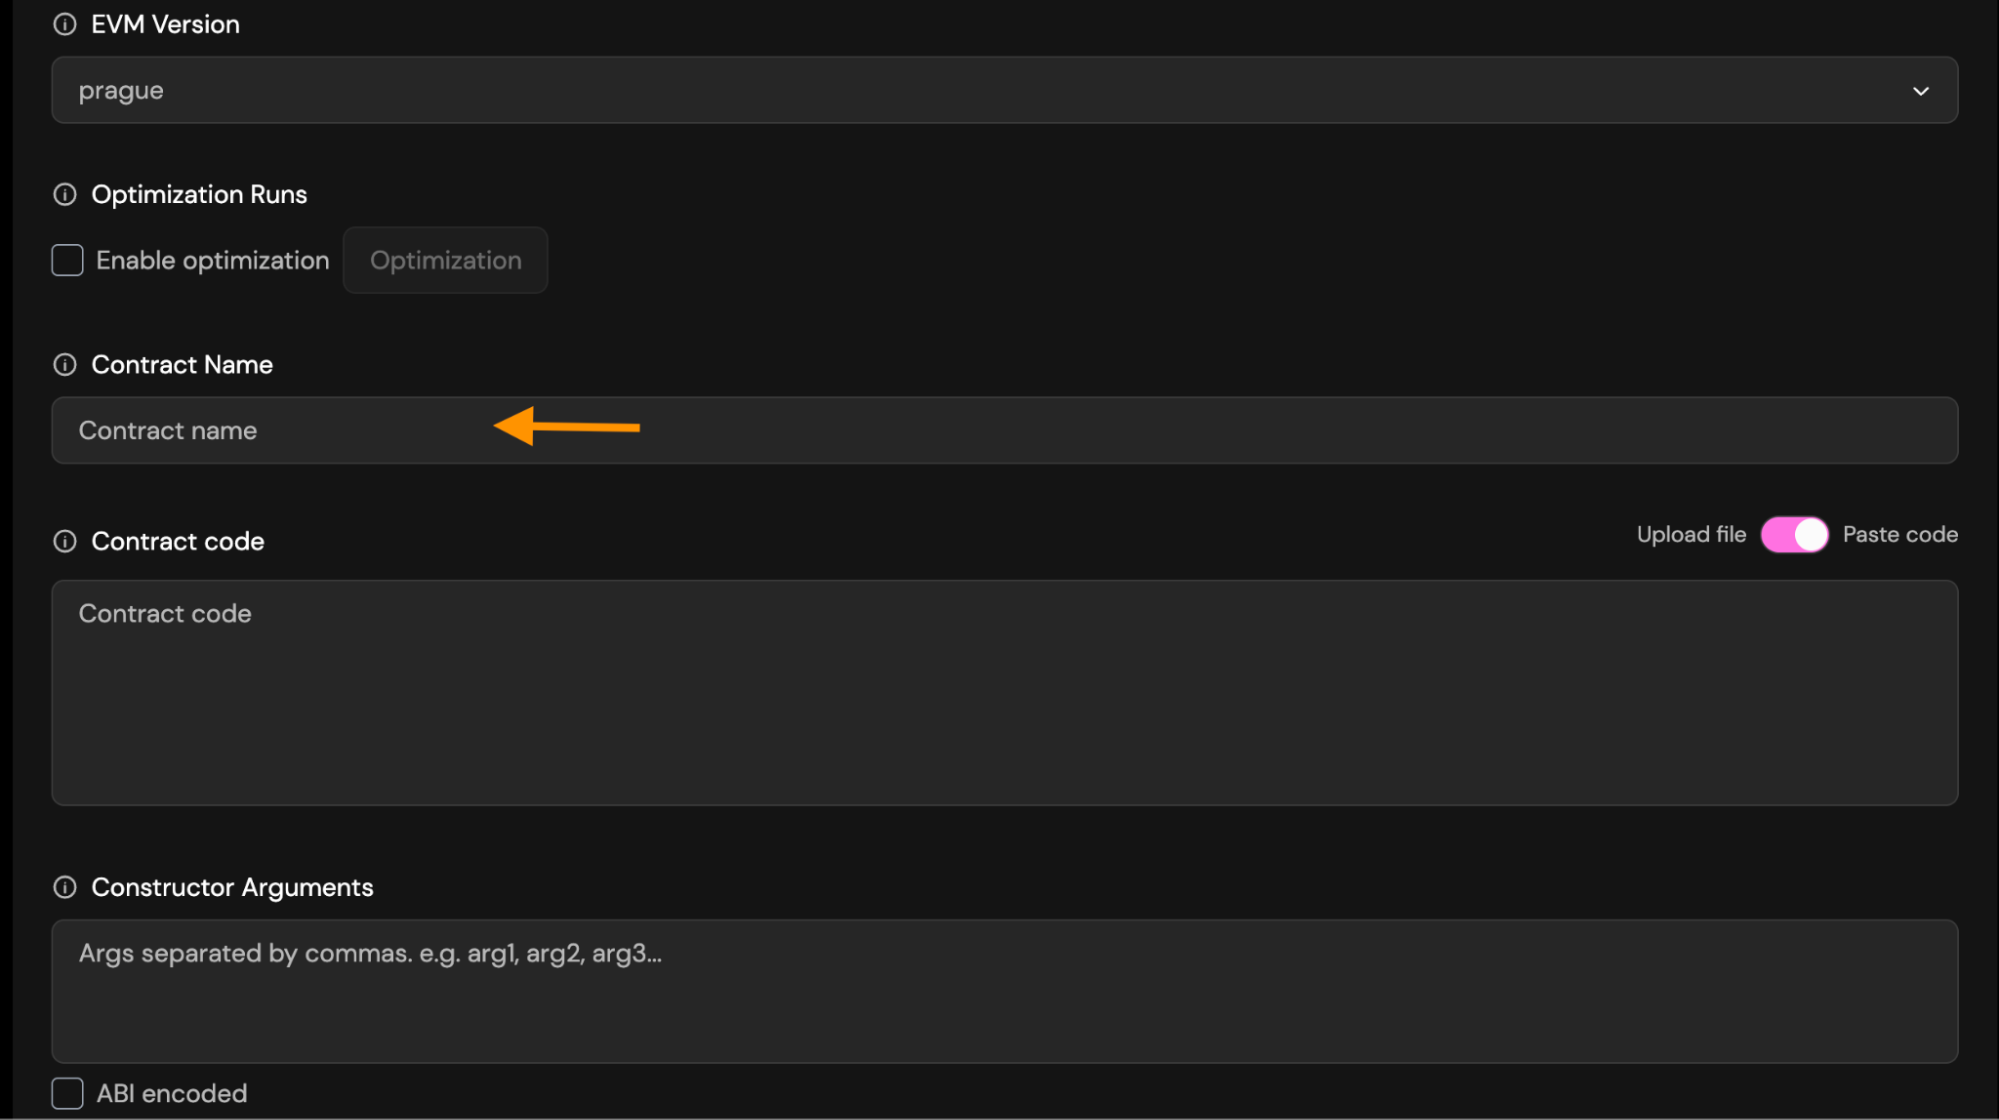
Contract Name: Enter the exact name of the contract you deployed. This is required so the verifier can match the correct bytecode.
-
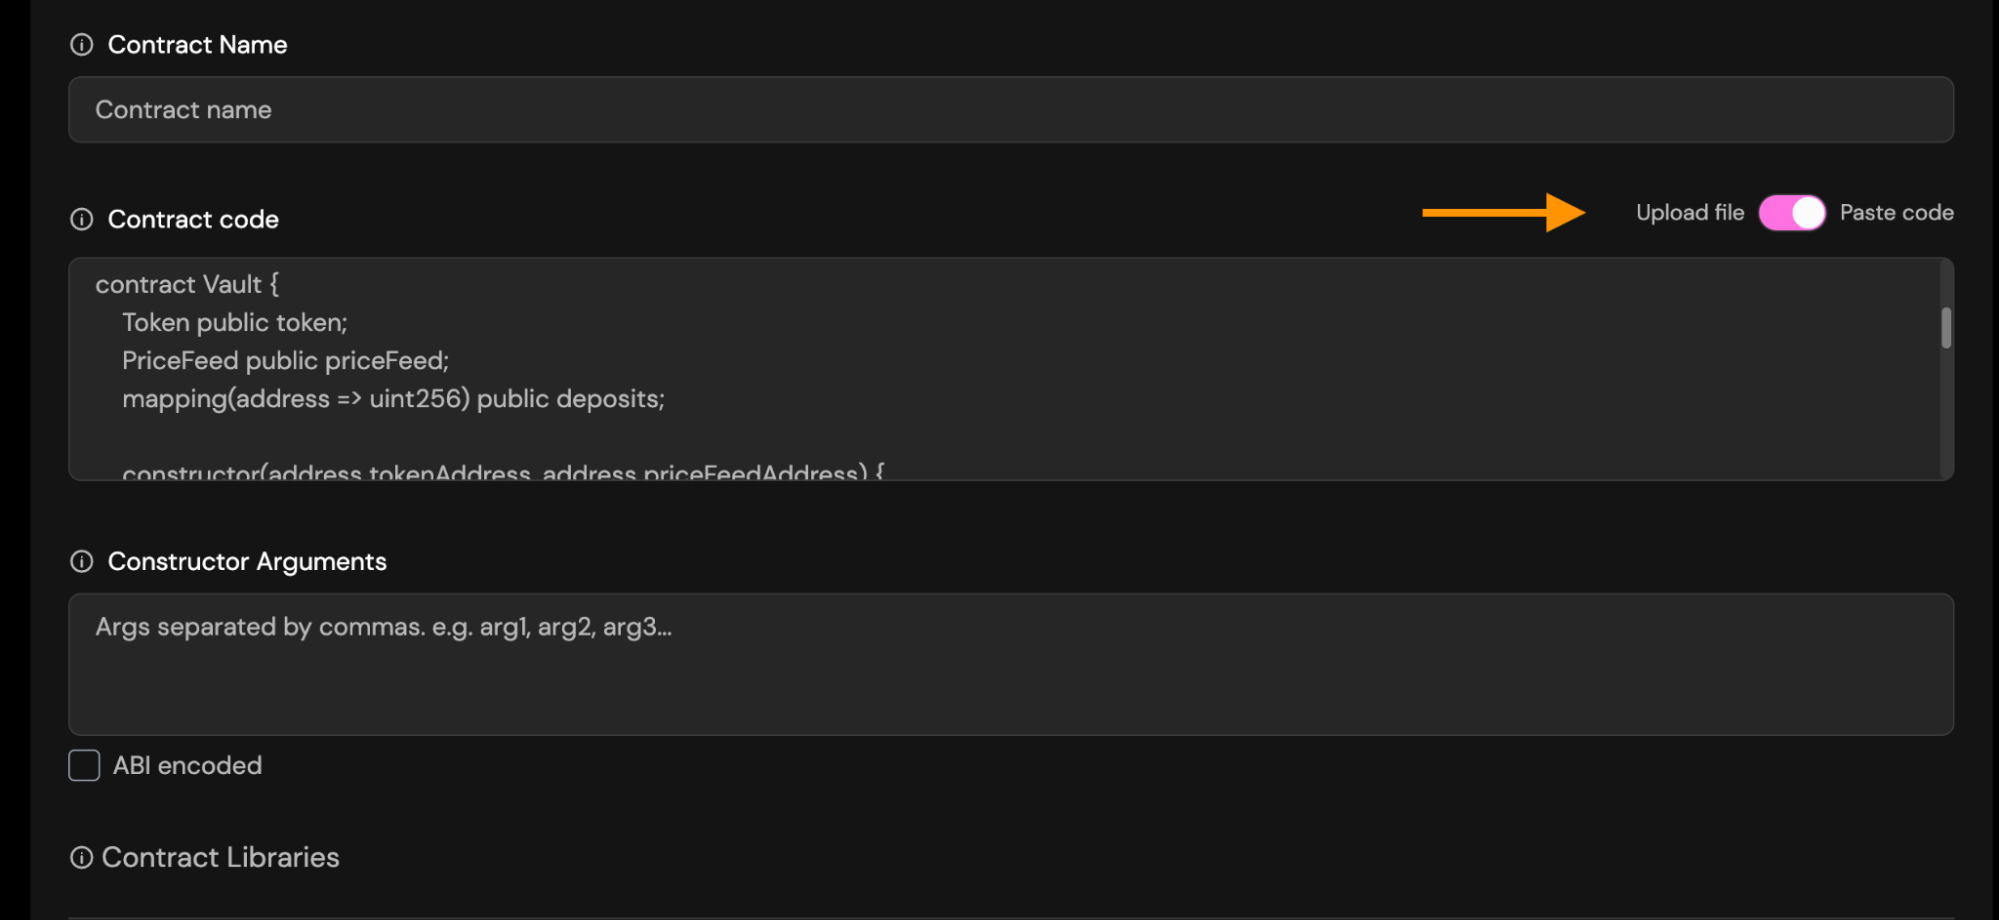
Paste/Upload source code: Provide the full Solidity source file.
You may choose between:
-
Paste code: Paste the raw contract source code into the field. This must be the exact source used during deployment.
-
Upload file: Upload a
.solfile directly from your computer.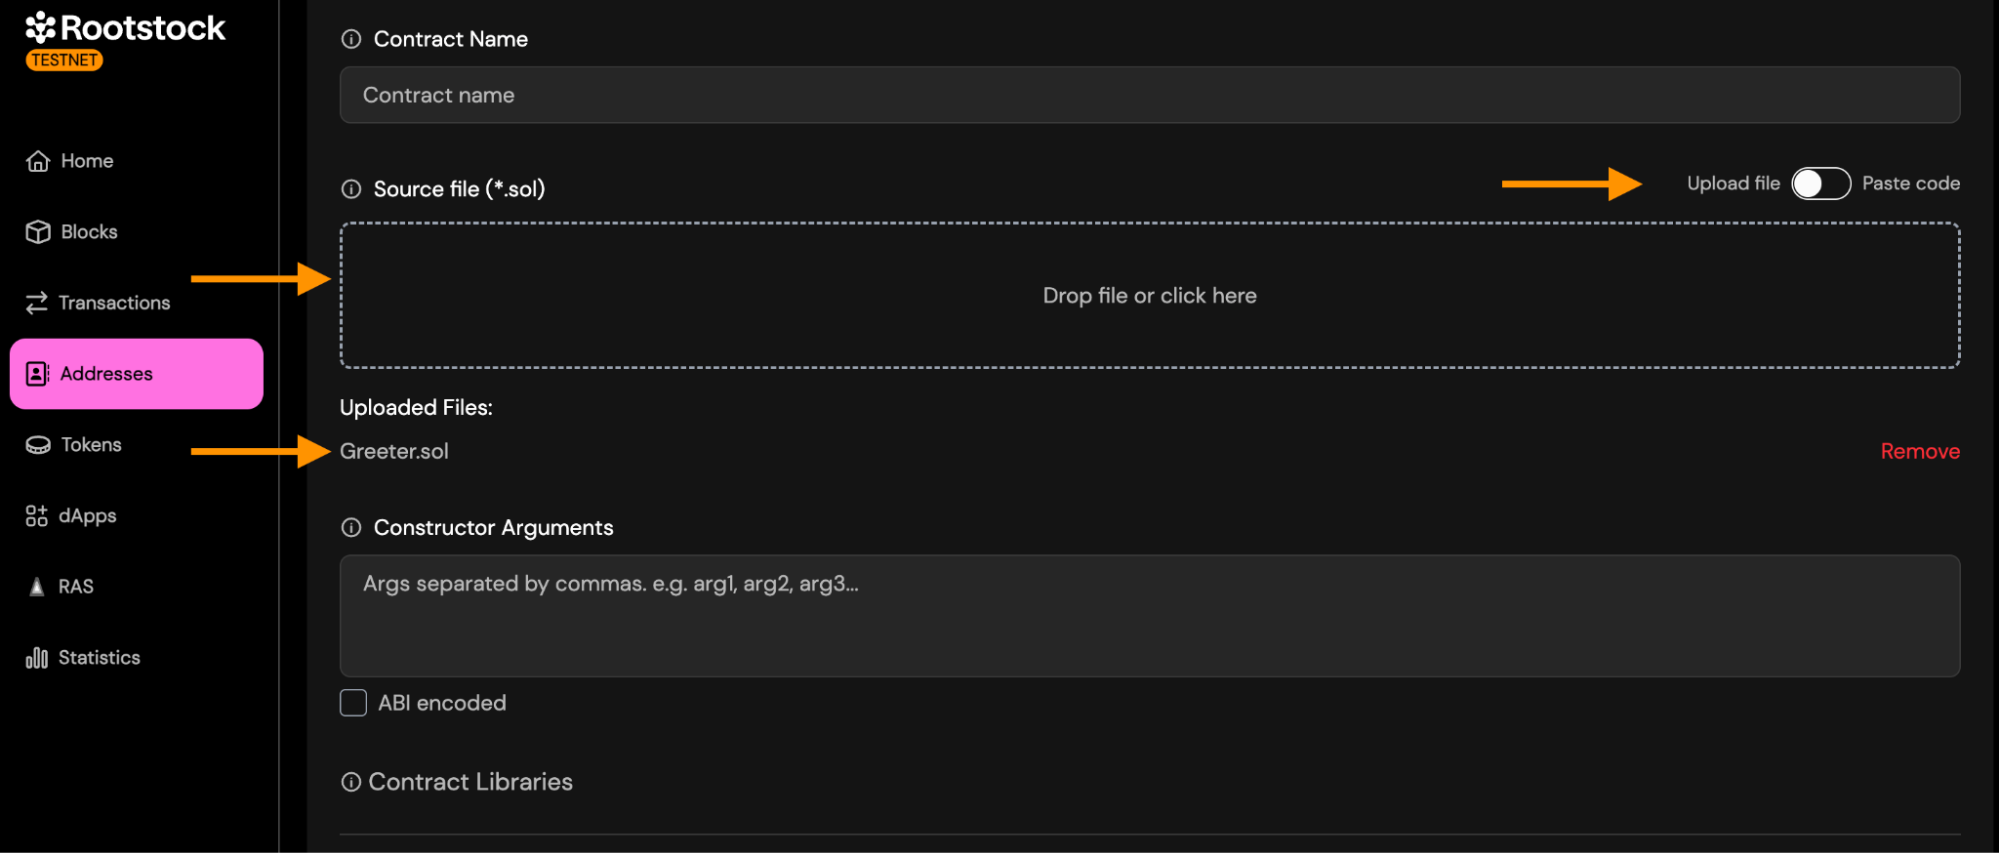
-
-
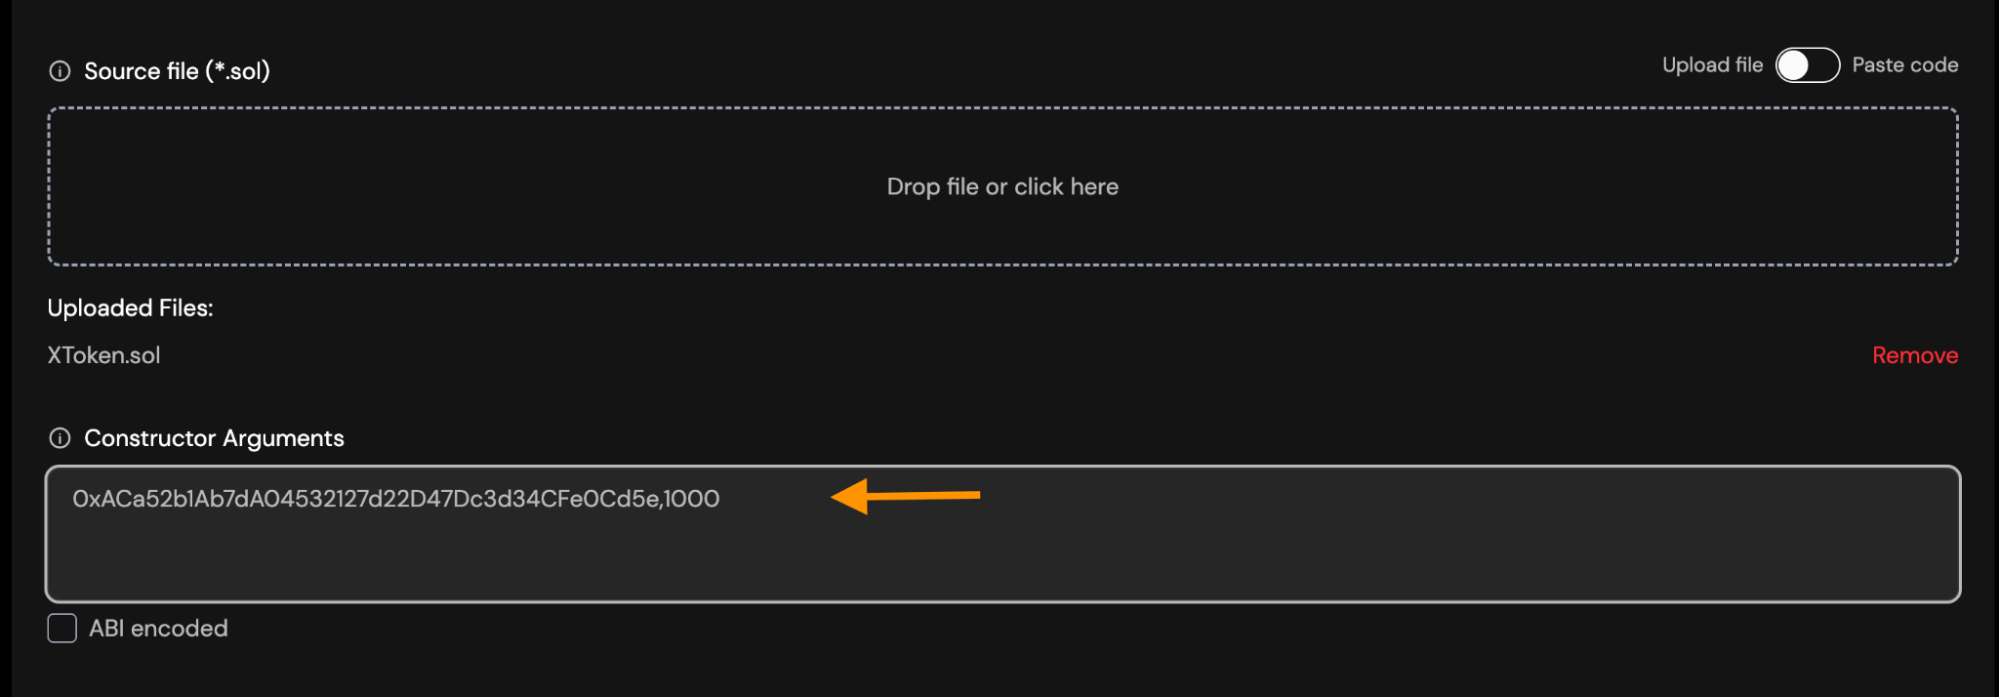
Constructor Arguments: You must enter constructor arguments separated by commas if you have more than one.
- Suppose your Solidity constructor looks like this:
constructor(address owner, uint256 maxSupply)- To verify the contract, enter the arguments like this:
0xACa52b1Ab7dA04532127d22D47Dc3d34CFe0Cd5e,1000Example:
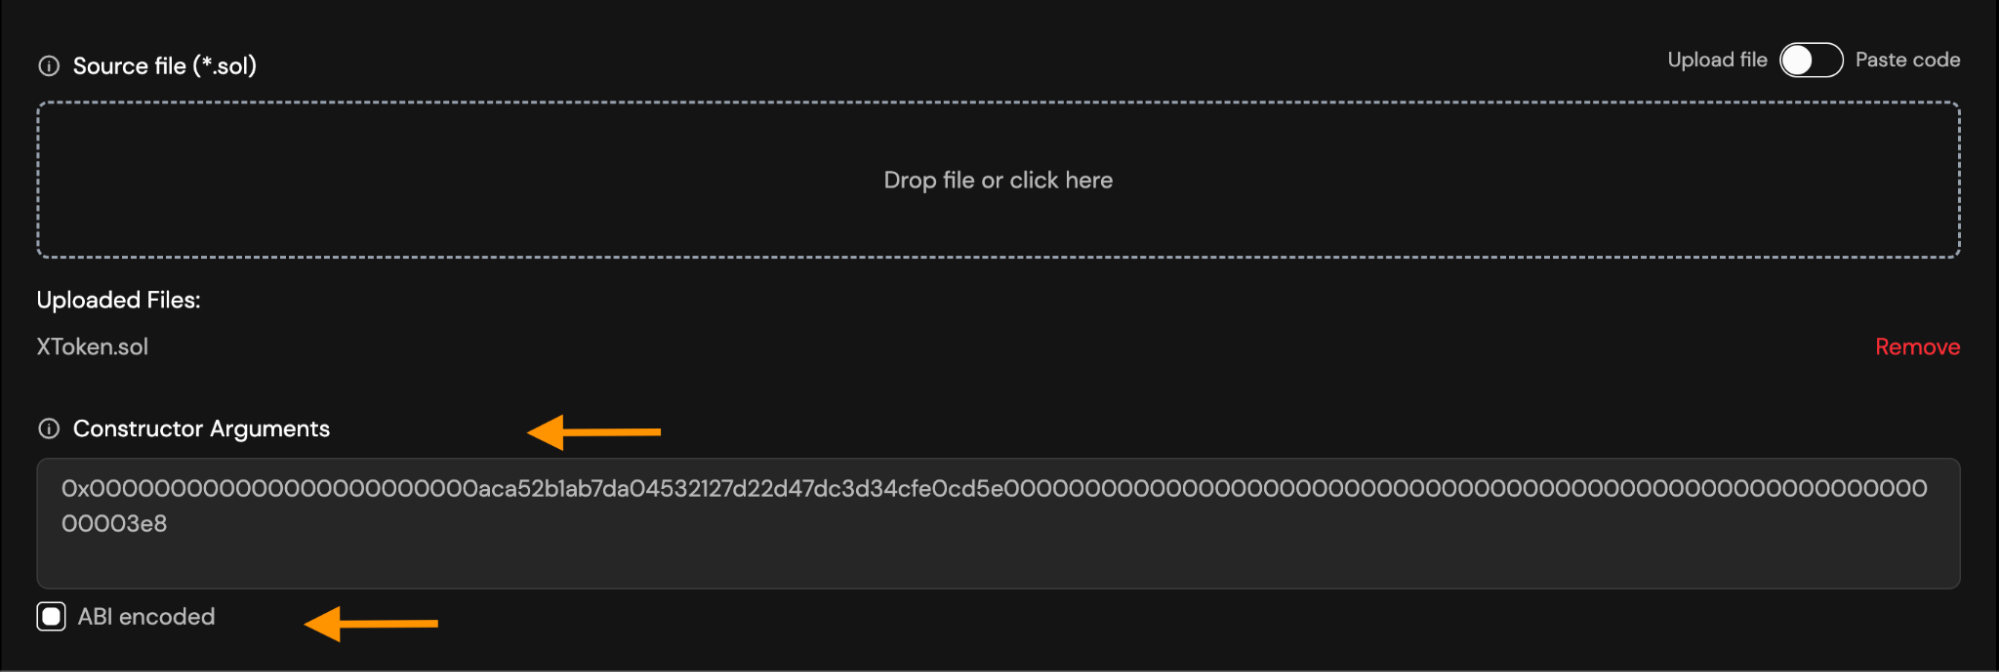
- If you already have them in ABI-encoded format, enable the "ABI encoded" checkbox and paste the encoded string instead.
-
How to encode arguments:
- ABI-ENCODING with Ethers.js
import { AbiCoder } from "ethers";const coder = AbiCoder.defaultAbiCoder();const encoded = coder.encode(["address", "uint256"],["0xaca52b1ab7da04532127d22d47dc3d34cfe0cd5e", "1000"],);console.log(encoded);Result:
0x000000000000000000000000aca52b1ab7da04532127d22d47dc3d34cfe0cd5e00000000000000000000000000000000000000000000000000000000000003e8- ABI-ENCODING from Remix:
- Open the Remix console
- Paste the following into the console:
web3.eth.abi.encodeParameters(["address", "uint256"],["0xaca52b1ab7da04532127d22d47dc3d34cfe0cd5e", "1000"],);Result:
0x000000000000000000000000aca52b1ab7da04532127d22d47dc3d34cfe0cd5e00000000000000000000000000000000000000000000000000000000000003e8- ABI-ENCODING with Foundry (cast):
cast abi-encode "constructor(address,uint256)" \0xaca52b1ab7da04532127d22d47dc3d34cfe0cd5e 1000Result:
0x000000000000000000000000aca52b1ab7da04532127d22d47dc3d34cfe0cd5e00000000000000000000000000000000000000000000000000000000000003e8 -
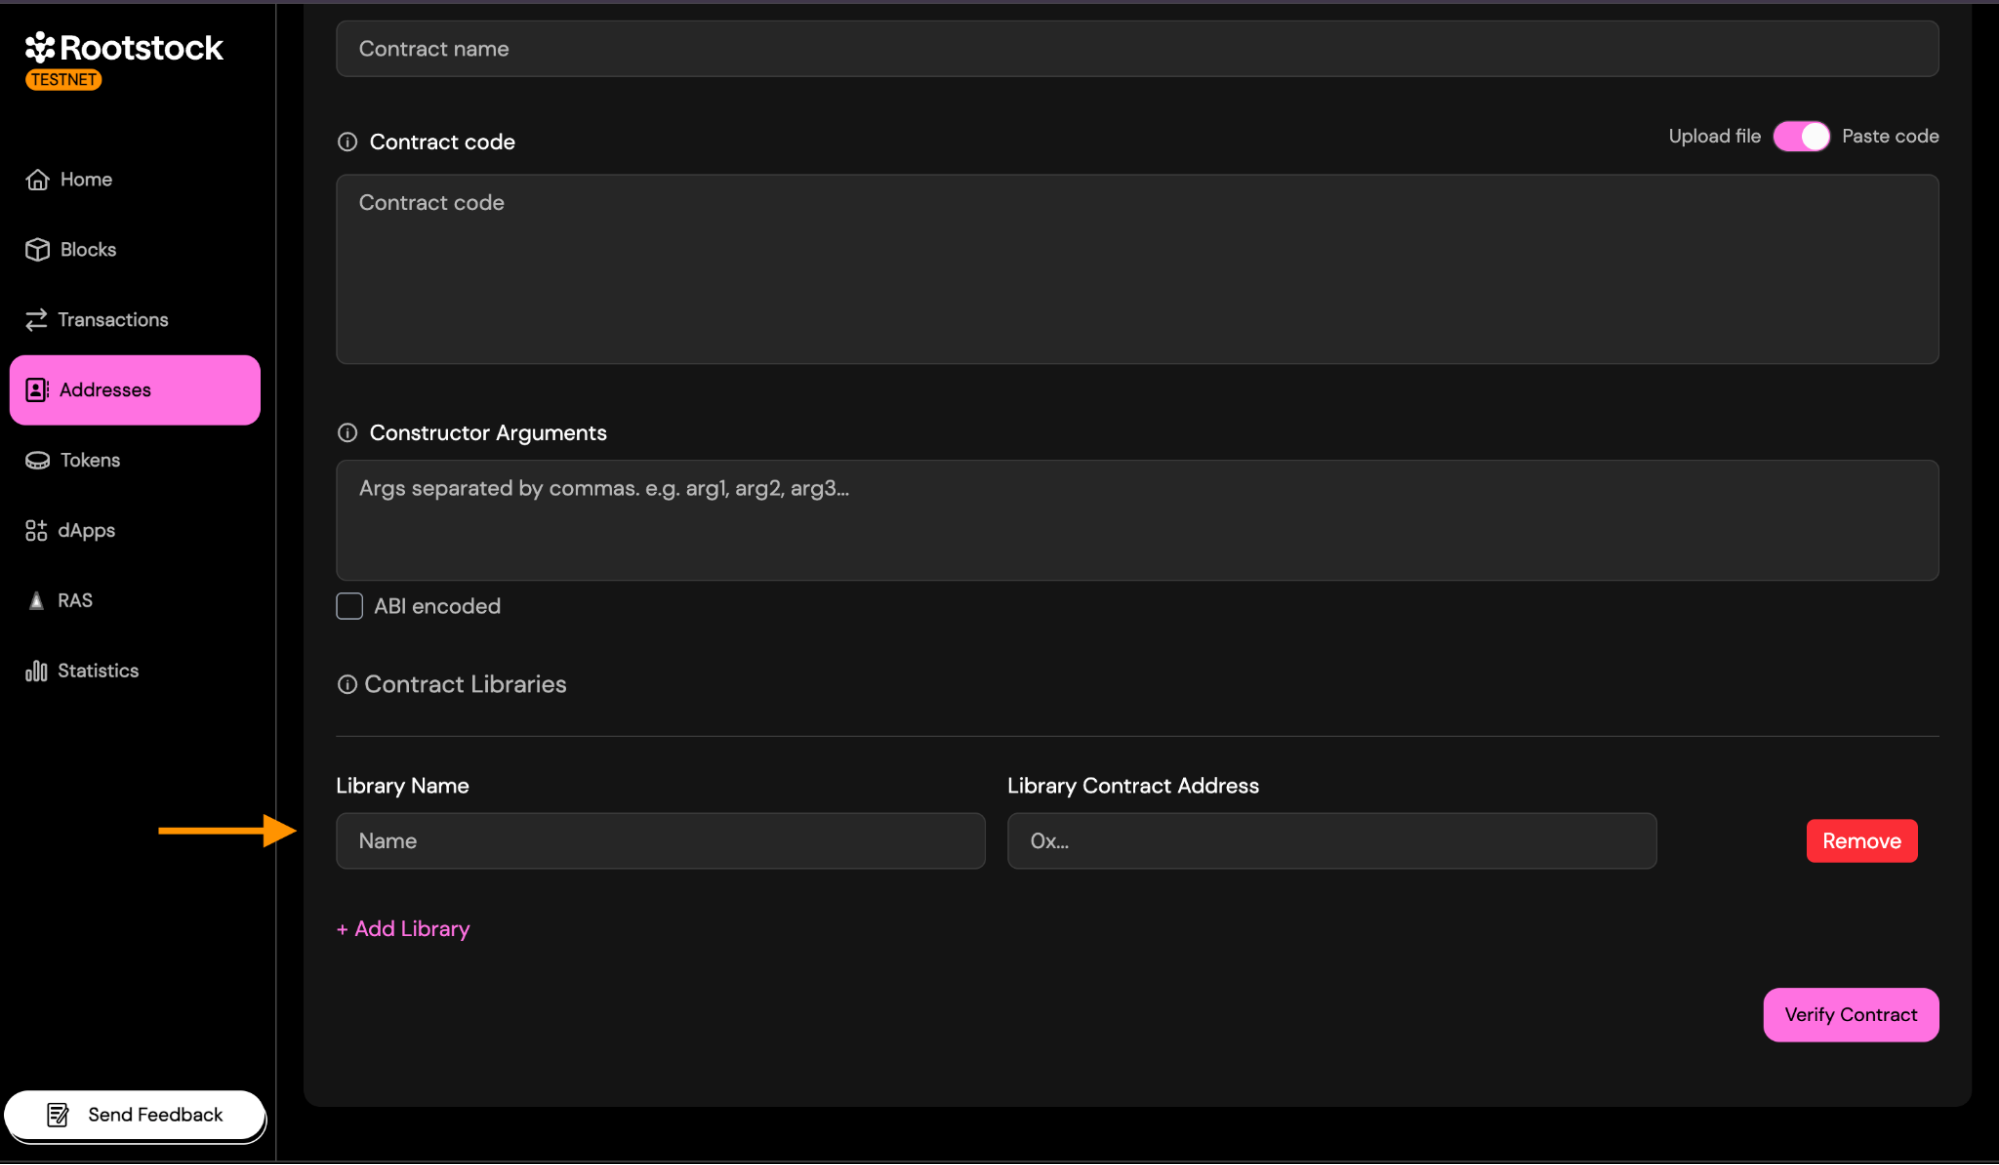
Libraries: If your contract links external libraries add each required library.
Provide:
- Library Name.
- Library Contract Address (the address where the library was deployed).
This step is required only if the compiled bytecode contains libraries.
2. Multiple Files
The Solidity (Multiple Files) method is designed for more complex contracts that use imports, have multiple .sol files, or cannot be flattened safely. This method allows you to upload all your Solidity source files exactly as they exist in your project.
Only the parts that differ from Single File are described below.
- Source Files: Upload all Solidity files required to compile your contract, preserving the original folder structure.
You can:
- Drag and drop multiple
.solfiles. - Upload an entire folder containing your contracts.
- Combine both approaches if needed.
Important rules:
- Every imported file must be included.
- Filenames must match exactly (case-sensitive).
- Folder structure should reflect your project layout.
- Do not flatten the files. This method expects multi-file compilation.
During verification, the explorer will reconstruct the compilation environment using the files you provide.
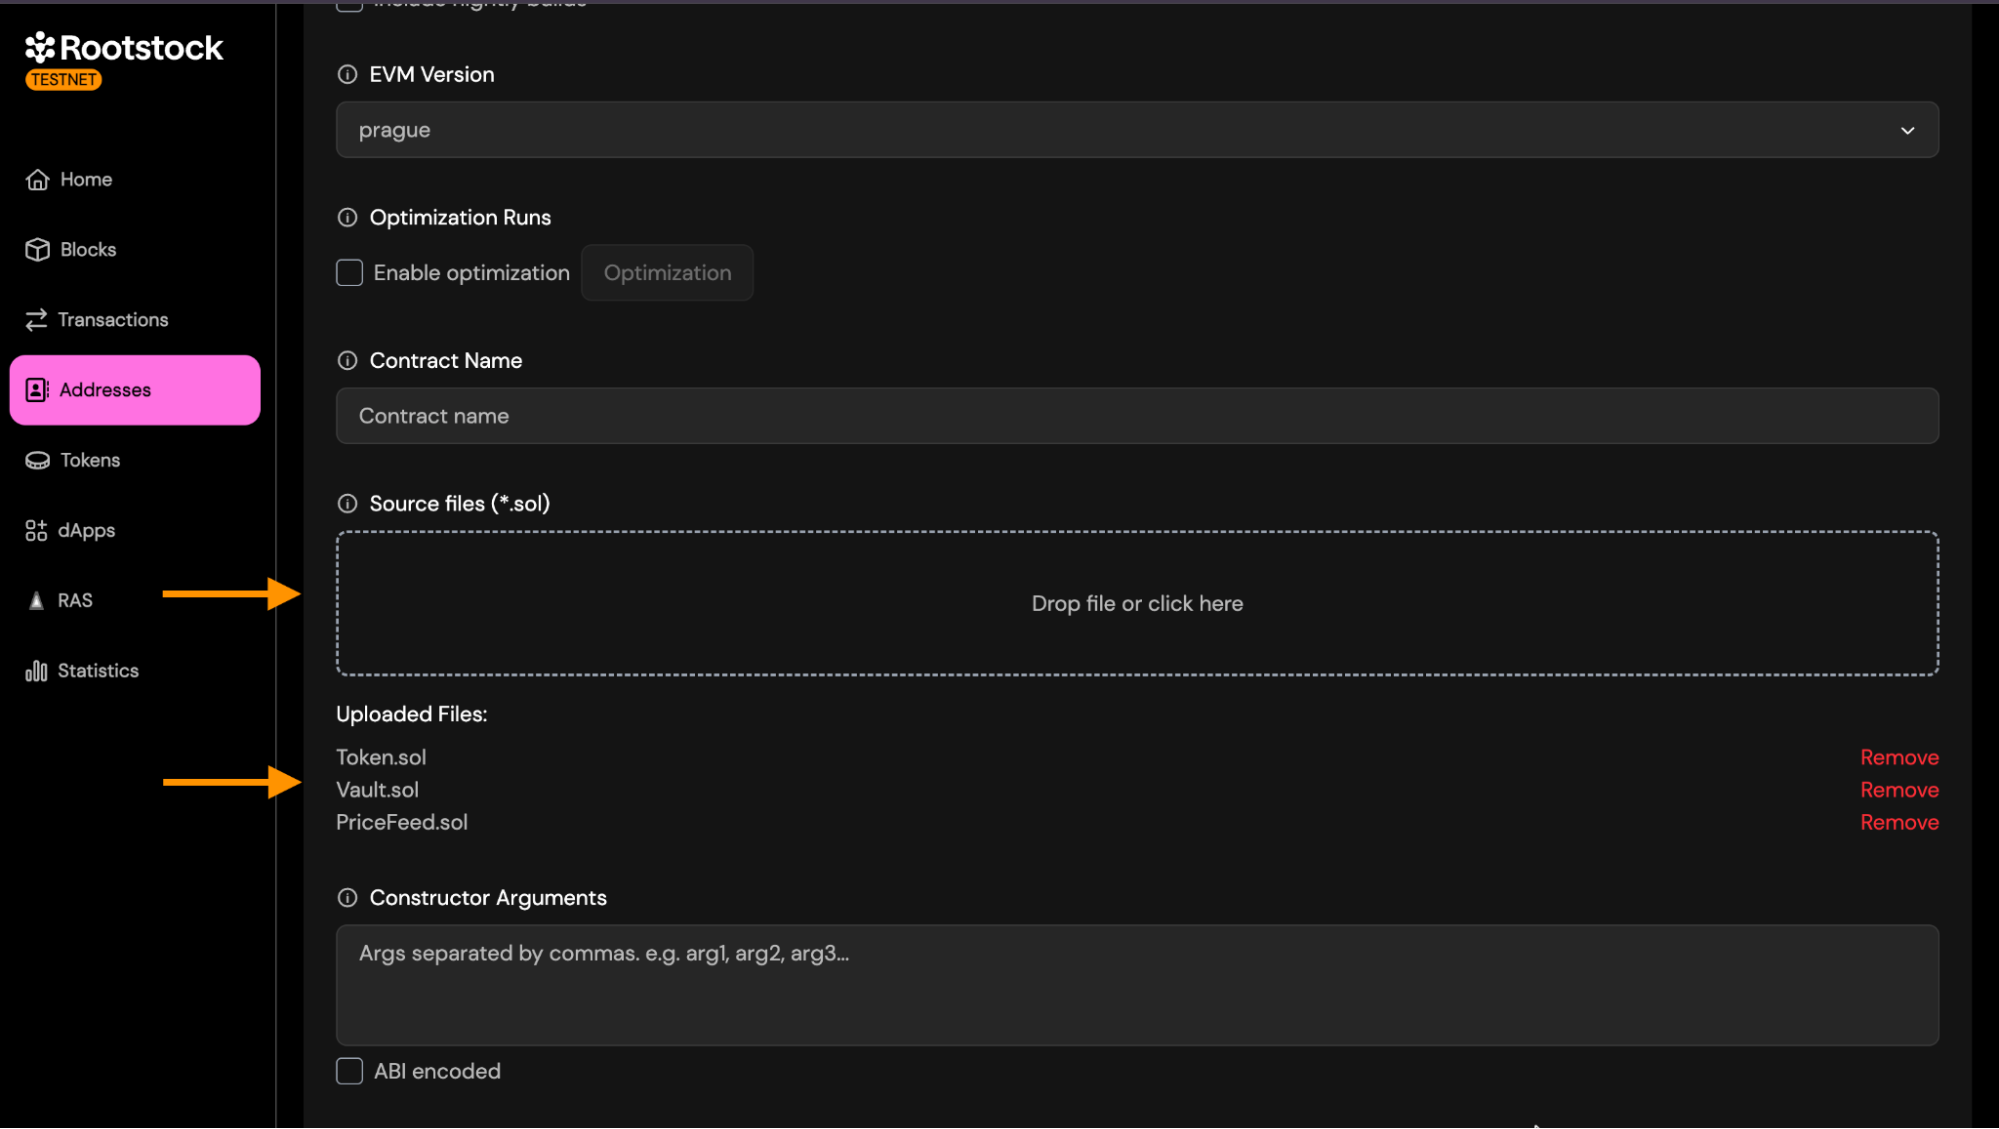
- Other Settings: All other fields (compiler version, EVM version, optimization, contract name, constructor arguments, libraries) work exactly the same as described in the Single File section.
3. Standard JSON
The Standard JSON Input method is the most reliable and exact verification approach. It reproduces the full Solidity compiler configuration used during deployment by providing a complete standard-json object, exactly as consumed by solc --standard-json.
This method is strongly recommended for:
- Projects compiled with Hardhat, Foundry, Truffle, or custom build scripts.
- Contracts with complex dependency structures.
- Projects where preserving metadata (AST, settings, compiler options) is essential.
- Ensuring a byte-for-byte deterministic match with the deployed bytecode.
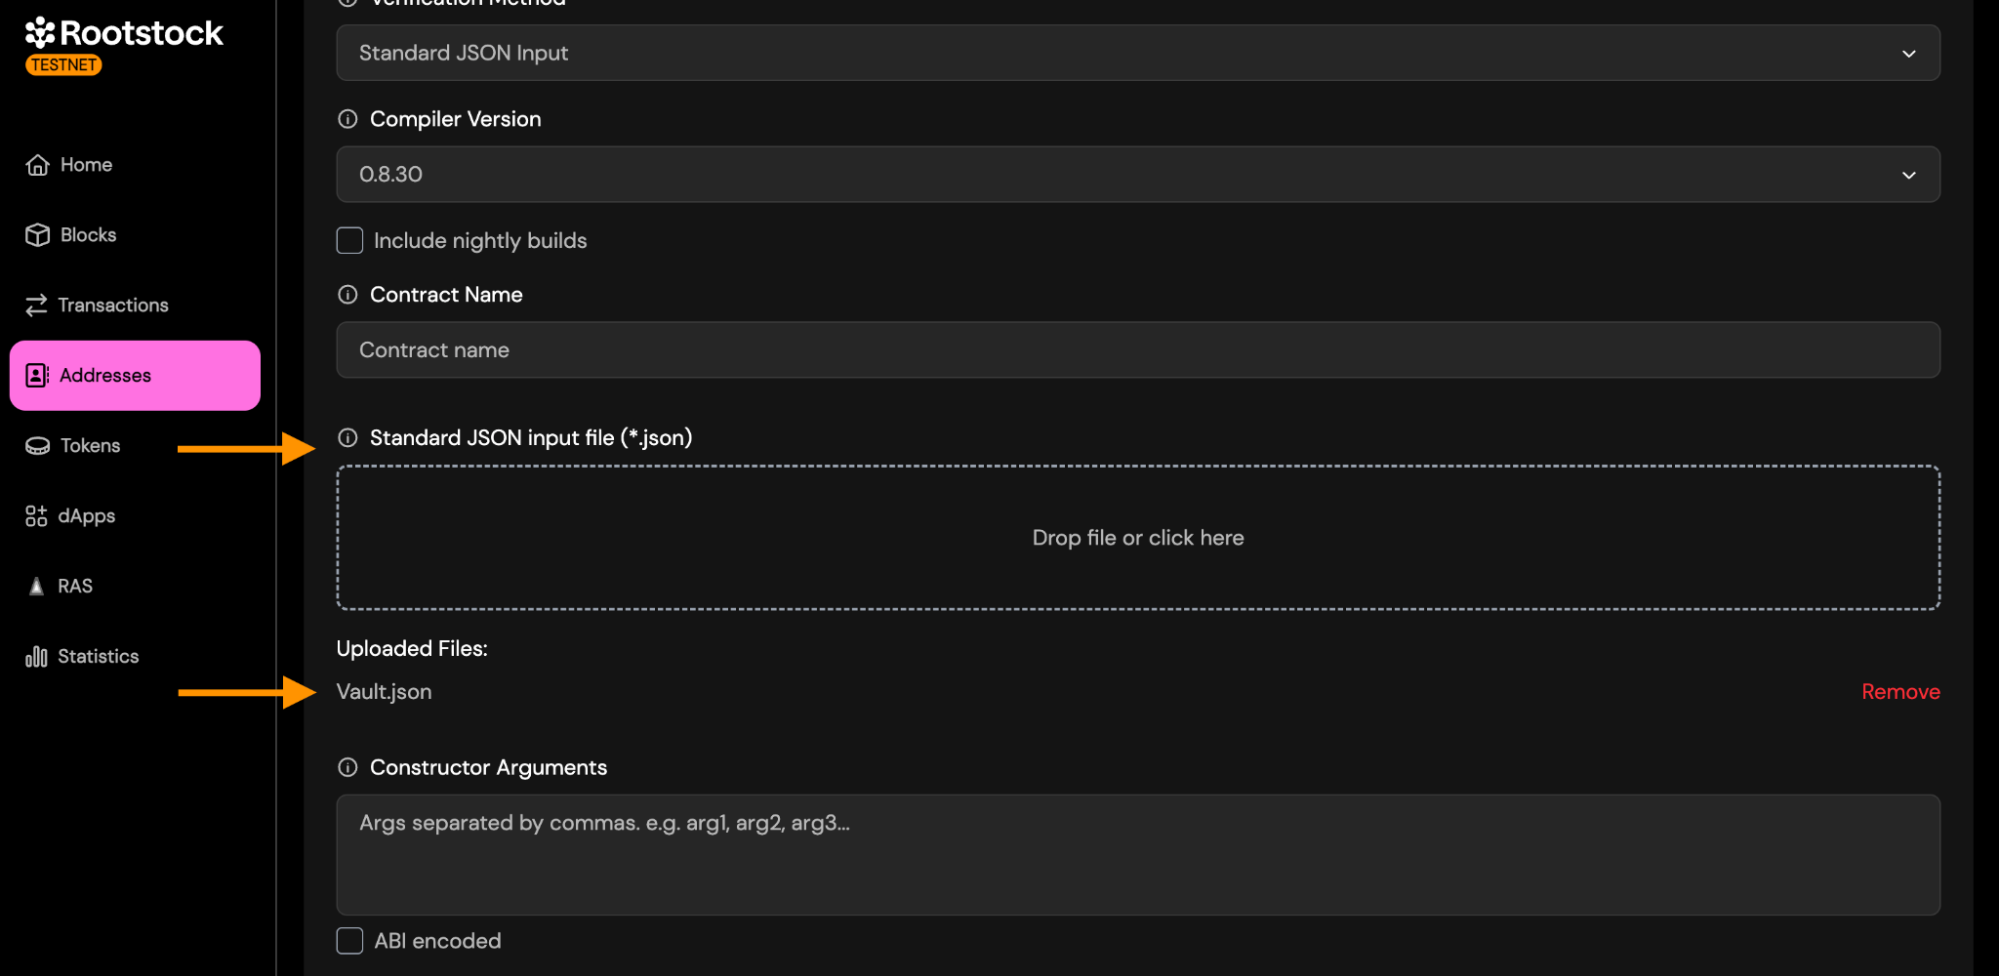
- Other Settings: All other fields (compiler version, optimization, contract name, constructor arguments, libraries) work exactly the same as described in the Single File section.
How to Generate Standard JSON Input
Hardhat:
npx hardhat compile --show-stack-traces
Then locate the Hardhat build-info file under artifacts/build-info/*.json; this file contains the Standard JSON compiler input in its input field.
-
How to Extract the Standard JSON Input:
After generating the file from Hardhat:
- Open the JSON file that was produced.
- Inside it, locate the field named "input".
- Copy everything inside the input object. This is the actual Standard JSON Input expected by the verifier.
- Paste it into a new file, and save it using the contract's name.
- Your file should look similar to the following structure:
{
  "language": "Solidity",
  "sources": {
    "Token.sol": {
      "content": "..."
    },
    "PriceFeed.sol": {
      "content": "..."
    },
    "Vault.sol": {
      "content": "..."
    }
  },
  "settings": {
    "optimizer": {
      "enabled": false,
      "runs": 200
    },
    "outputSelection": {
      "*": {
        "": ["ast"],
        "*": [
          "abi",
          "metadata",
          "devdoc",
          "userdoc",
          "storageLayout",
          "evm.legacyAssembly",
          "evm.bytecode",
          "evm.deployedBytecode",
          "evm.methodIdentifiers",
          "evm.gasEstimates",
          "evm.assembly"
        ]
      }
    },
    "remappings": [],
    "evmVersion": "cancun"
  }
}
Foundry:
forge verify-contract \
    --chain-id 31 \
    --watch \
    --compiler-version <compiler-version> \
    --show-standard-json-input \
    <contract-address> \
    <contract-file>:<contract-name> \
    > <contract-name>.json
Replace:
<contract-address>→ the deployed contract address.<contract-file>→ path to the Solidity file inside your project.<contract-name>→ name of the contract inside that file.<compiler-version>→ the Solidity compiler version used to compile and deploy the contract (for example,v0.8.28).
The
> <contract-name>.jsonat the end of the command redirects the Standard JSON input output into a file in the current directory, which can then be uploaded as-is to the Rootstock Explorer verification tool.
--show-standard-json-input emits only the target contract and its imports. If your project compiles with via_ir = true, that is not the compilation unit that produced your bytecode, so this input is not guaranteed to reproduce it. Submit it, and if it comes back as a bytecode mismatch, rebuild the input from the build info your deploy wrote — see the via-IR entry under Troubleshooting.
If your contract links external libraries, add one --libraries flag per library so they are written into settings.libraries of the generated JSON:
--libraries <library-file>:<library-name>:<library-address>
4. Hardhat Verification
Select Hardhat as your verification method to verify contracts directly from your Hardhat project. This method does not require uploading files through the interface. Instead, verification is performed using the Hardhat CLI.
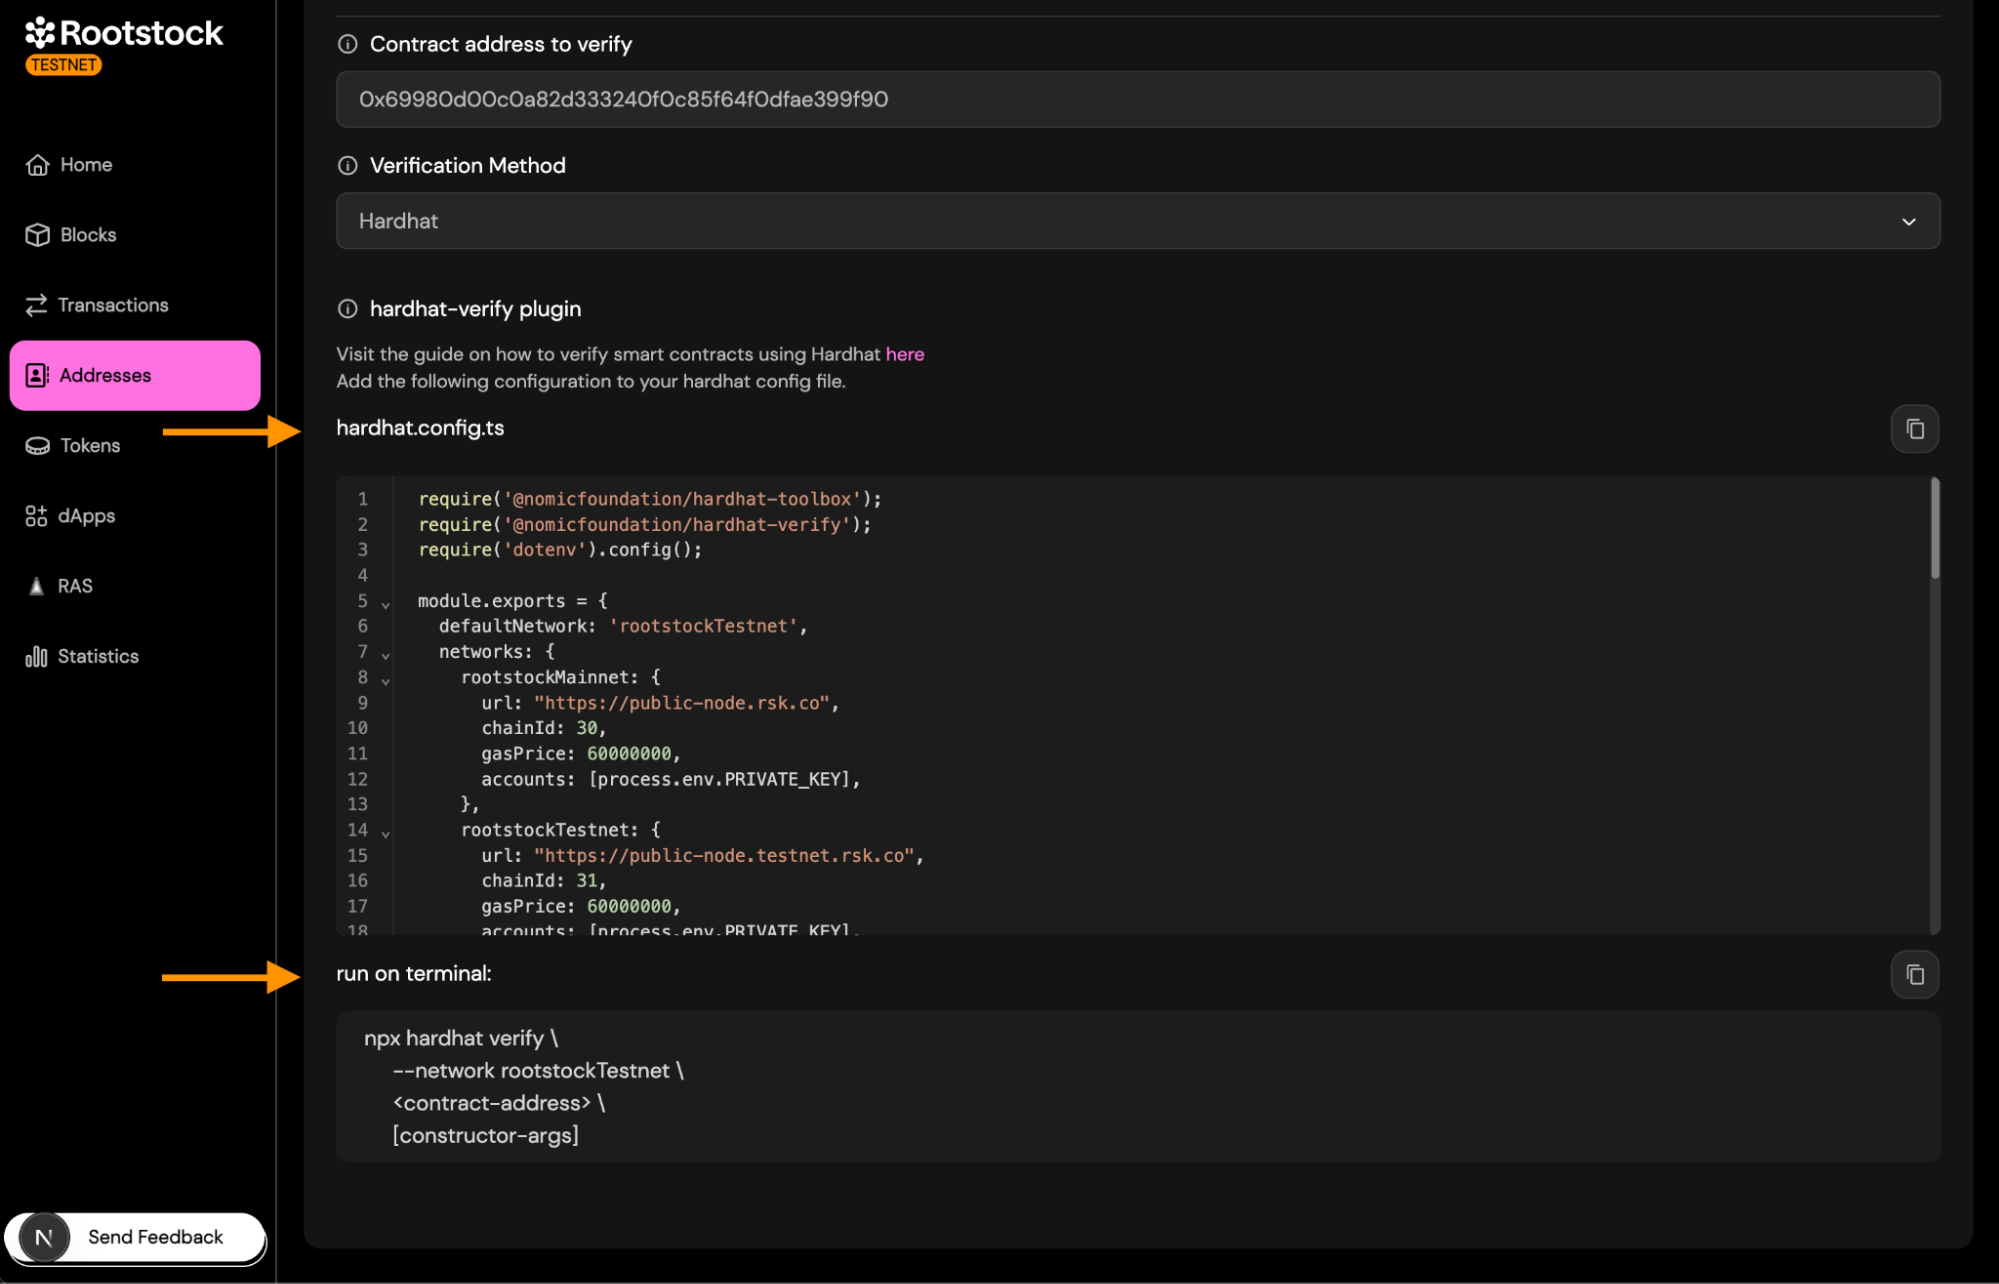
Copy the configuration snippet into your hardhat.config.ts file.
This snippet includes:
- The Hardhat Verify plugin
- Rootstock Testnet/Mainnet RPC URLs
- Chain IDs
- Account setup for signing requests
Make sure your PRIVATE_KEY is defined in your .env file.
Run the verification command in the terminal:
npx hardhat verify \
    --network rootstockTestnet \
    <contract-address> \
    [constructor-args]
Replace:
<contract-address>with your deployed contract address[constructor-args]with constructor parameters (if any)
Once it completes successfully, your contract will be verified on the Rootstock Explorer.
For a detailed walkthrough, see Verify Smart Contracts using the Hardhat Verify Plugin.
5. Foundry Verification
Select Foundry as your verification method to verify contracts using the forge verify-contract command.
This method integrates Foundry directly with the Rootstock Explorer's verification API, allowing you to verify a deployed contract from your local environment.
Run the verification command in the terminal:
forge verify-contract \
    --chain-id 31 \
    --watch \
    --compiler-version <compiler-version> \
    --verifier custom \
    --verifier-url https://be.explorer.testnet.rootstock.io/api/v3/etherscan \
    <contract-address> \
    <contract-file>:<contract-name>
Replace:
<contract-address>→ the deployed contract address.<contract-file>→ path to the Solidity file inside your project.<contract-name>→ name of the contract inside that file.<compiler-version>→ the Solidity compiler version used to compile and deploy the contract (for example,v0.8.28).
If your contract links external libraries, add one --libraries flag per library. Verification does not reuse the linking from your deploy, so each library has to be named again:
--libraries <library-file>:<library-name>:<library-address>
Once the command finishes, your contract will appear as Verified on the Rootstock Explorer.
For a detailed walkthrough, see Verify Smart Contracts using Foundry.
Submit and Validate
Once you have entered all the details, click "Verify Contract".
-
Expected statuses: The verification status will change from "Pending" to "Success" or "Failure".
-
On successful status:
a. You will see the
Verifiedbadge on the contract page.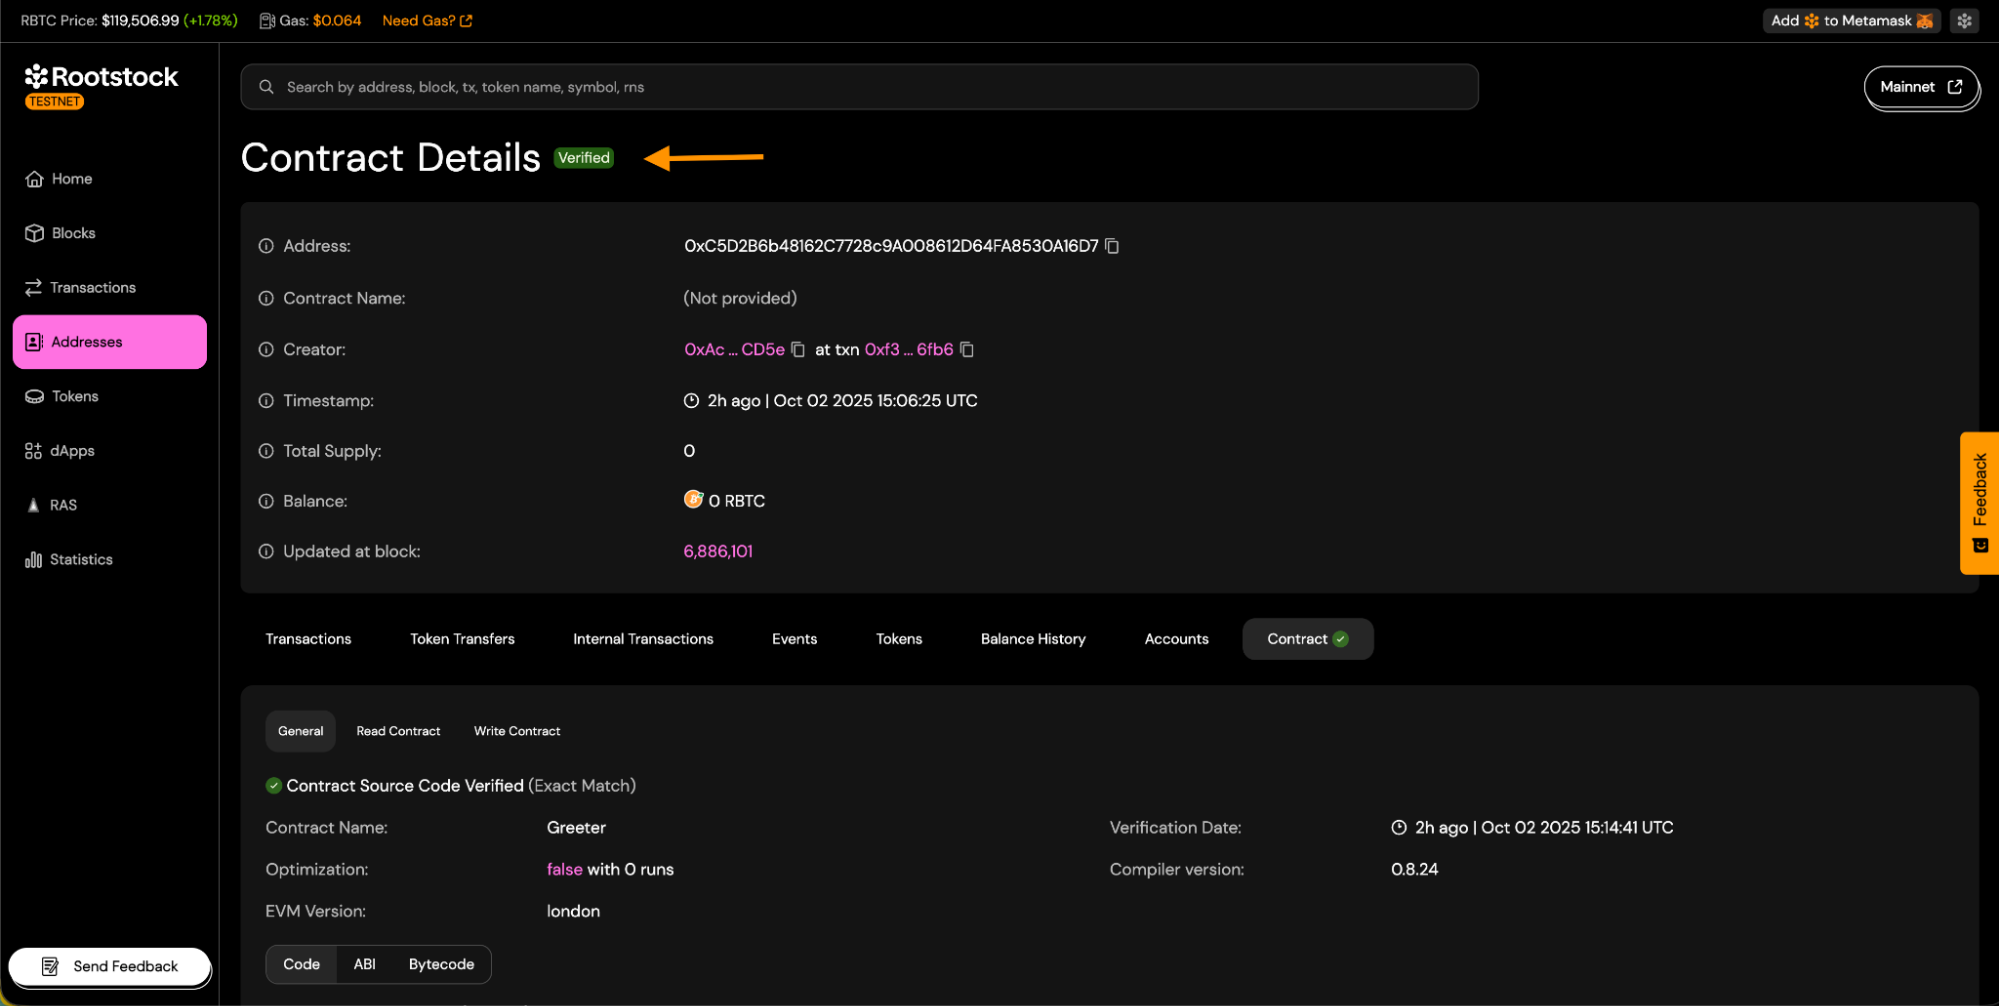
b. Source code tabs will be visible.
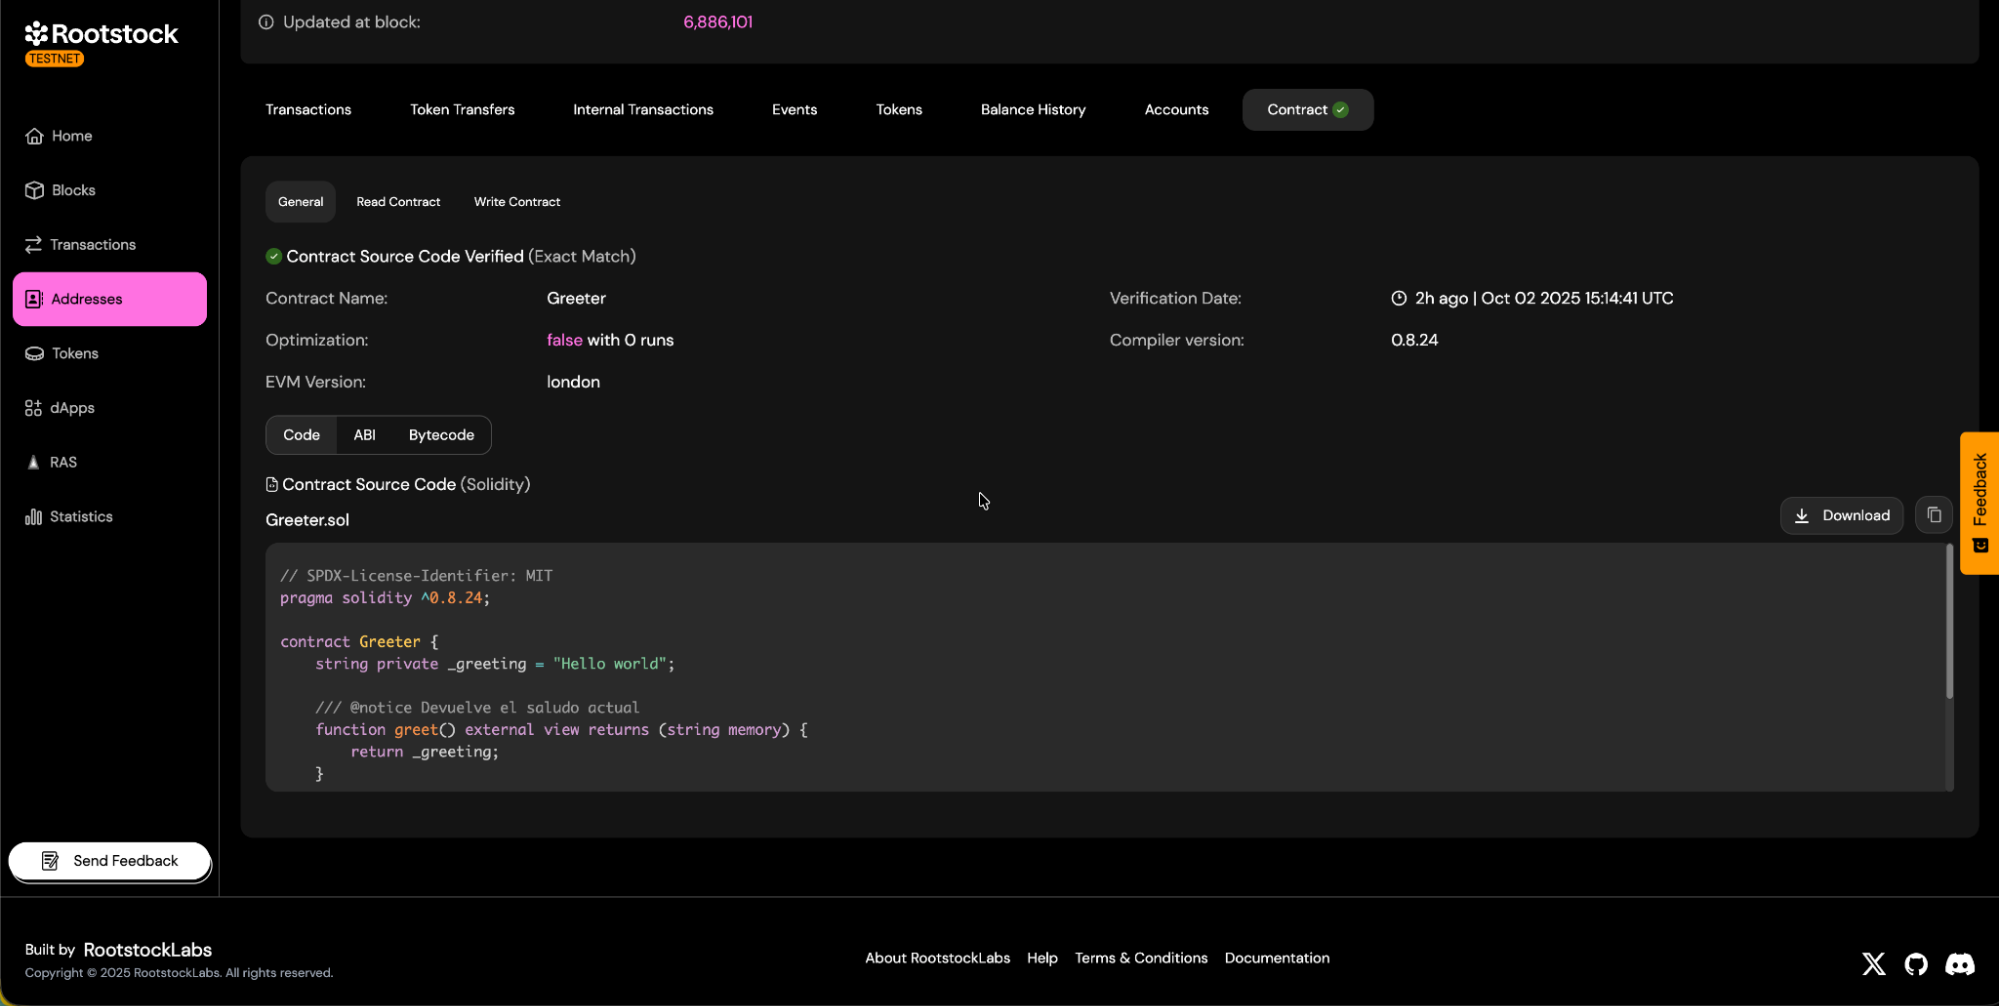
c. You will be able to download the contract ABI.
d. Contract read and write panels will be available.
- Read Methods:
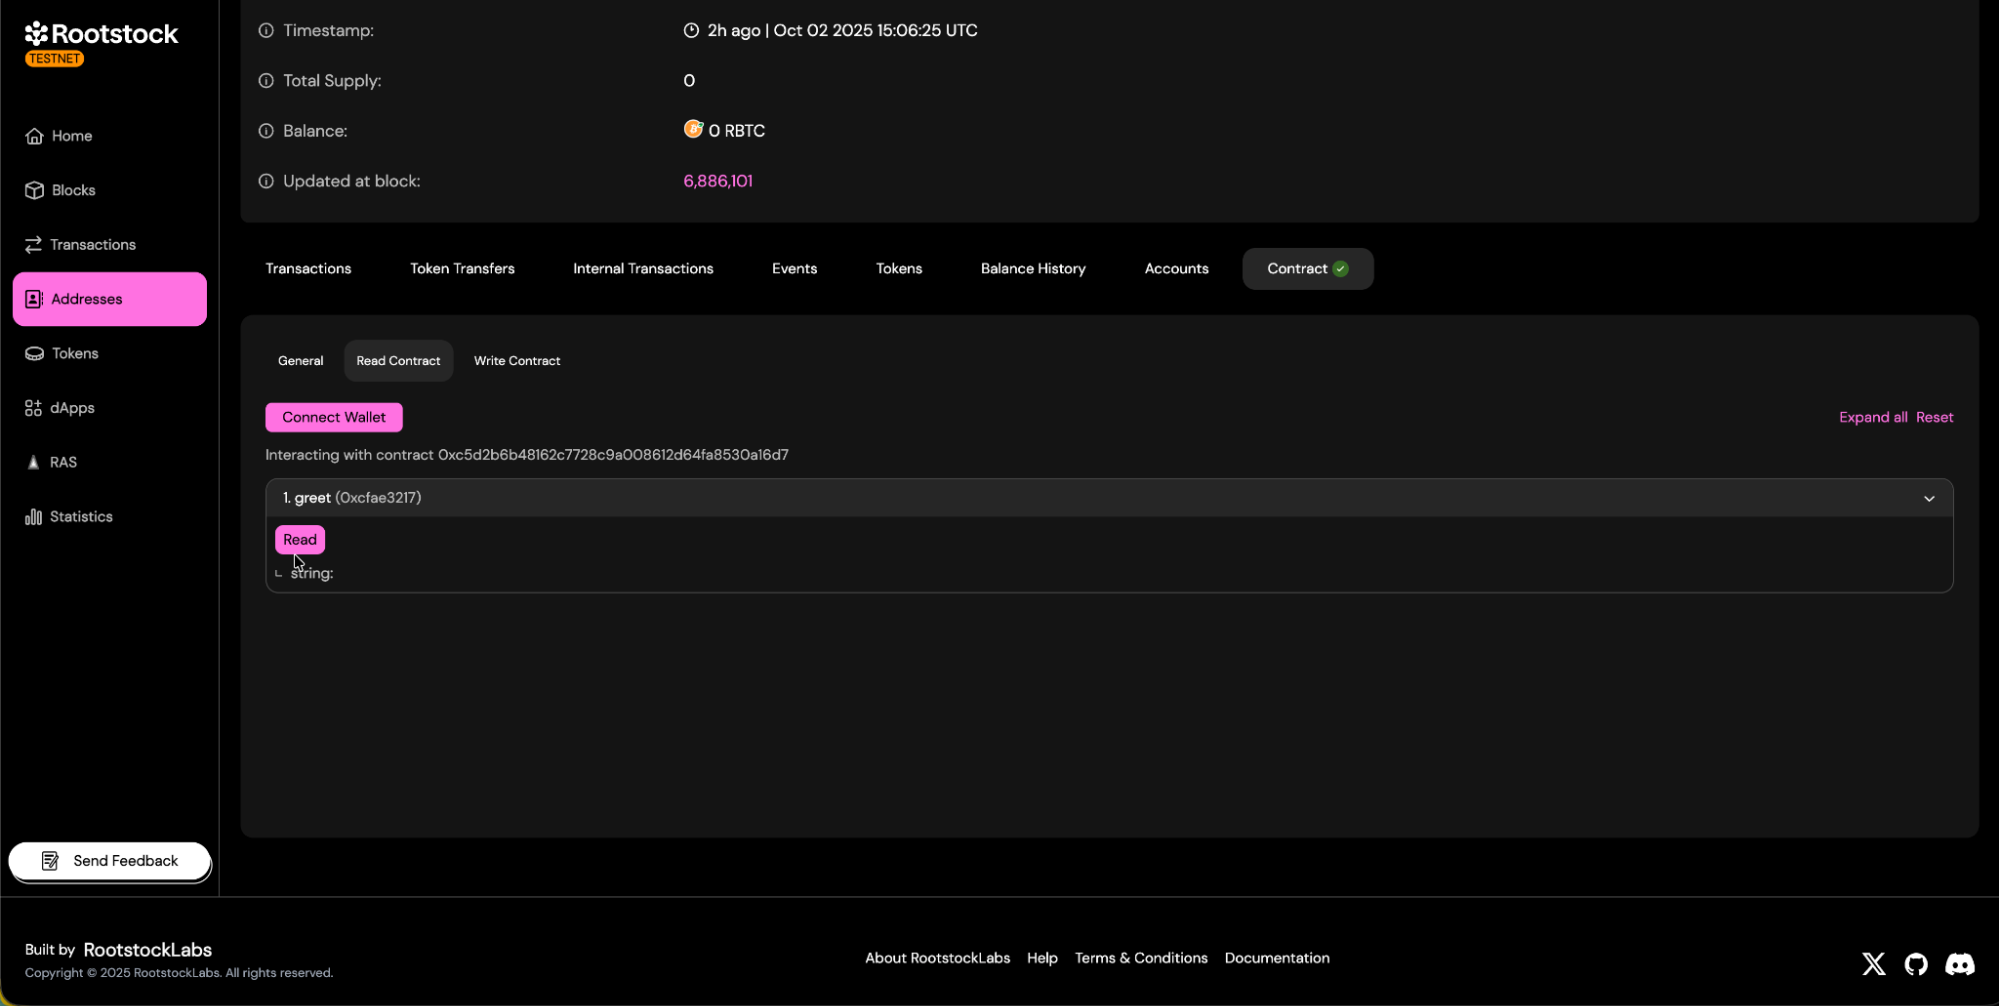
- Write Methods:
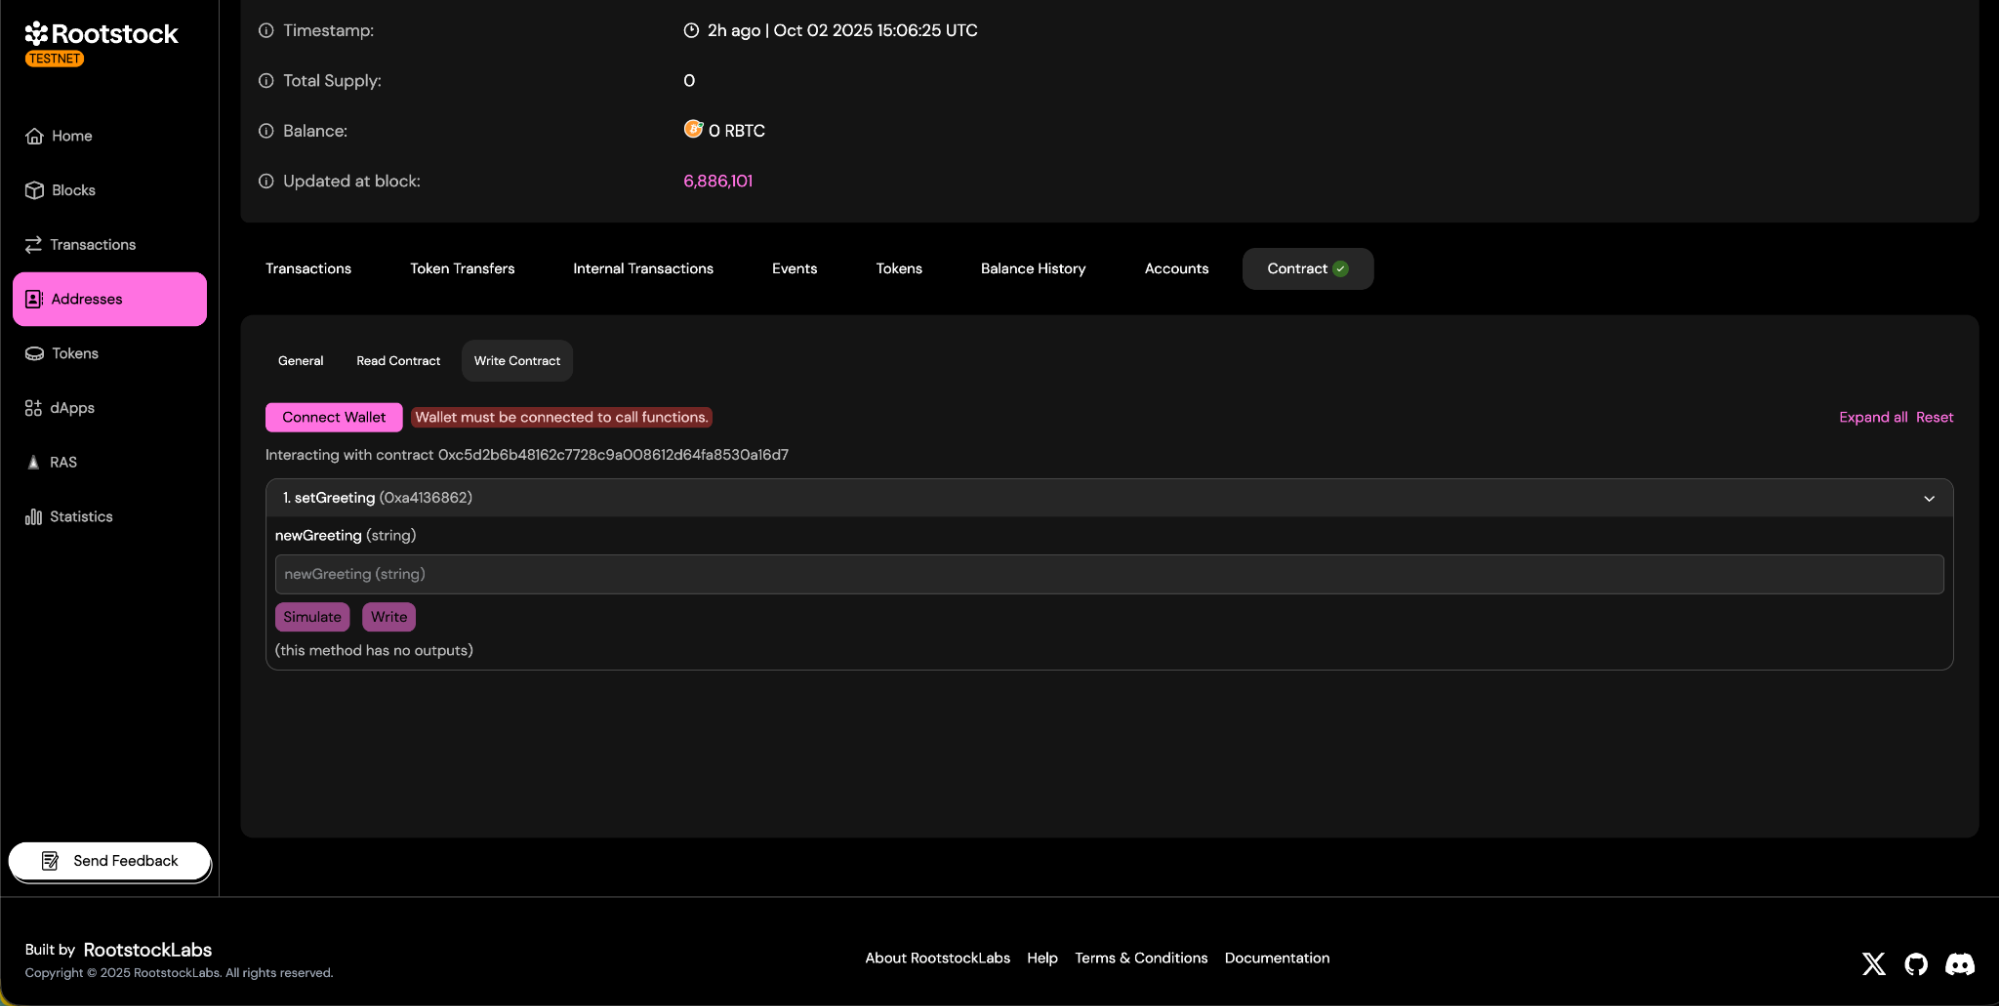
- Read Methods:
Troubleshooting
Verification compares the bytecode the explorer recompiles against the bytecode on chain. The code body has to match; a metadata footer that differs is tolerated when it is the same length and still decodes as valid metadata. Every failure below is a real difference between the compilation you submitted and the one that produced the deployed bytecode. The exception is when the failure happens in your local tooling, before anything reaches the explorer.
Compiler version mismatch
- Use the exact Solc version your deploy used, not the version shown in an example command. Do not read it off the
pragmaeither: a pragma often only bounds the version, and even when it pins one exactly it omits the+commithash that identifies the build.- Foundry: read
solc_versionfromfoundry.toml(solcis the same setting; Foundry accepts either), or take the full version frommetadata.compiler.versioninout/<File>.sol/<Contract>.json. - Hardhat: take
solcLongVersionfrom the build info underartifacts/build-info/— it carries the+commit.…suffix thatsolcVersionomits. In your config it lives undersolidityin Hardhat 2 (a bare version string,solidity.version, or an entry insolidity.compilers[]), and under the compiler profile in Hardhat 3.
- Foundry: read
Bytecode mismatch with via-IR enabled
With via_ir = true, Solc output for a contract depends on which other sources were in the compilation unit, not only on the contract and its imports. forge verify-contract submits just the target's import closure, a smaller set than the one your deploy compiled, so the recompiled bytecode can differ. Run the plain command first: on the project this guidance comes from, thirteen of the fourteen deployed contracts verified with it, and the one that failed was the largest. Once it fails for a given source tree it keeps failing, deterministically, until the input changes.
For a contract that is already deployed, the compilation unit it was deployed from is the one input guaranteed to reproduce its bytecode. Recover it from the build info of the deploy — the archived artifact if you kept one, otherwise a build of the exact commit you deployed, since a source added or removed since then can change the output — then drop test/ and script/ so the submission fits the explorer's budget:
forge build --build-info
grep -l '"src/Vault.sol"' out/build-info/*.json
jq '.input | {language, sources: (.sources | with_entries(select((.key | startswith("test/")) or (.key | startswith("script/")) | not))), settings}' out/build-info/<hash>.json > standard-input.json
- The
greppicks the build-info file holding your target, since a project can accumulate several. Thejqfilter names three keys because Standard JSON accepts onlylanguage,sources, andsettings; Foundry also storesallowPaths,basePath,includePaths, andversionunder.inputfor its own use. - That trim is part of the recipe, not a fallback. This explorer caps a Standard JSON submission at 100 sources and 1.5 MiB (1,572,864 bytes) of source content by default, and over either limit it answers
SOURCE_BUDGET_EXCEEDEDinstead of compiling. The build this guidance comes from is 127 sources and 1,694,661 bytes; droppingtest/andscript/brings it to 77 sources and 1,209,404 bytes. - Check the trim before submitting, because under via-IR removing sources can change the output. Recompile it with the same Solc version the deploy used (
solcVersionin the build-info file) and compare the target's creation bytecode against the build info — the two digests must be equal, and if they differ, put the sources back:
jq -r '.output.contracts["src/Vault.sol"].Vault.evm.bytecode.object' out/build-info/<hash>.json | shasum -a 256
solc --standard-json standard-input.json > recompiled.json && jq -r '.errors // [] | map(select(.severity=="error")) | length' recompiled.json
jq -r '.contracts["src/Vault.sol"].Vault.evm.bytecode.object' recompiled.json | shasum -a 256
- Submit the result through Standard JSON Input. Redeploying from a smaller tree is not an option here — the address and its state are already live — so reproducing the original compilation unit is the only path.
Before your next deployment, put the filters on the command that compiles the deploy and keep the build info that run writes:
forge script script/Deploy.s.sol --rpc-url <rpc-url> --broadcast --build-info --skip 'test/**'
- Use globs, not the bare
test/scriptaliases.--skipfilters which files compile as targets, not what ends up in the unit: anything a surviving target imports comes back. The aliases match only.t.soland.s.sol, so a helper liketest/BaseTest.solsurvives and drags its imports with it. On this project, of 127 sources the aliases left 96,'test/**'left 83, and'test/**' 'script/**'— usable onforge build, not on the deploy command — left 55. - Never pass
--skip scripttoforge script: it skips the script being run, and the run stops withCould not find target contract. - Keep the
out/build-info/<hash>.jsonthe deploy wrote, outsideout/, sinceforge build --forceclears that folder. Without it you are rebuilding from the deployed commit, where anything added or removed since the deploy can change the via-IR output. If the code body does reproduce, a metadata footer that differs by the same length still verifies here, though some other explorers record that as a partial match. - Turning via-IR off is the other pre-deployment option and it removes the failure mode outright, since legacy codegen is not source-set sensitive. That is a decision about your contracts, not about verification.
Library not found / address mismatch
forge verify-contract submits only the libraries in your Foundry configuration for that command — the --libraries flags you pass, plus any libraries entry in foundry.toml. It never reads your deploy's broadcast file or artifacts, so the flags your deploy script passed have to be repeated here. A missing library leaves unresolved placeholders in the recompiled bytecode, so the comparison fails.
- Pass every deployed library, one
--librariesflag each:
--libraries src/libraries/MyLib.sol:MyLib:0x1111111111111111111111111111111111111111
- The file part is the source path as the compiler sees it, after remappings. For a library that comes from a dependency, that is its path inside the dependency — for example
node_modules/@scope/pkg/contracts/MyLib.sol:MyLib:0x…. - The source of truth for names and addresses is the top-level
libraries[]array inbroadcast/<script>.s.sol/<chainId>/run-latest.json. - To see what your command actually ships before submitting, dump the Standard JSON input and inspect its
settings.libraries:
forge verify-contract ... --show-standard-json-input > standard-input.json
Invalid constructor arguments
-
Verify the precise encoding, order, and types of your constructor arguments.
- Read the values from the
argumentsfield of the deploying entry intransactions[]ofbroadcast/<script>.s.sol/<chainId>/run-latest.json(nullwhen the constructor takes none). They are stored decoded, so ABI-encode them with cast abi-encode before passing them. --guess-constructor-argscan fail its own preflight withLocal bytecode doesn't match on-chain bytecodeeven when your local artifact and the deployed bytecode are identical. Drop--guess-constructor-argsand--rpc-url, and pass the arguments explicitly instead:
--constructor-args 0x00000000000000000000000000000000000000000000000000000000000003e8 - Read the values from the
Optimization settings differ
- The optimizer flag, the number of runs, and the EVM version all change the output bytecode. Each must match what you compiled with.
- Read them from
foundry.toml(optimizer,optimizer_runs,evm_version) or from your Hardhat config. Do not assume the form defaults match your project.
- Read them from
Flattening / import issues
- Consider using the Standard JSON verification method to avoid path or flattening issues.
Proxy and Implementation
- Verify the implementation contract and the proxy separately. Each is its own address with its own source and constructor arguments.
- A proxy's constructor arguments usually include the implementation address and the encoded initializer call. Read them from the deploy broadcast file rather than reconstructing them by hand.
If verification keeps failing, stop adjusting the form and compare inputs instead. Take the Standard JSON your tooling actually submits (forge verify-contract ... --show-standard-json-input) and check it against the build info from the deploy. The difference between those two files is the reason verification fails.
Resources
- Verify smart contracts using Blockscout or Hardhat Plugin