Virtual Testnets: Use Tenderly to Fork the Rootstock Mainnet for Development
Need a safe and efficient way to test your dApp features before deploying them on the Rootstock mainnet? Look no further than virtual testnets! These simulated blockchain environments, offered by platforms like Tenderly, provides a perfect testing ground for developers.
Imagine a clone of the Rootstock mainnet, where you can experiment freely without using real tokens. Virtual testnets mimic the behavior of a real blockchain, allowing you to deploy your dApps, interact with smart contracts, and debug transactions – all within a controlled setting.
Tenderly's virtual testing environment allows the creation of simulated networks, managing account balances, and manipulating contract storage – all without needing to interact with the Rootstock mainnet or testnet.
In this tutorial, we will do the following:
- Set up a Tenderly Account
- Setup a Virtual Test network
- Fork the Rootstock Mainnet: Create a simulated network that replicates the current state of the Rootstock mainnet.
- Integrating a project
- Easily revert to a previous network state for more controlled testing scenarios by using snapshots.
- Set account balances (native token & ERC20).
- Override contract storage
Prerequisites
- A Tenderly Account: Sign up for a free Tenderly account to access the Virtual Testnet features
- Basic familiarity with Smart Contracts.
Getting Started
Creating a Project:
- Sign up or Log in to your Tenderly account and create a new project specifically for Rootstock.
Setting up a Virtual Testnet
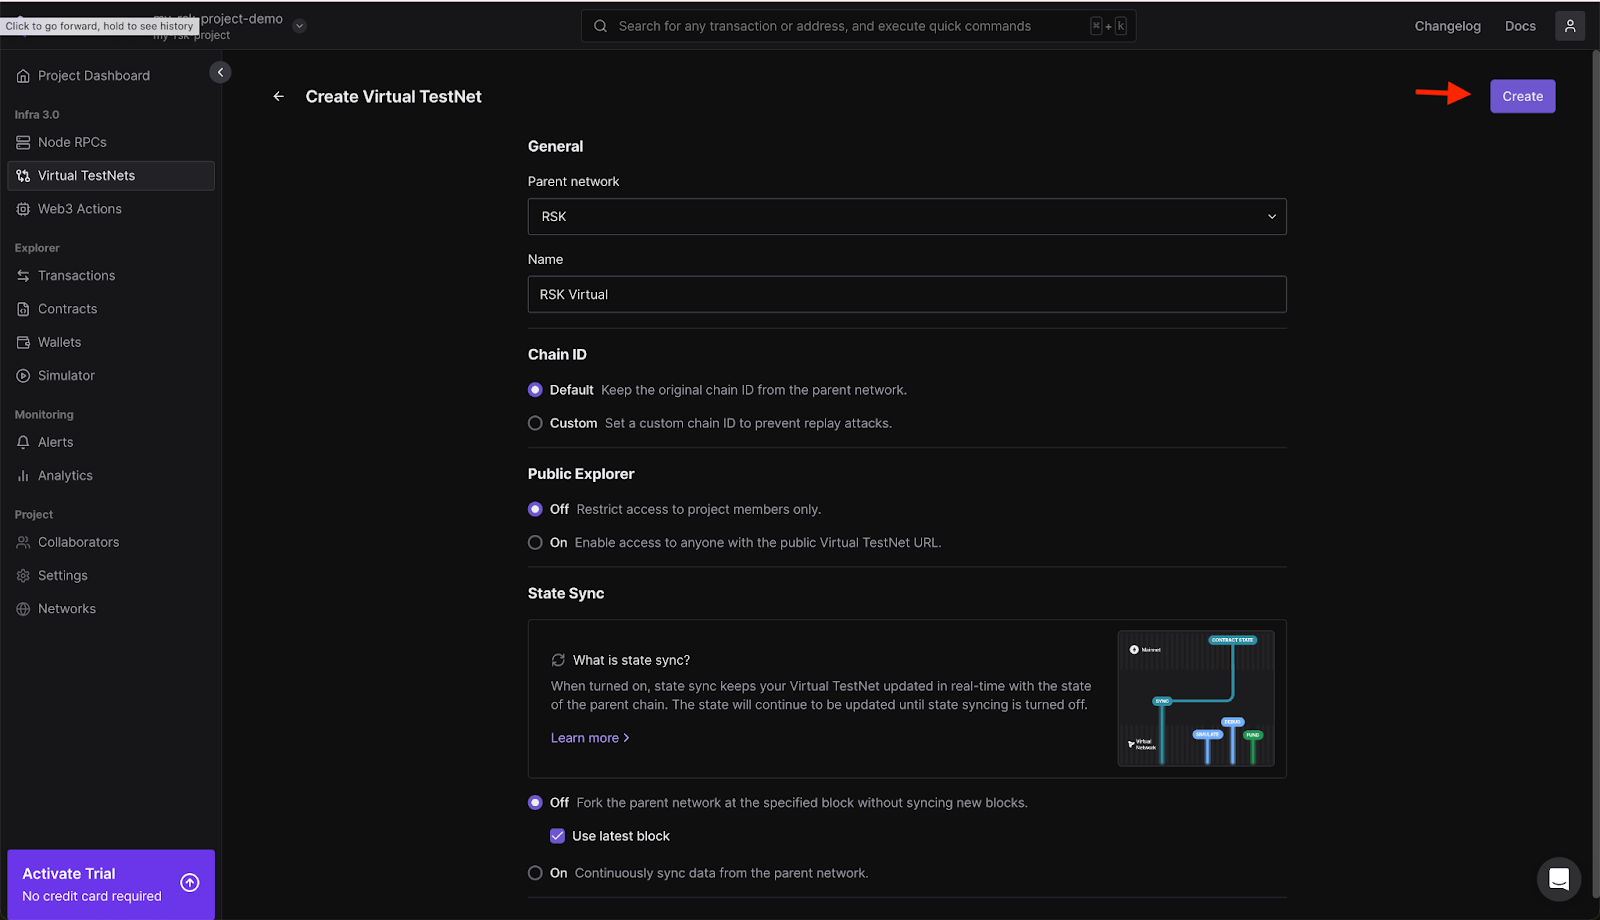
In the left navigation, choose Virtual Testnets and click on the button “Create Virtual Testnet”.
Use the configuration below to setup a virtual testnet:
- Parent network: RSK
- Network name: Any name of choice
- Chain ID: Default
- Public Explorer: Off, select use latest block.
Your setup should look like the one in the image below; Click Create.
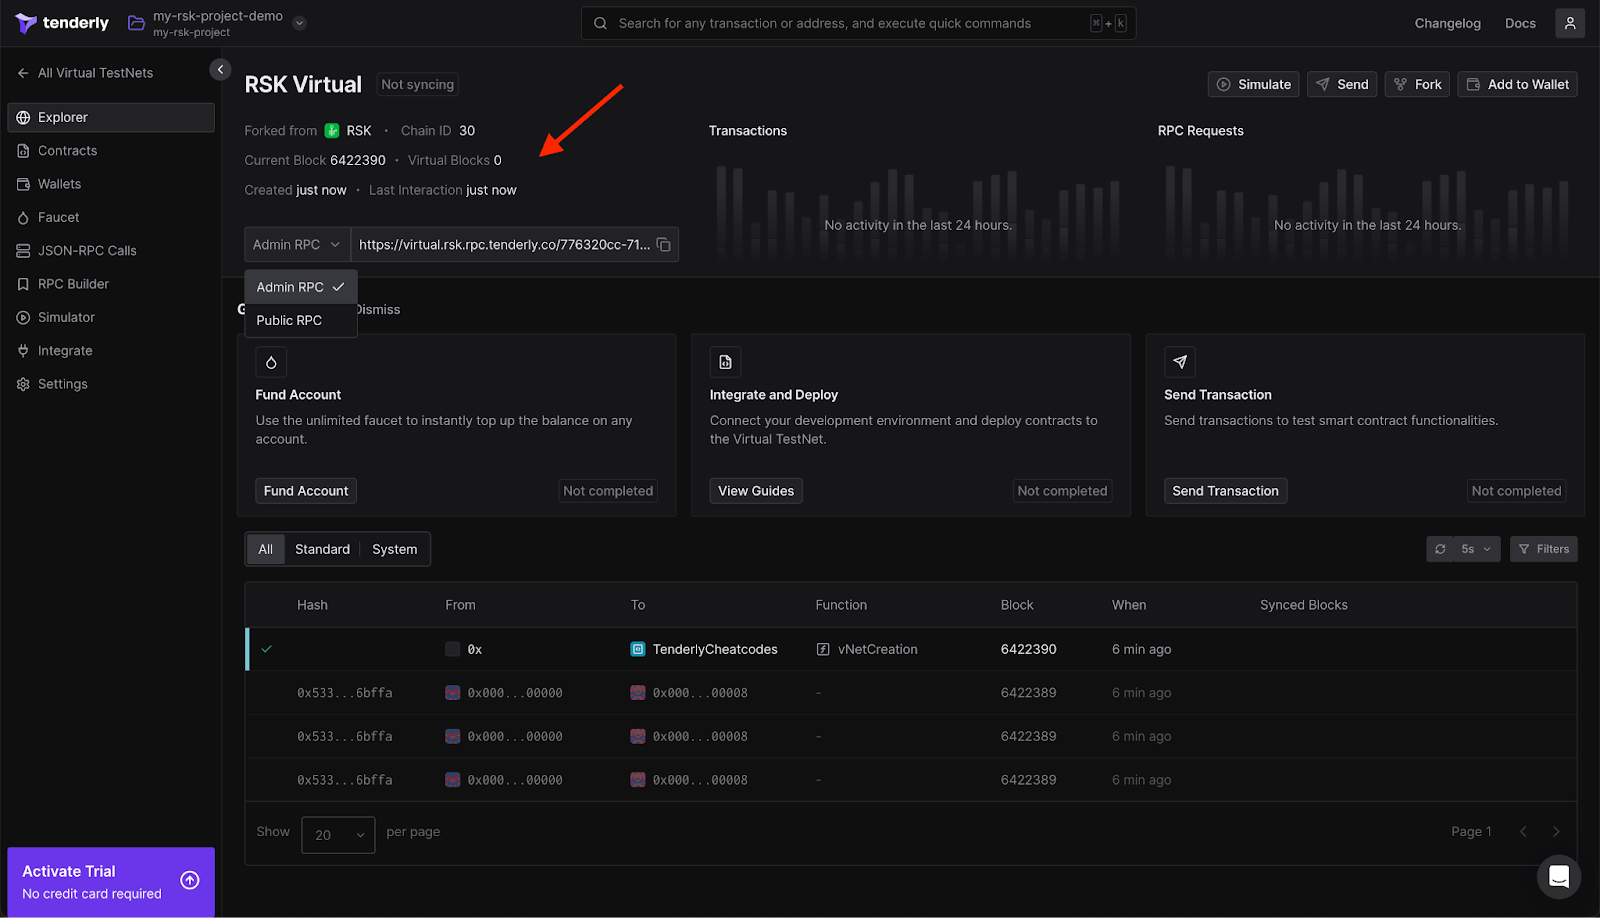
On Tenderly, there are two RPC configurations: Public RPC and Admin RPC.
- The Public RPC allows standard RCP interactions with the blockchain, such as deploying contracts and interacting with smart contracts.
- The Admin RPC enables you to modify the Testnet network state, including account balances, block numbers, and storage, to support your development requirements.
Integrate a Project
On the left menu, select Integrate to learn how to add the TestNet you just created to your project. Examples are available for Hardhat, Foundry, and other frameworks. In addition to setup examples, you'll find instructions on how to send transactions and fund accounts.
To interact with Tenderly in your Hardhat project, you will need the hardhat-tenderly package,
which you can install by running the following command:
npm i @tenderly/hardhat-tenderly
Next, import and set up Tenderly in your hardhat.config file:
import * as tdly from "@tenderly/hardhat-tenderly";
require("dotenv").config();
This will enable Tenderly's features in your Hardhat project.
Using Snapshots for Reliable Testing
Using Tenderly's admin RPC, you can capture snapshots of your testnet's current state and revert to these snapshots as needed. This feature is particularly useful when running multiple tests that modify the testnet state. By taking a snapshot before executing a test, making changes during the test, and then reverting to the snapshot afterward, you ensure that each test starts with a clean, consistent network state. This approach enhances the reliability and repeatability of your tests.
Take snapshot
To take a snapshot, add the code below;
const TENDERLY_RCP = 'https://virtual.rsk.rpc.tenderly.co/{id}

export async function takeSnapshot() {
   const requestOptions = {
       method: 'POST',
       headers: {
           'Content-Type': 'application/json'
       },
       body: JSON.stringify({
           jsonrpc: '2.0',
           method: 'evm_snapshot'
       })
   };
   const response = await fetch(TENDERLY_RCP, requestOptions);
   const snapshotId = (await response.json()).result;
   return snapshotId;
}
The function takeSnapshot creates a snapshot on an EVM network using a Tenderly RPC endpoint.
It sends a POST request with JSON RPC data and returns the snapshot ID.
Revert to snapshot
To revert to snapshot, add the code below;
export async function revertToSnapshot(snapshotId: string) {
   const requestOptions = {
       method: 'POST',
       headers: {
           'Content-Type': 'application/json'
       },
       body: JSON.stringify({
           jsonrpc: '2.0',
           method: 'evm_revert',
           params: [snapshotId]
       })
   };
   await fetch(TENDERLY_RCP, requestOptions);
}
This takes a snapshotId as a parameter and uses it to revert the EVM state to the specified snapshot. It constructs a POST request with the necessary JSON-RPC data, sends it to the Tenderly RPC endpoint, and awaits the response. Essentially, this function rolls back the EVM to a previous state captured in the snapshot.
Set account balances (native token & ERC20)
Using tenderly admin rpc, you can set both native token and any ERC20 balances for any account in the TestNet. This allows you to create the test scenarios that you need.
Set native tokens balance
export async function setNativeBalance(walletAddress: string, amount: BigInt) {
   const amountHex = ethers.toQuantity(amount.toString());
   await ethers.provider.send("tenderly_setBalance", [
       walletAddress,
       amountHex,
   ]);
}
Set ERC20 balance
To set an account balance, copy and paste the code below;
export async function setErc20Balance(erc20Address: string, walletAddress: string, amount: BigInt) {
   const amountHex = ethers.toQuantity(amount.toString());
   await ethers.provider.send("tenderly_setErc20Balance", [
       erc20Address,
       walletAddress,
       amountHex,
   ]);
}
Override the contract storage
Tenderly allows you to override smart contract storage in the TestNet, but we need to know the memory slot of the storage variable we want to modify. For value type variables like address or integer, we can just count the position of the variable in the contract.
pragma solidity ^0.8.0;
contract SimpleStorage {
   uint256 public value1; // Stored at slot 0
   uint256 public value2; // Stored at slot 1


   function setValues(uint256 _value1, uint256 _value2) public {
       value1 = _value1;
       value2 = _value2;
   }
}
Once you have identified the slot you need to modify, you can set a new value for that slot. Remember to convert the value to 32 bytes, as this is the memory size of a storage slot.
async function overrideContractStorage() {
   // where to override
   let storageSlot = 4;
   const abiCoder = new ethers.AbiCoder();
   const storageSlot32Bytes = abiCoder.encode(["uint256"], [storageSlot]);


   // what to override
   const newValue = 2;
   const newValue32Bytes = abiCoder.encode(["uint256"], [newValue]);


   // override
   await ethers.provider.send("tenderly_setStorageAt", [
       addresses.oldMultisig,
       storageSlot32Bytes,
       newValue32Bytes,
   ]);
}
For reference types like dynamic arrays, we need to follow the principles outlined in the "Layout of State Variables in Storage" to find the storage slot. Another more empirical approach is to read your contract's storage slot by slot to identify the variables stored in each slot, using for example the ethers method getStorageAt.
...and that’s it, in this guide, we have successfully created a project, setup a Virtual Testnet, forked the Rootstock Mainnet by creating a simulated network that replicates the current state of the Rootstock mainnet. Learned how to integrate an existing project, leverage Snapshots, take snapshots, revert snapshot, set account balances (native token & ERC20), and override the contract storage.