Build a Token-Gated NFT Minting dApp with Thirdweb and RootstockCollective
In this guide, we’ll build a token-gated platform using Thirdweb and RootstockCollective, this dApp will enable members of the platform to mint unique collectibles based on the amount of stRIF tokens they hold. We will learn how to integrate Web3 wallets authentication, use Thirdweb to mint NFT drops, verify token balances, and enable NFT minting.
This guide will also demonstrate how token ownership can be used to control access. We’ll use stRIF, the governance token of the RootstockCollective, to determine which NFTs users can mint. Holding stRIF will enable members to mint unique collectibles based on the amount of stRIF tokens they hold, they will be granted access to mint two ERC-721 collections: Rooties (Level 1) and Legends (Level 2). This ensures that only engaged community members can participate, creating an exclusive and verifiable experience.
What we’ll cover
- Understanding Tokenization and Token-gating
- Set up the development environment
- Implement Web3 authentication with Sign-In With Ethereum (SIWE) using Thirdweb Auth.
- Create a token-gating mechanism to verify ERC-20 (stRIF) balances using Thirdweb.
- Create and Mint NFT drops using Thirdweb platform
- Deploy smart contracts for stRIF, Rooties (ERC-721), and Legends (ERC-721).
- Integrate NFT minting functionality using Thirdweb’s prebuilt React components.
- Implement conditional media rendering based on token ownership and levels.
Prerequisites
- Node v18+
- Bun package manager
bun install - MetaMask or a compatible Web3 wallet
- Thirdweb account. Create an account.
Bun is used in this article but you could use your preferred package manager.
Understanding Tokenization & Token-Gating
Tokenization refers to the process of converting real-world assets into digital tokens on a blockchain. These tokens can represent anything of value—real estate, art, commodities, or even financial instruments—and make them tradable, divisible, and accessible globally.
Token-Gating leverages this by granting exclusive access based on token ownership, it provides a way to restrict access based on a user’s token holdings, ensuring that only eligible users can interact with certain features or content. This method, common in dApps, governance (DAOs) and NFT platforms, enables communities to reward loyalty and manage privileges transparently. Token-gating moves access control from central authorities to on-chain proof of ownership, linking digital asset value to real-world utility.
RootstockCollective, or The Collective, is a DAO (Decentralized Autonomous Organization) designed to develop the Rootstock ecosystem by empowering and rewarding builders and users of Rootstock, and RIF token holders. Members of the RootstockCollective gain access exclusive voting rights and participation in the DAO’s governance and decision-making process on Rootstock.
Thirdweb’s pre-built contracts to avoid writing the smart contracts from scratch, this makes the deployment fast and hassle-free. These contracts are fully compatible with Rootstock and allows us focus on configuring the logic of the platform rather than low-level implementation details. This guide will show how to use the Thirdweb SDK to handle key actions like connecting wallets, check token holdings, and mint NFTs. We’ll also use Thirdweb’s UI components to manage media rendering and user interactions with transactions on Rootstock.
Getting Started
Clone the RootstockCollective rewards sample repository and open in code editor.
git clone https://github.com/rsksmart/rootstock-collective-rewards.git
Create a Project on Thirdweb
Visit the Thirdweb dashboard to sign up and create your project, set up authentication and generate the required Client ID and Secret Key.
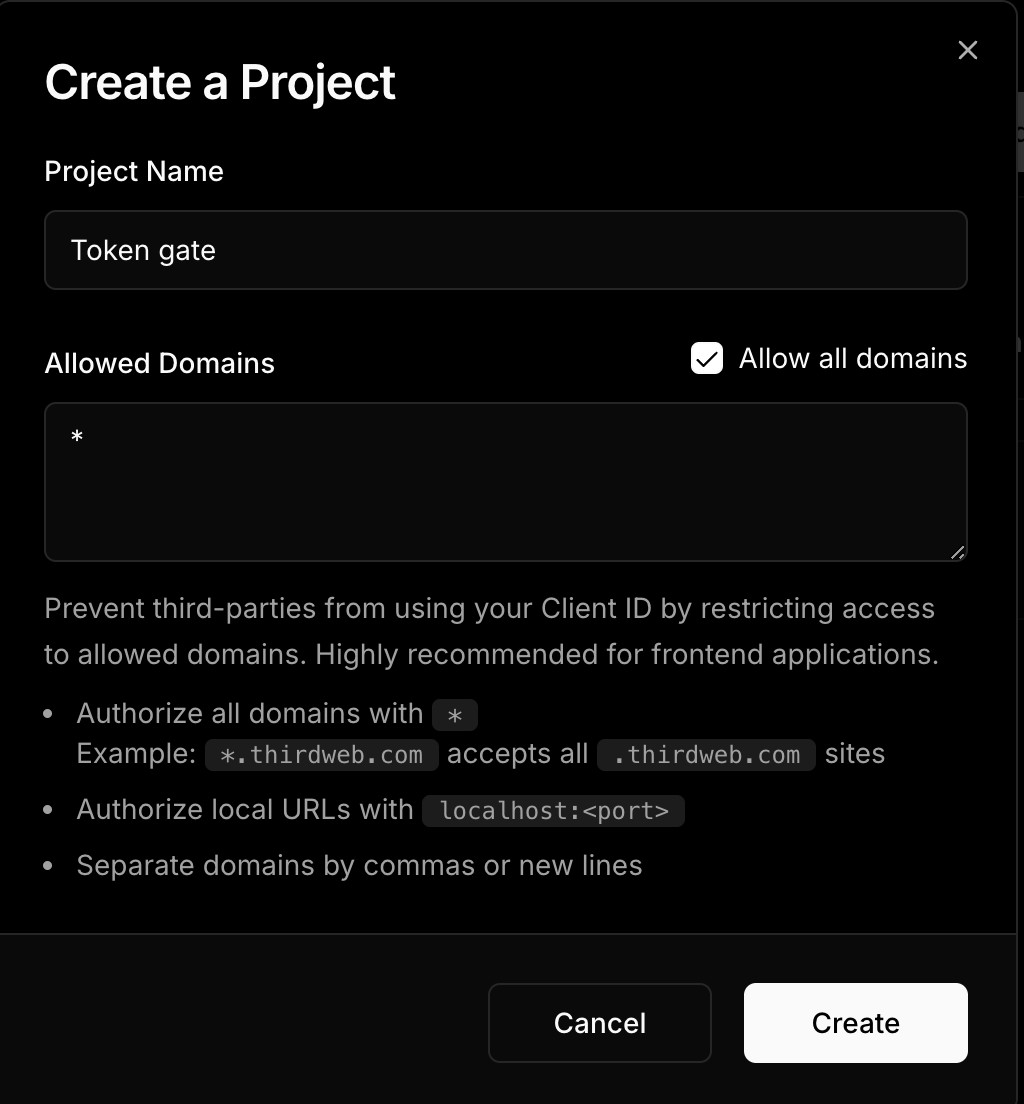
Once signed in, navigate to "Create Project" and add a project name and allow domains.

For this mock project, you will need to allow all domains since requests will be made through localhost. In the future, you can restrict access to only your app’s domain.
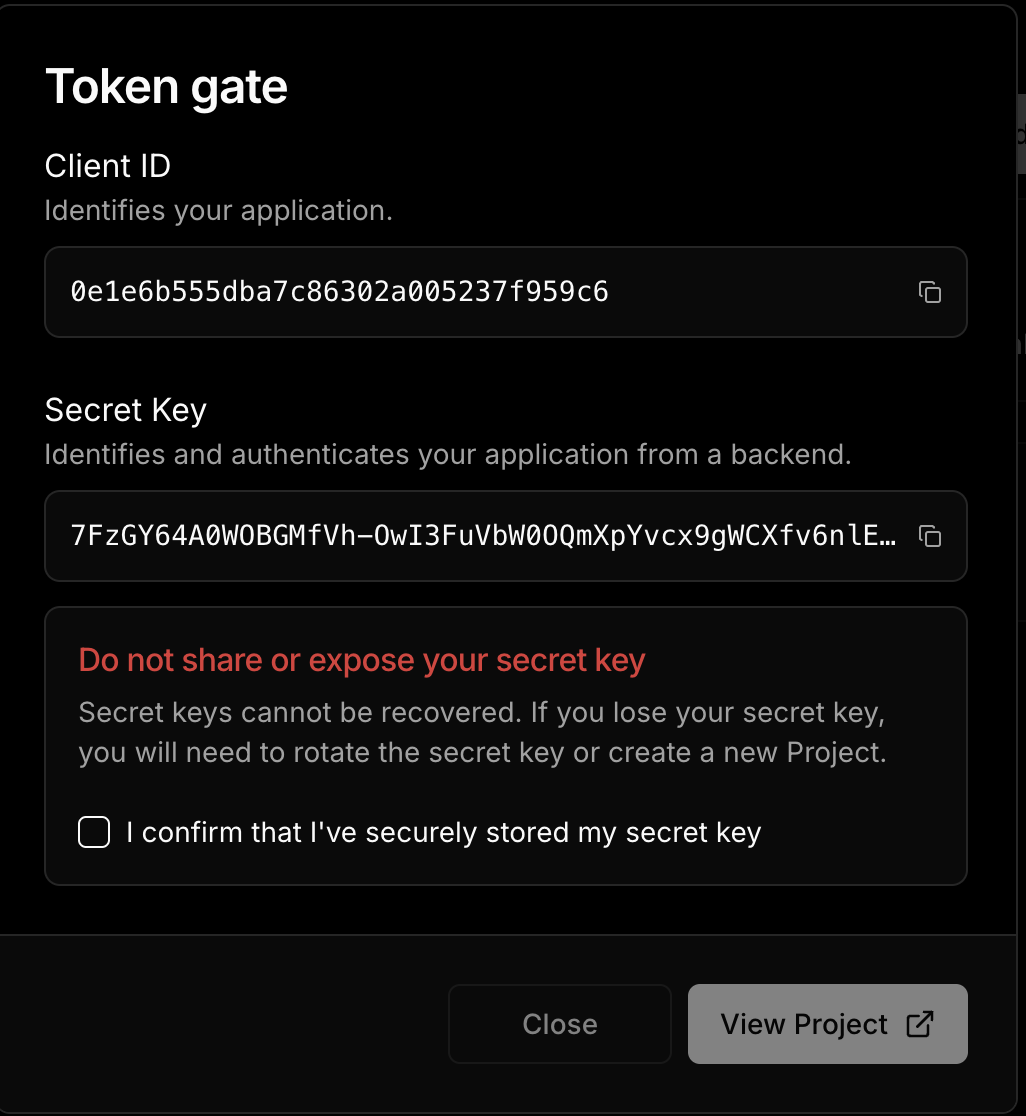
Now you will be able to able to copy the necessary credentials for this project, note the admin wallet could be any wallet, including metamask or others.
Add Environment Variables
# Required: Client ID from thirdweb dashboard
# Get it from: https://thirdweb.com/dashboard/
NEXT_PUBLIC_TEMPLATE_CLIENT_ID=your_client_id_here

# Required: Secret key for server-side operations
# Get it from: https://thirdweb.com/dashboard/
# WARNING: Never expose this in client-side code or commit to version control
THIRDWEB_SECRET_KEY=your_secret_key_here

# Required: Domain for authentication
# Format: hostname:port
# Use localhost:3000 for local development
# Use your actual domain in production (e.g., myapp.com)
NEXT_PUBLIC_THIRDWEB_AUTH_DOMAIN=localhost:3000

# Required: Private key of the admin wallet
# Get it from: Your wallet's export private key option
# WARNING: Keep this secure and never share or commit this
# Used for: Contract deployments, admin operations
THIRDWEB_ADMIN_PRIVATE_KEY=your_private_key_here
Run the Project
To run the project, rename .env.example to .env.local and configure the required credentials. This includes getting a Client ID from the Thirdweb dashboard for authentication, a Secret Key for secure server-side operations, an Authentication Domain to define where logins are processed, and an Web3 Wallet Private Key for deploying contracts and managing admin tasks. Use process.env in Next.js to safely access these variables within your application.
To run the project:
bun run dev
Implement Web3 authentication
Web3 authentication allows users to verify their identity by signing a unique message with their wallet. This replaces traditional passwords with cryptographic signatures, ensuring secure and decentralized authentication. We’ll set this up using Thirdweb’s authentication tools in Next.js.
I. Set up Auth
Locate the file in src/app/utils/thirdwebAuth.ts, this file initializes createAuth, defining the authentication domain and linking the admin wallet using a private key stored in environment variables. This setup ensures secure handling of authentication requests.
// /src/app/utils/thirdwebAuth.ts
import { createAuth } from "thirdweb/auth";
import { privateKeyToAccount } from "thirdweb/wallets";
import { client } from "./client";

const privateKey = process.env.THIRDWEB_ADMIN_PRIVATE_KEY || "";

if (!privateKey) {
  throw new Error("Missing THIRDWEB_ADMIN_PRIVATE_KEY in .env file.");
}

export const thirdwebAuth = createAuth({
  domain: process.env.NEXT_PUBLIC_THIRDWEB_AUTH_DOMAIN || "",
  adminAccount: privateKeyToAccount({ client, privateKey }),
});
II. Define Auth Logic
Define the authentication logic in src/app/actions/auth.ts.
generatePayload: Creates a signable message for authentication.login: Verifies the signed message and stores a session token (JWT) in cookies.isLoggedIn: Checks if the user has a valid session.logout: Clears the session, this logs the user out.
By keeping these operations on the server, we ensure that sensitive data like authentication tokens remain secure.
// src/app/actions/auth.ts

"use server";
import { VerifyLoginPayloadParams } from "thirdweb/auth";
import { cookies } from "next/headers";
import { thirdwebAuth } from "../utils/thirdwebAuth";

export const generatePayload = thirdwebAuth.generatePayload;

export async function login(payload: VerifyLoginPayloadParams) {
  const verifiedPayload = await thirdwebAuth.verifyPayload(payload);
  if (verifiedPayload.valid) {
    const jwt = await thirdwebAuth.generateJWT({
      payload: verifiedPayload.payload,
    });
    cookies().set("jwt", jwt);
  }
}

export async function isLoggedIn() {
  const jwt = cookies().get("jwt");
  if (!jwt?.value) {
    return false;
  }

  const authResult = await thirdwebAuth.verifyJWT({ jwt: jwt.value });
  if (!authResult.valid) {
    return false;
  }
  return true;
}

export async function logout() {
  cookies().delete("jwt");
}
III. Connect Auth to Frontend
Connect the authentication to the frontend in src/app/components/LoginButton.tsx.
This component extends Thirdweb’s ConnectButton to handle authentication. It automatically connects wallets and checks session status, ensuring users stay logged in without needing to sign in repeatedly. The button manages login, logout, and verifies if a user is authenticated based on their wallet signature.
// /src/app/components/LoginButton.tsx

"use client";

import { ConnectButton } from "thirdweb/react";
import { client } from "../utils/client";
import { generatePayload, isLoggedIn, login, logout } from "../actions/auth";
import { rootstockTestnet } from "../utils/consts";

export const LoginButton = () => {
  return (
    <ConnectButton
      autoConnect={true}
      client={client}
      chain ={rootstockTestnet}
      auth={{
        isLoggedIn: async (address) => {
          return await isLoggedIn();
        },
        doLogin: async (params) => {
          await login(params);
        },
        getLoginPayload: async ({ address }) => generatePayload({ address }),
        doLogout: async () => {
          await logout();
        },
      }}
    />
  );
};
Create an action to verify the balance of an ERC20 as a gate for the app
We will use Thirdweb’s ERC-20 extension, which provides built-in methods for interacting with token contracts. The hasAccess function utilizes the balanceOf method from this extension to fetch a wallet’s stRIF balance. It then returns two key values: the exact token amount and whether the user qualifies as a member.
This function checks if a user's wallet address holds any stRIF tokens. It retrieves the token balance for the given address. It then returns an object indicating both the token amount and whether the user is considered a "member" (has access) based on having a positive balance.
// /src/app/actions/gate.ts.
import { stRIF } from "../utils/consts";
import { balanceOf } from "thirdweb/extensions/erc20";

/**
 * Checks if the given address has access to the exclusive content.
 * @param address - The user's wallet address.
 * @returns An object containing the `isMember` status and the `amount` of tokens.
 */
export default async function hasAccess(address: string): Promise<{ isMember: boolean; amount: bigint }> {
  const balance = await balanceOf({
    contract: stRIF,
    address: address,
  });
  return {
    amount: balance,
    isMember: balance > 0,
  };
}
Deploying the Governance Tokens for the RootstockCollective using Thirdweb
To deploy the example governance tokens on the RootstockCollective DAO, we need three essential token collections:
- A governance token (stRIF)
- Two NFT tiers (Rooties and Legend NFT drops)
The RootstockCollective Token - stRIF is the DAO’s governance token, it's the RIF Token staked in the Collective, granting members exclusive voting rights and participation in the DAO’s governance and decision-making process on Rootstock. To join RootstockCollective, you need to have RIF tokens, and stake them into the Collective. For more information on how to join the RootstockCollective as a Builder and access grants and rewards, read the Collective Rewards: How to Become a Builder.
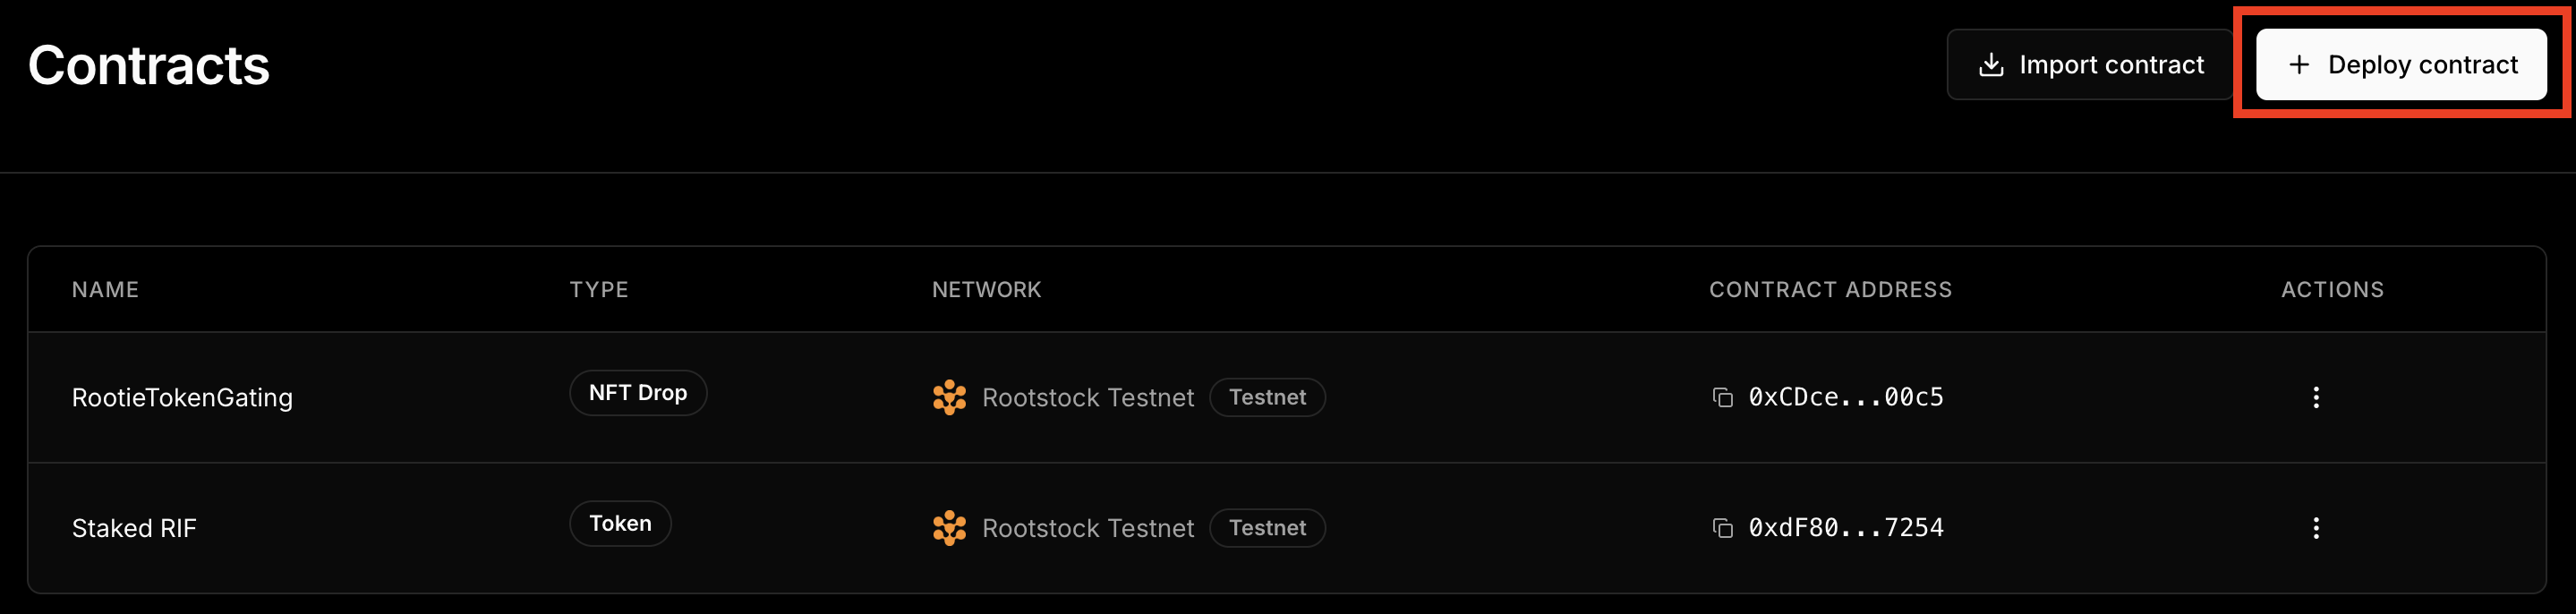
To deploy the governance token, navigate to the Contracts section on the Thirdweb Dashboard.
📍 stRIF Mock Token Contract Address: 0xdF80......7254:
- This is the mock stRIF governance token used in this guide. It will be created and deployed using Thirdweb.
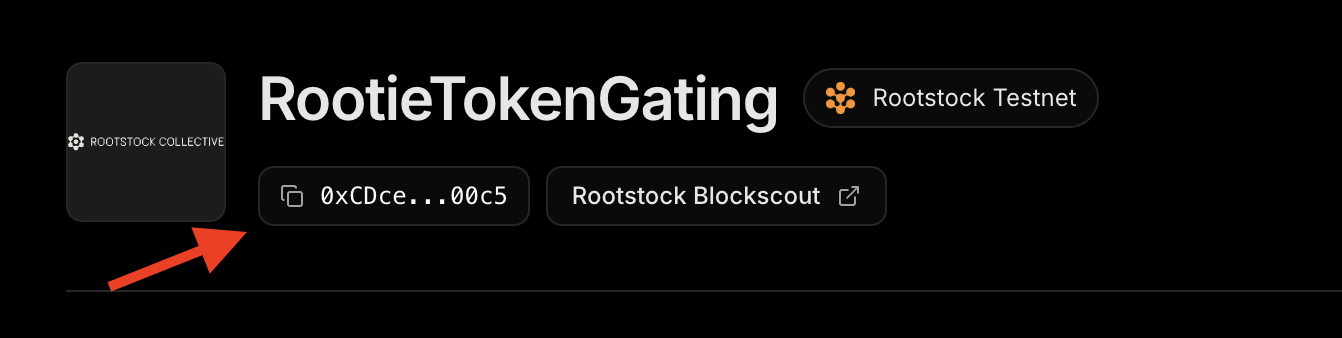
📍 RootieTokenGating Contract Address: 0xCDce......00c5:
- The Rootie Collection is the first membership tier, allowing users to join the DAO and access basic benefits. It’s the gateway to becoming an active participant.
📍 LegendTokenGating Contract Address: 0xe2F5......cD49:
- The Legend Collection is reserved for top contributors, granting advanced perks and exclusive rights within the DAO. Think of it as a badge of honor for high-impact members.
With Thirdweb’s contract tools, we skip the complexity of manual deployment and focus on building. Now, let’s take a look at how these tokens fit into our broader platform architecture.
Click on Deploy Contracts.
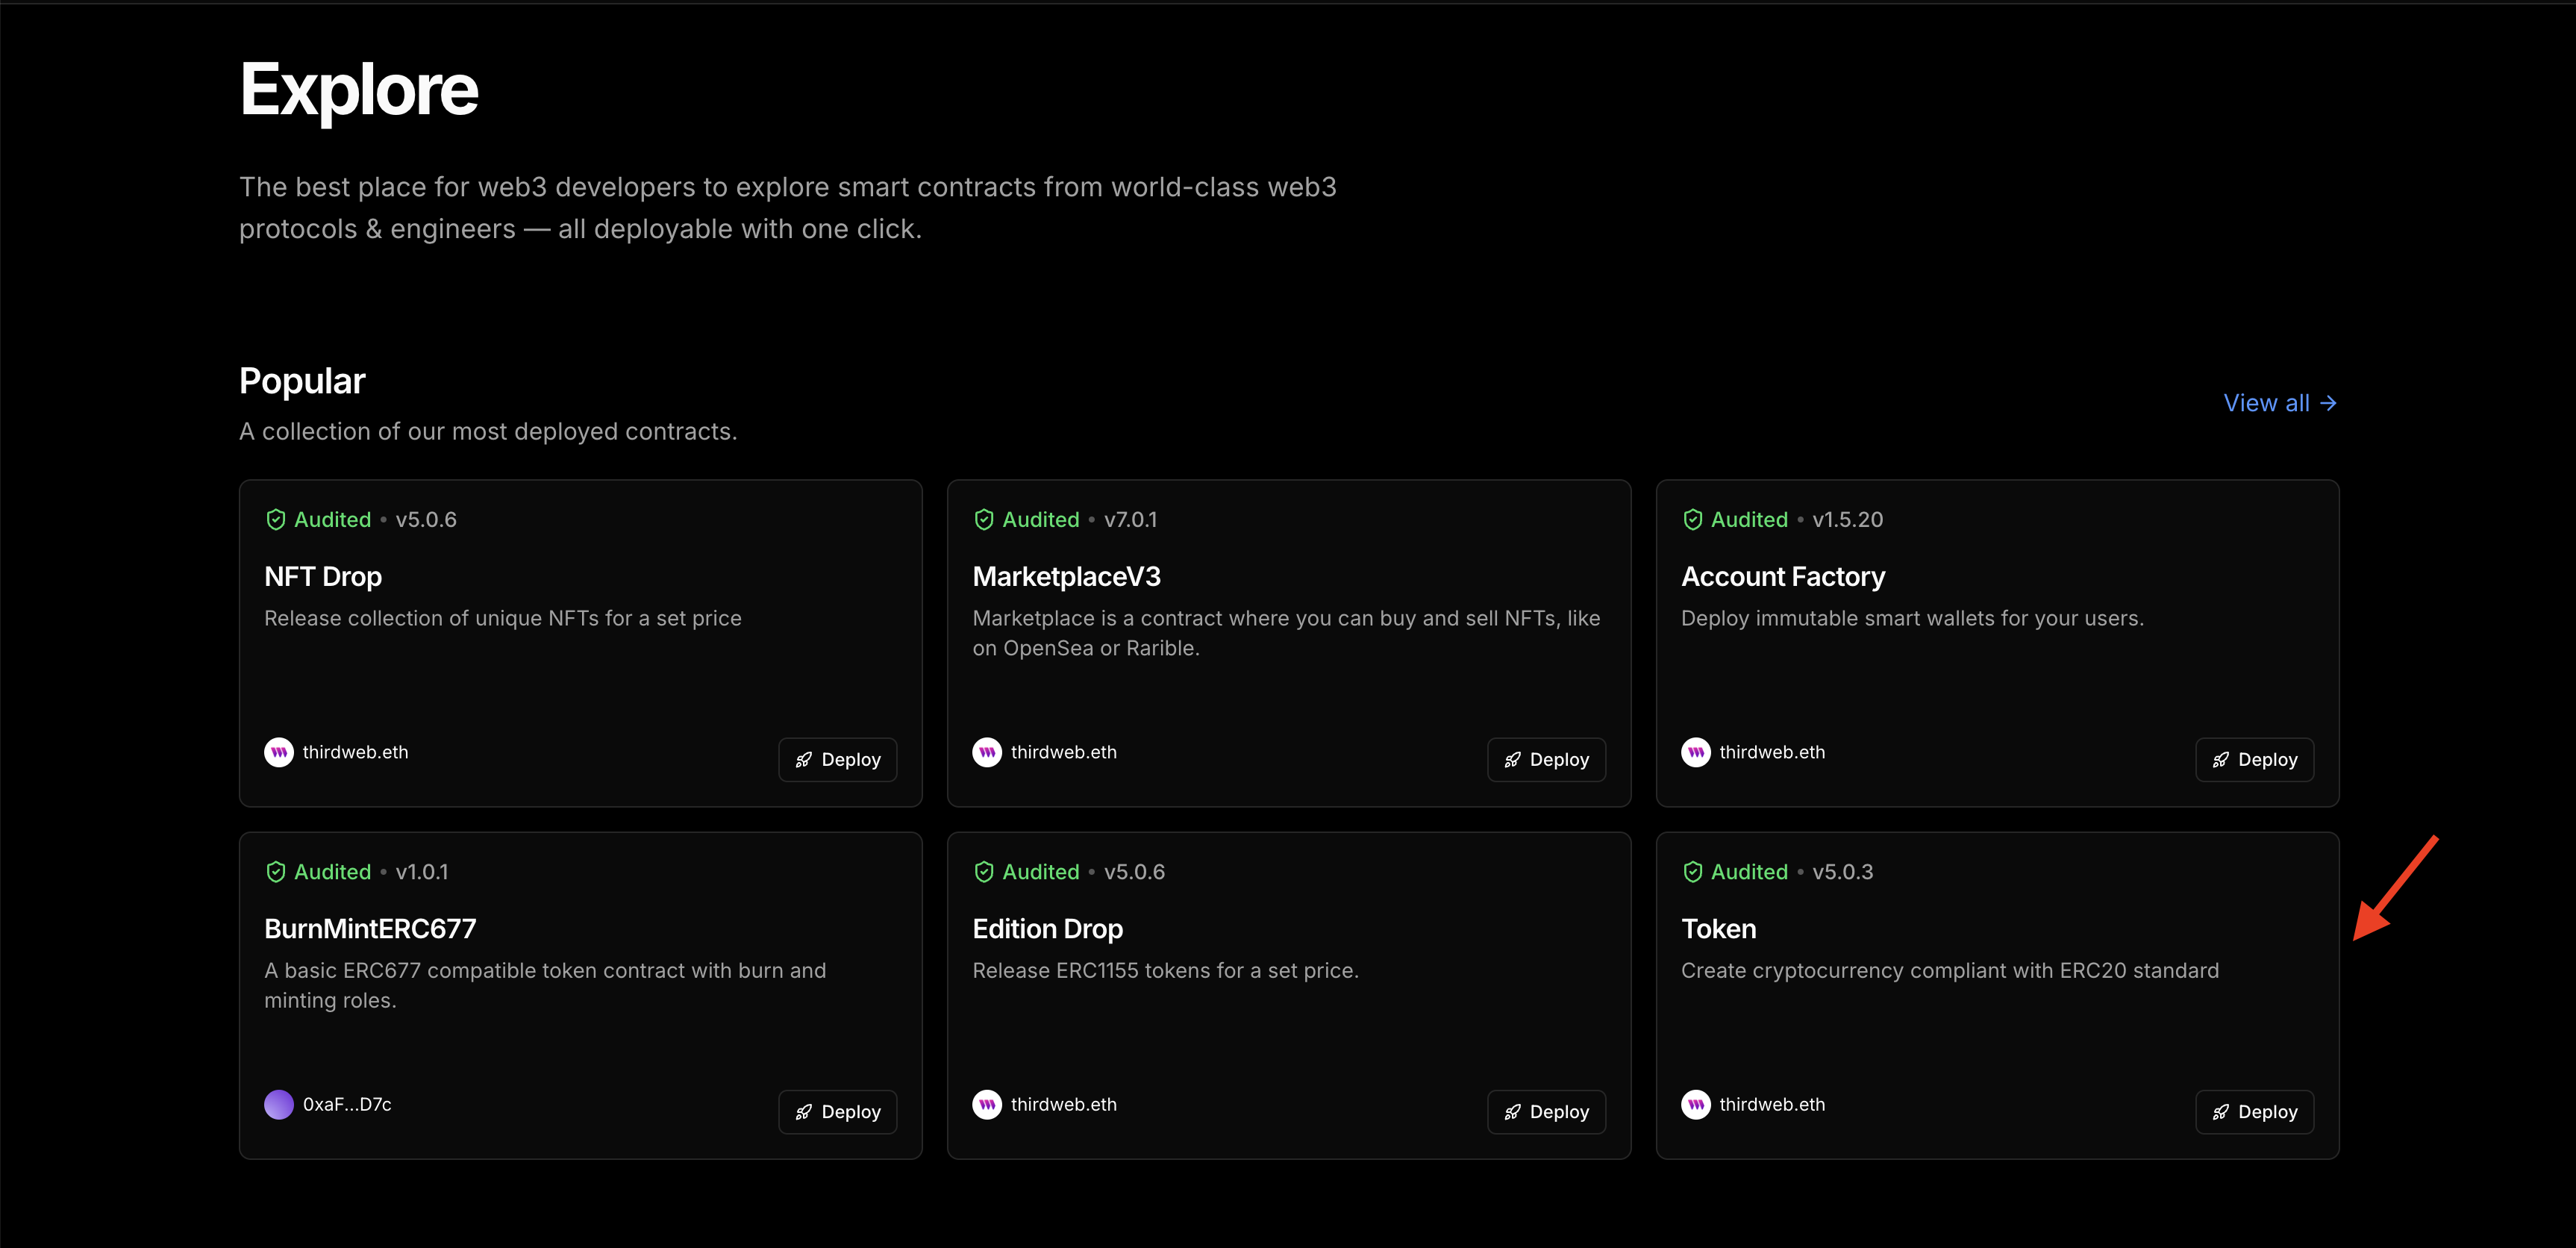
Choose the Token Contract.
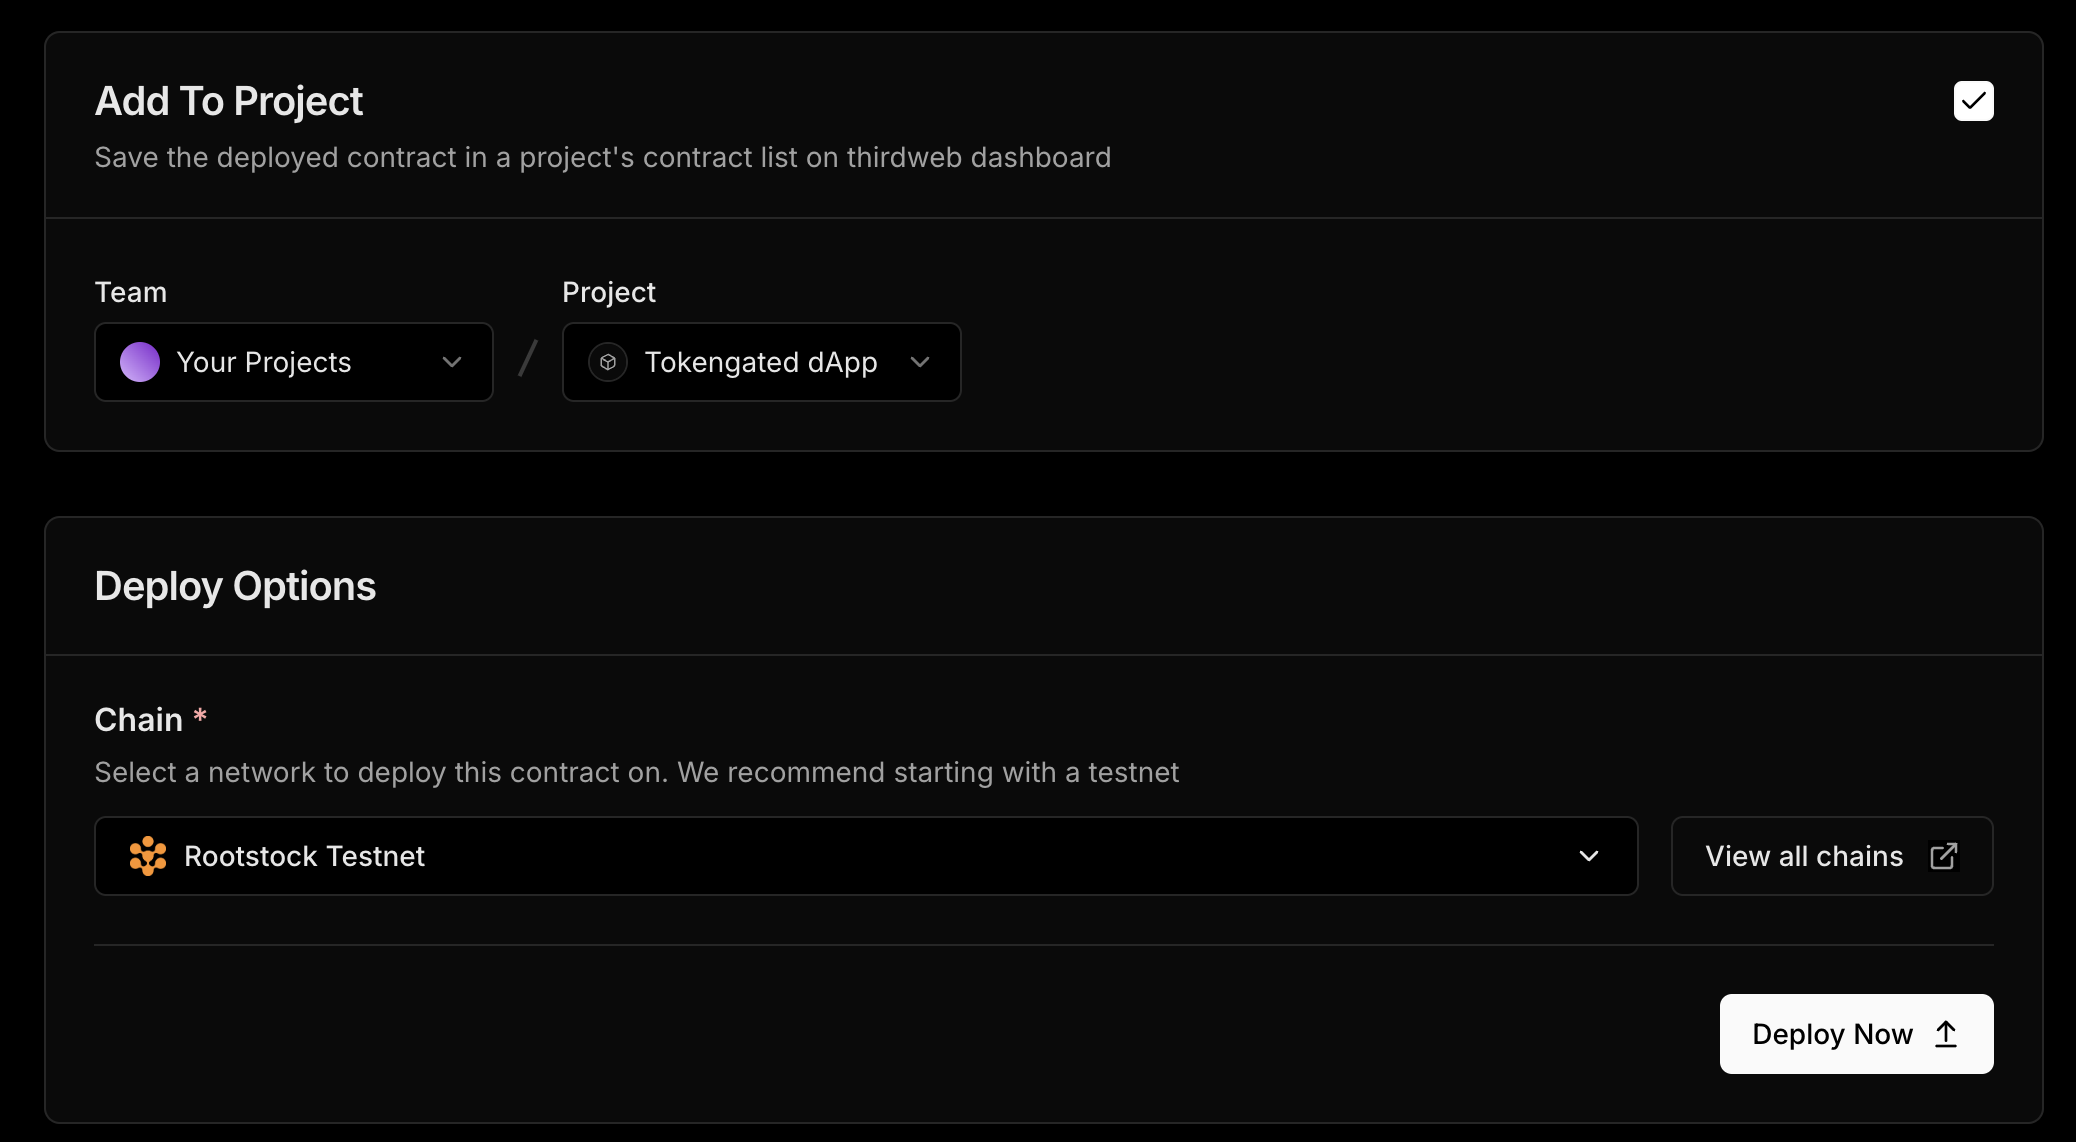
Enter a name, symbol, image and description for your governance token. On the Add Project section, ensure you’re adding the token to the right project and choose the as Rootstock Testnet. Click on Deploy Now and confirm the transaction in your wallet. Click on View Contract.
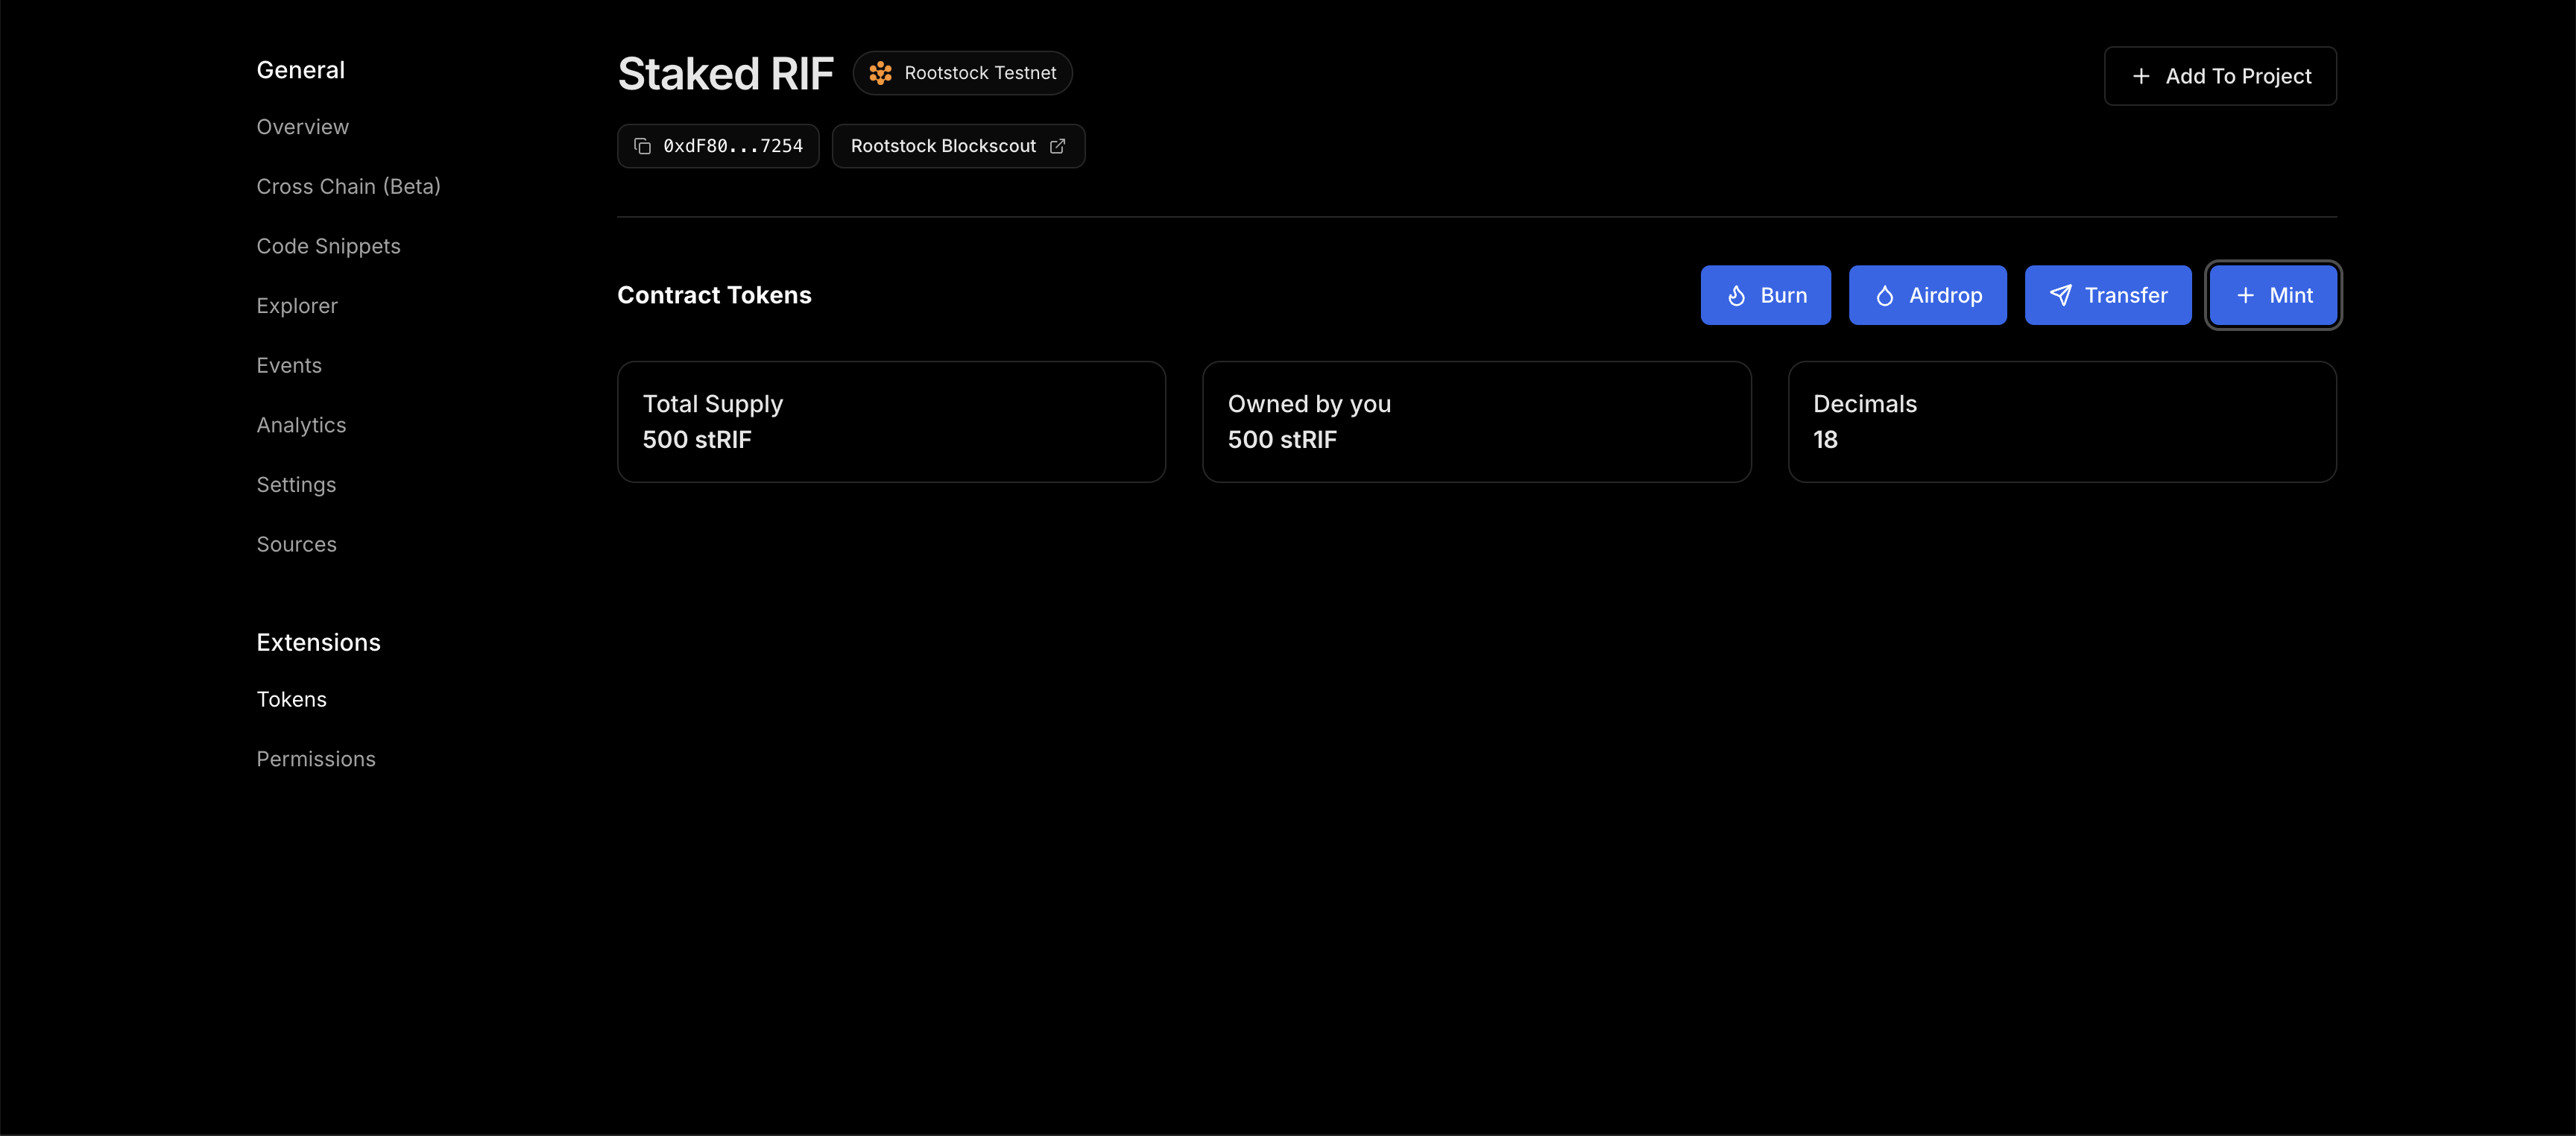
We need to configure our Staked RIF governance token and set an additional supply amount. To do this, go to Extensions —> Tokens —> Mint —> Set additional supply amount (500) —> Mint Tokens. Approve the transaction in your wallet.
You can now view the amount of minted Staked RIF tokens on your dashboard.
Create and Deploy the NFT Drop Contracts
Now, we need to deploy the ERC721 NFT Drop contracts to allow for NFT minting. We will do the following steps:
- Create and Deploy the NFT Drop Contract
- Upload a custom NFT to the deployed contract
- Set claim conditions
- Mint the NFT
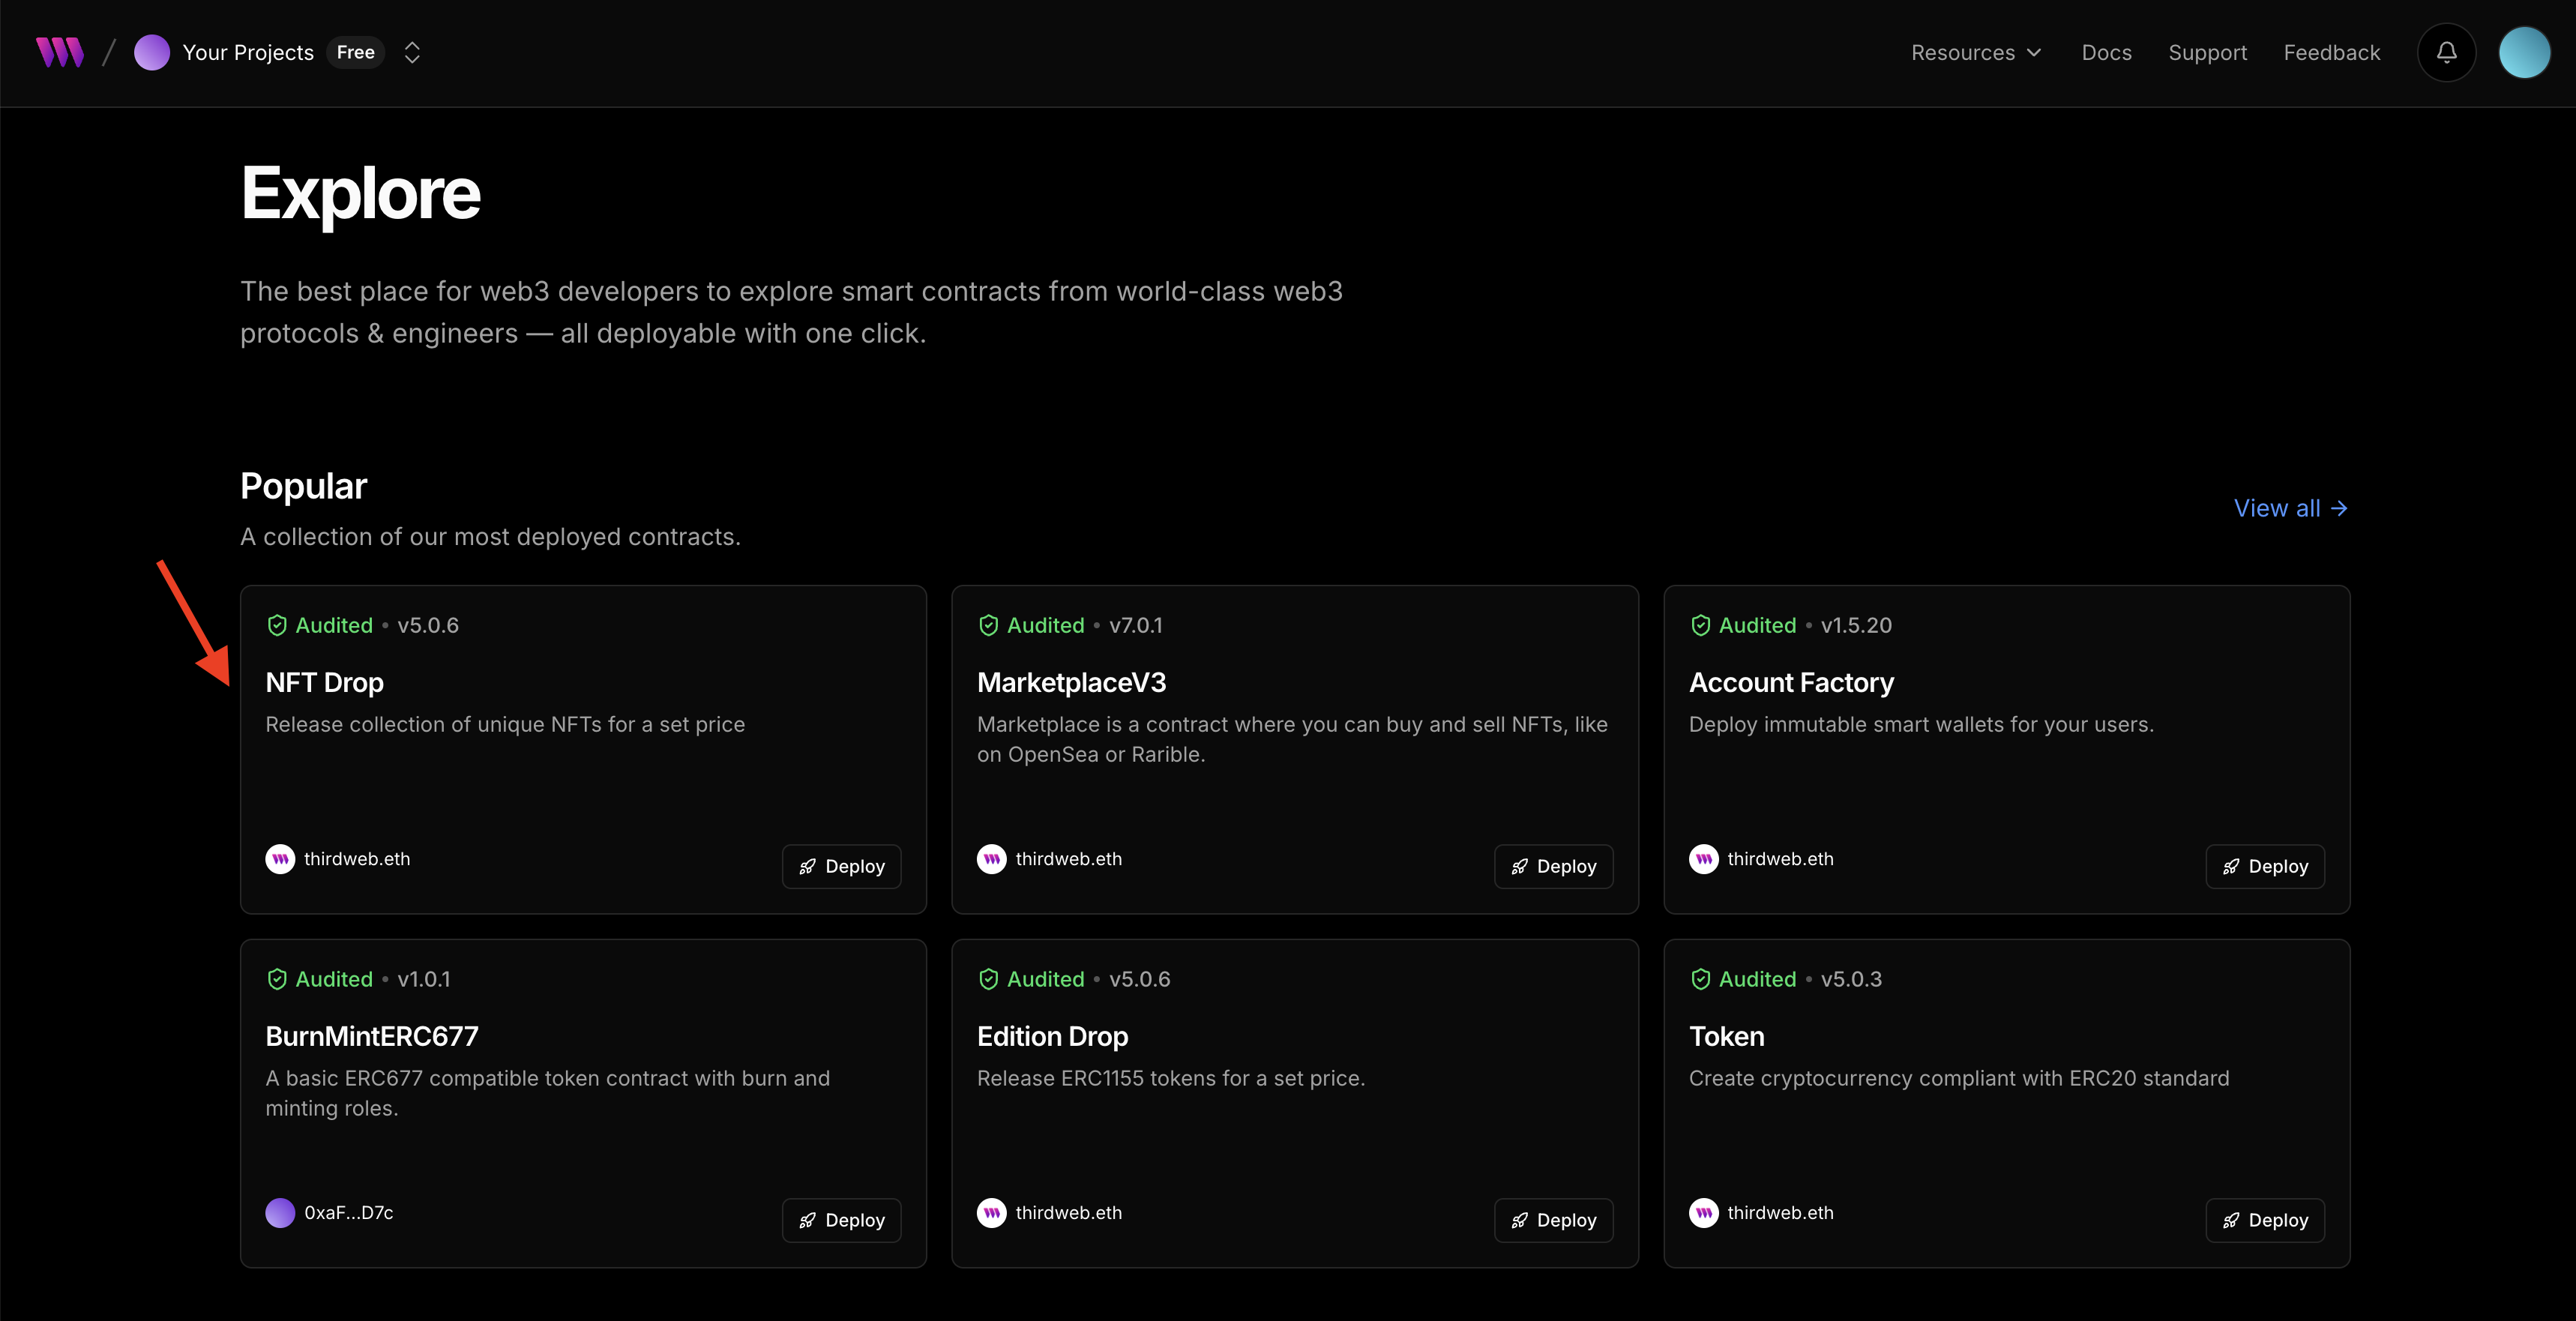
Choose the NFT drop contract in explore section and click Deploy Now.
Configure the NFT Drop contract metadata
Enter a name, symbol, image and description of your NFT, scroll down the page to ensure that the contract is deployed to the right project and network. Once confirmed, click Deploy Contract and confirm the transaction in your wallet. Click to view the RootieTokenGating NFT.
Upload custom NFT
Go to the NFT tab under extensions and click on single upload to upload the Legend NFT. You can set a name, description, attributes, and other advanced configurations. Click on Lazy Mint NFT.
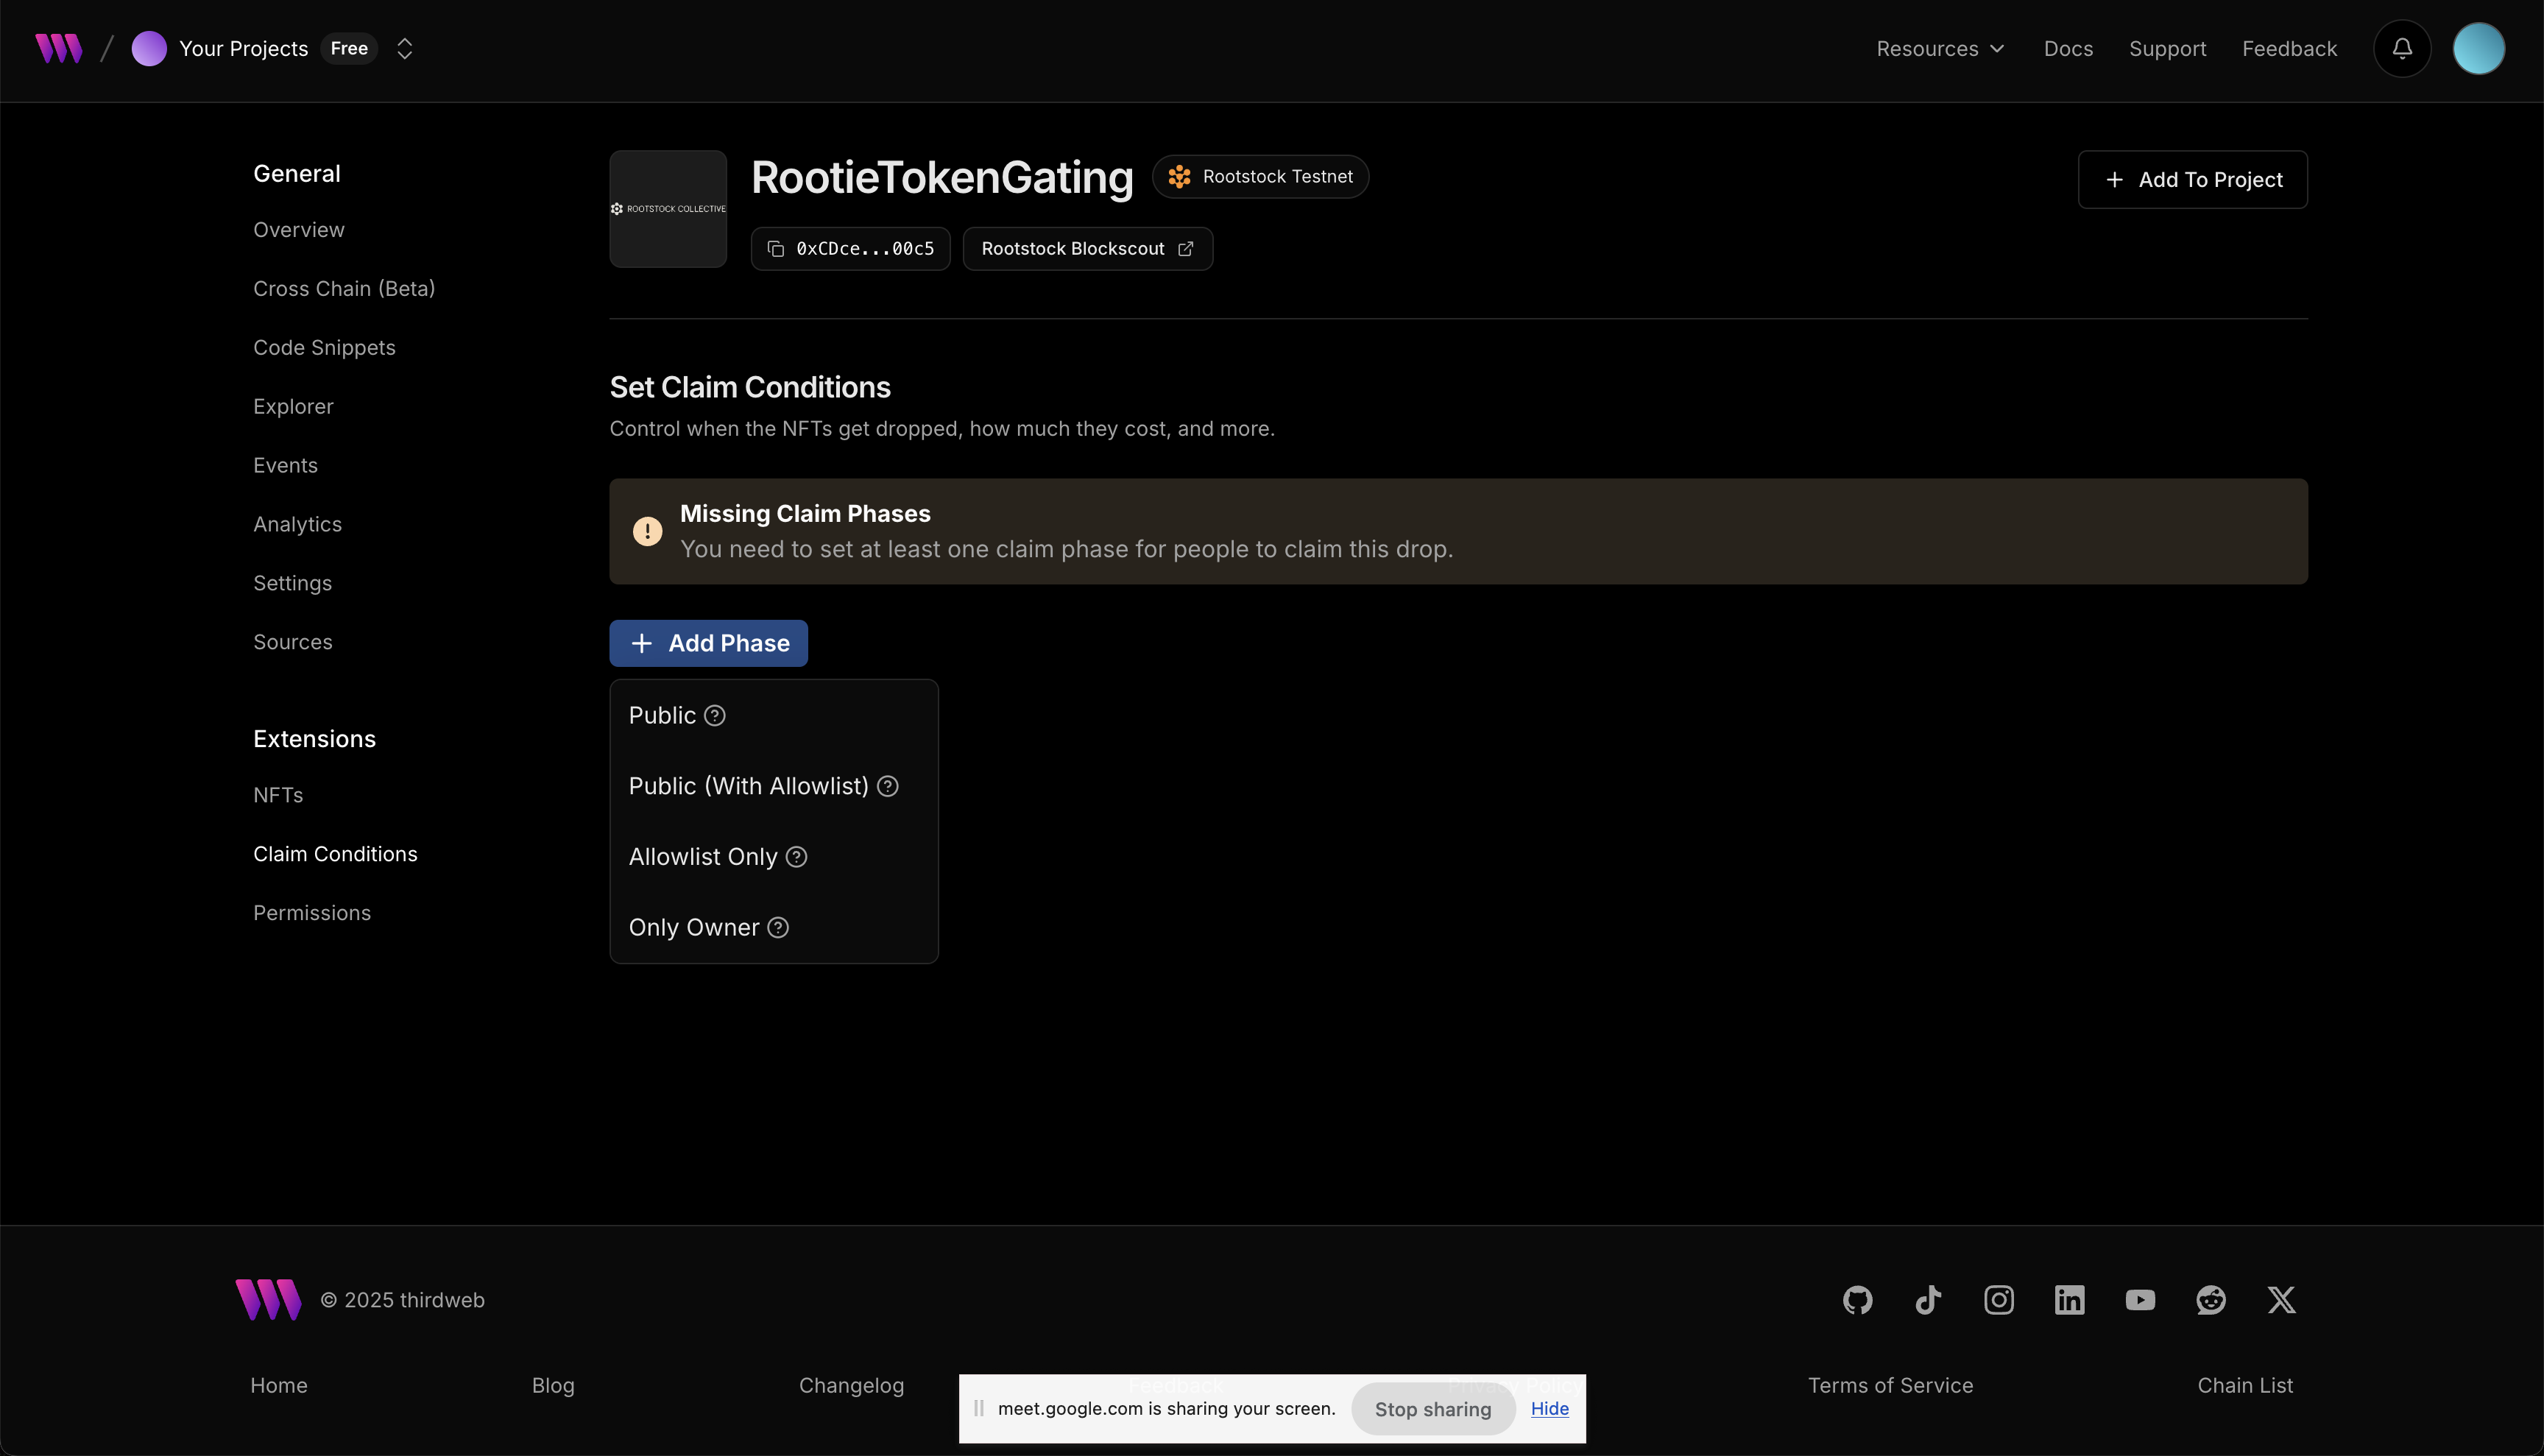
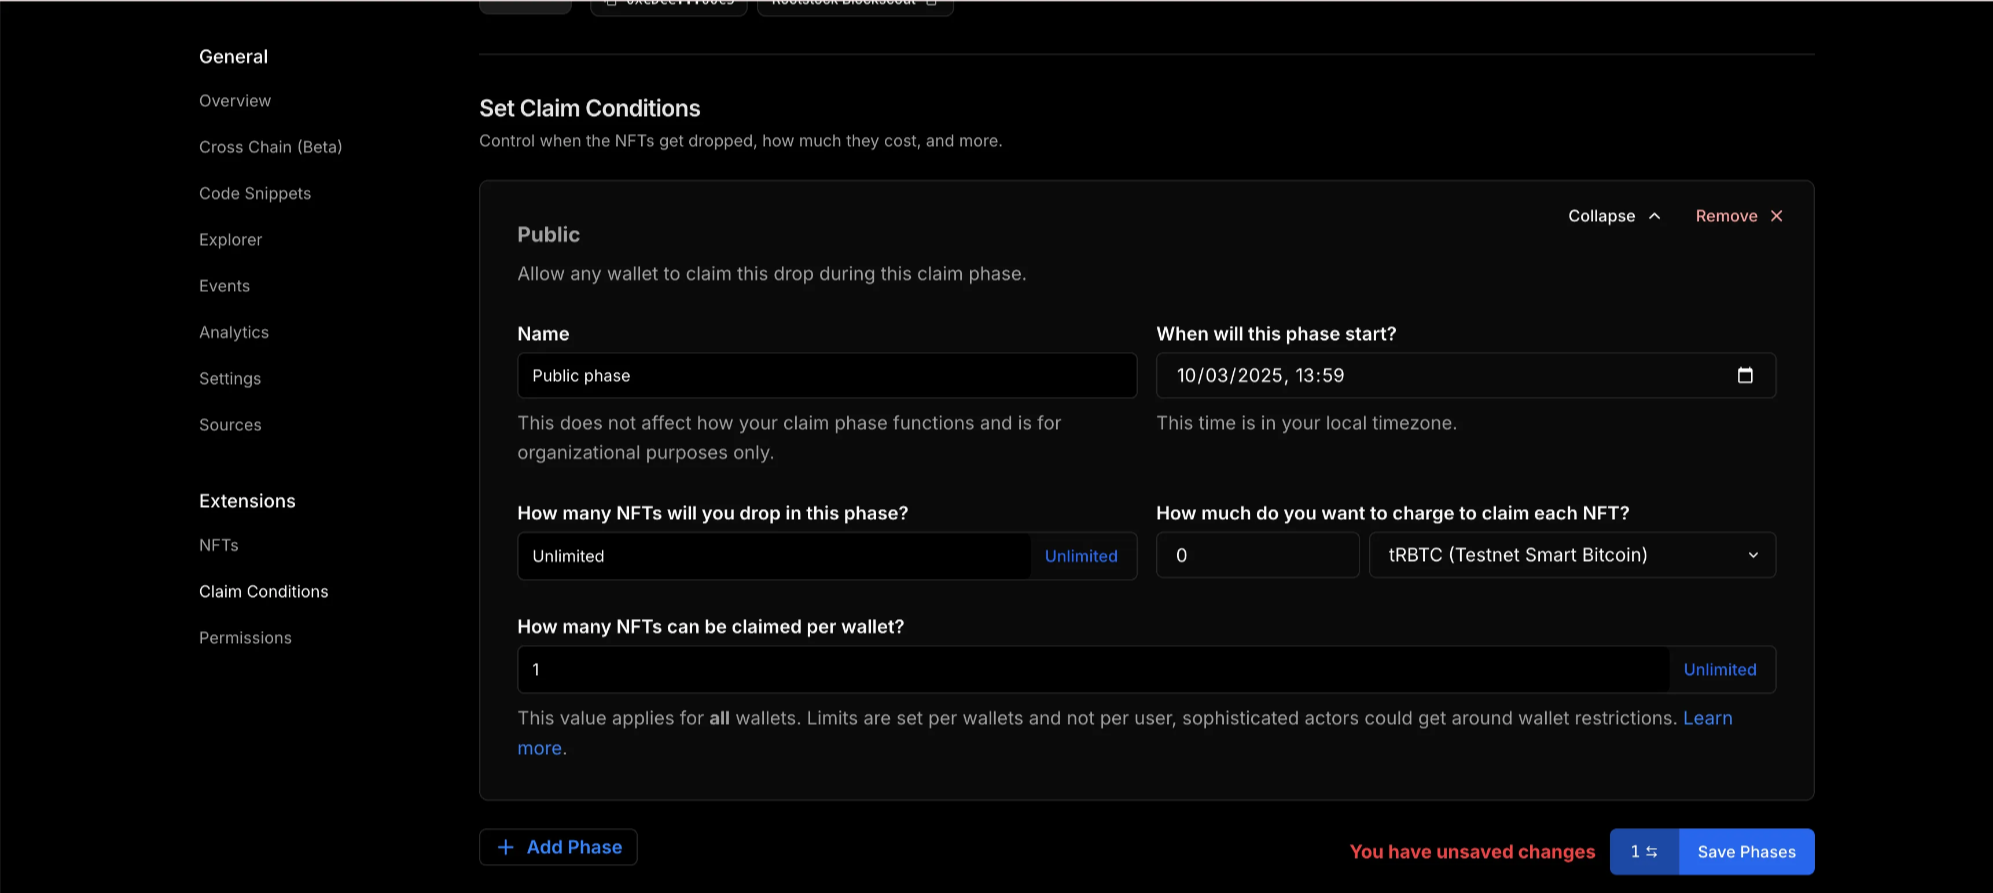
Set NFT Claim Conditions
Now the Legend NFT has been uploaded, to enable access to members to mint the NFT drop, we need to set claim conditions. Go to Extensions —> Claim Conditions —> Add Phase —> Public. Approve the transaction in your wallet.
Here, you can set the NFT to unlimited, set the amount of NFT that can be claimed per wallet or charge an amount when NFT is claimed. For guide, we will set the legend NFT to be claimed once per wallet, set the amount to claim the NFT to 0 and use the tRBTC network. Click on Save Phase and approve the transaction in wallet.
Follow the same process to mint the second NFT drop. You can find the deployed tokens on your dashbaord.
Next, open each of the deployed contracts and copy their contract addresses.
Go to src —> app —> utils —> consts.ts and paste each of the contract addresses in the respective export function.
Your code should look like this:
// /src/app/utils/consts.ts

import { defineChain, getContract, NATIVE_TOKEN_ADDRESS } from "thirdweb";
import { client } from "./client";

export const rootstockTestnet = defineChain({
  id: 31,
  rpc: "https://public-node.testnet.rsk.co",
  nativeCurrency: {
    name: "TRBTC",
    symbol: "TRBTC",
    decimals: 18,
  },
});

export const TRBTC = getContract({
  client,
  chain: rootstockTestnet,
  address: NATIVE_TOKEN_ADDRESS,
});

export const stRIF = getContract({
  client: client,
  chain: rootstockTestnet,
  address: "0xdF80EA040959962AD484A18edF791c6b23a07254",
});

export const rootieContract = getContract({
  client: client,
  chain: rootstockTestnet,
  address: "0xCDceE0e2dc6fb158A6dea2B614D21e04d5CF00c5",
});

export const legendContract = getContract({
  client: client,
  chain: rootstockTestnet,
  address: "0xe2F55fE86fdCa4279D4b90c0653Dad086687cD49",
});
Minting integration using TransactionButton
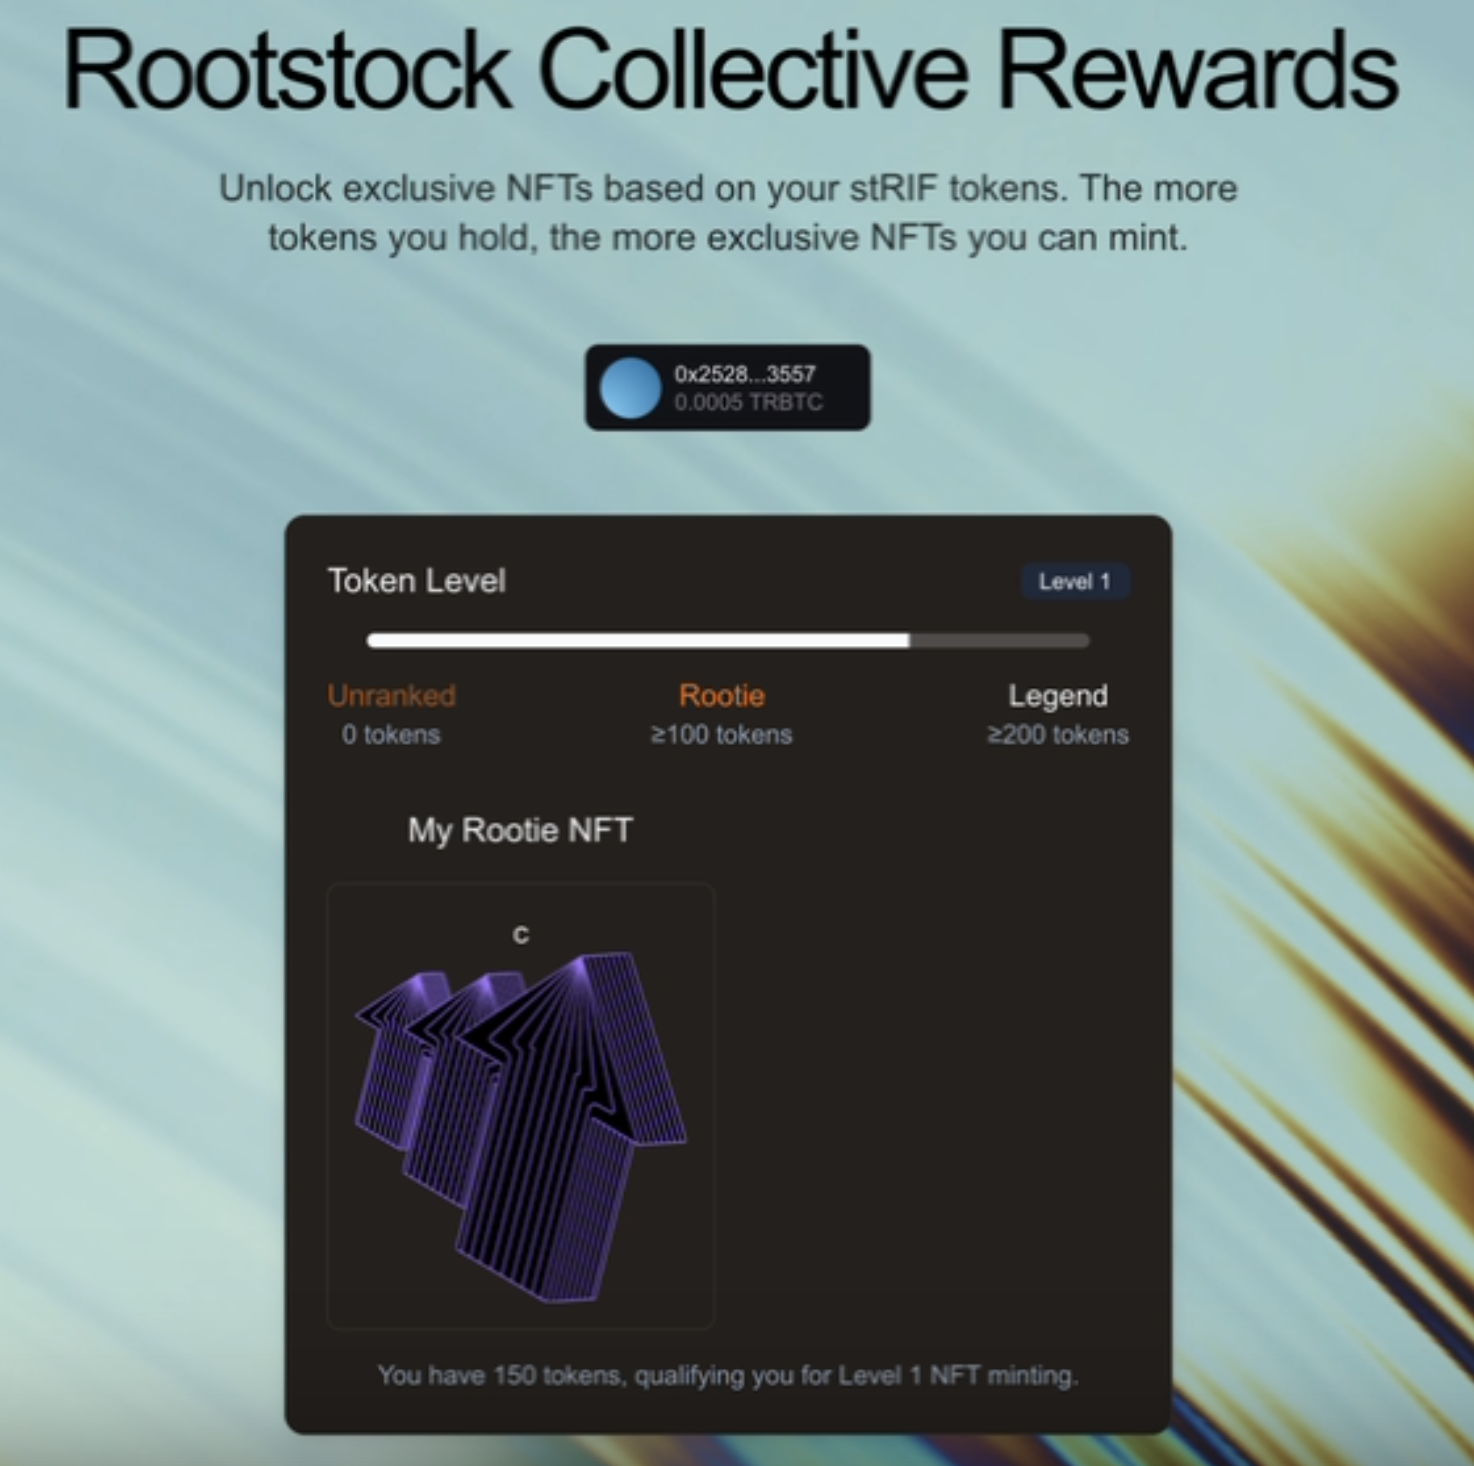
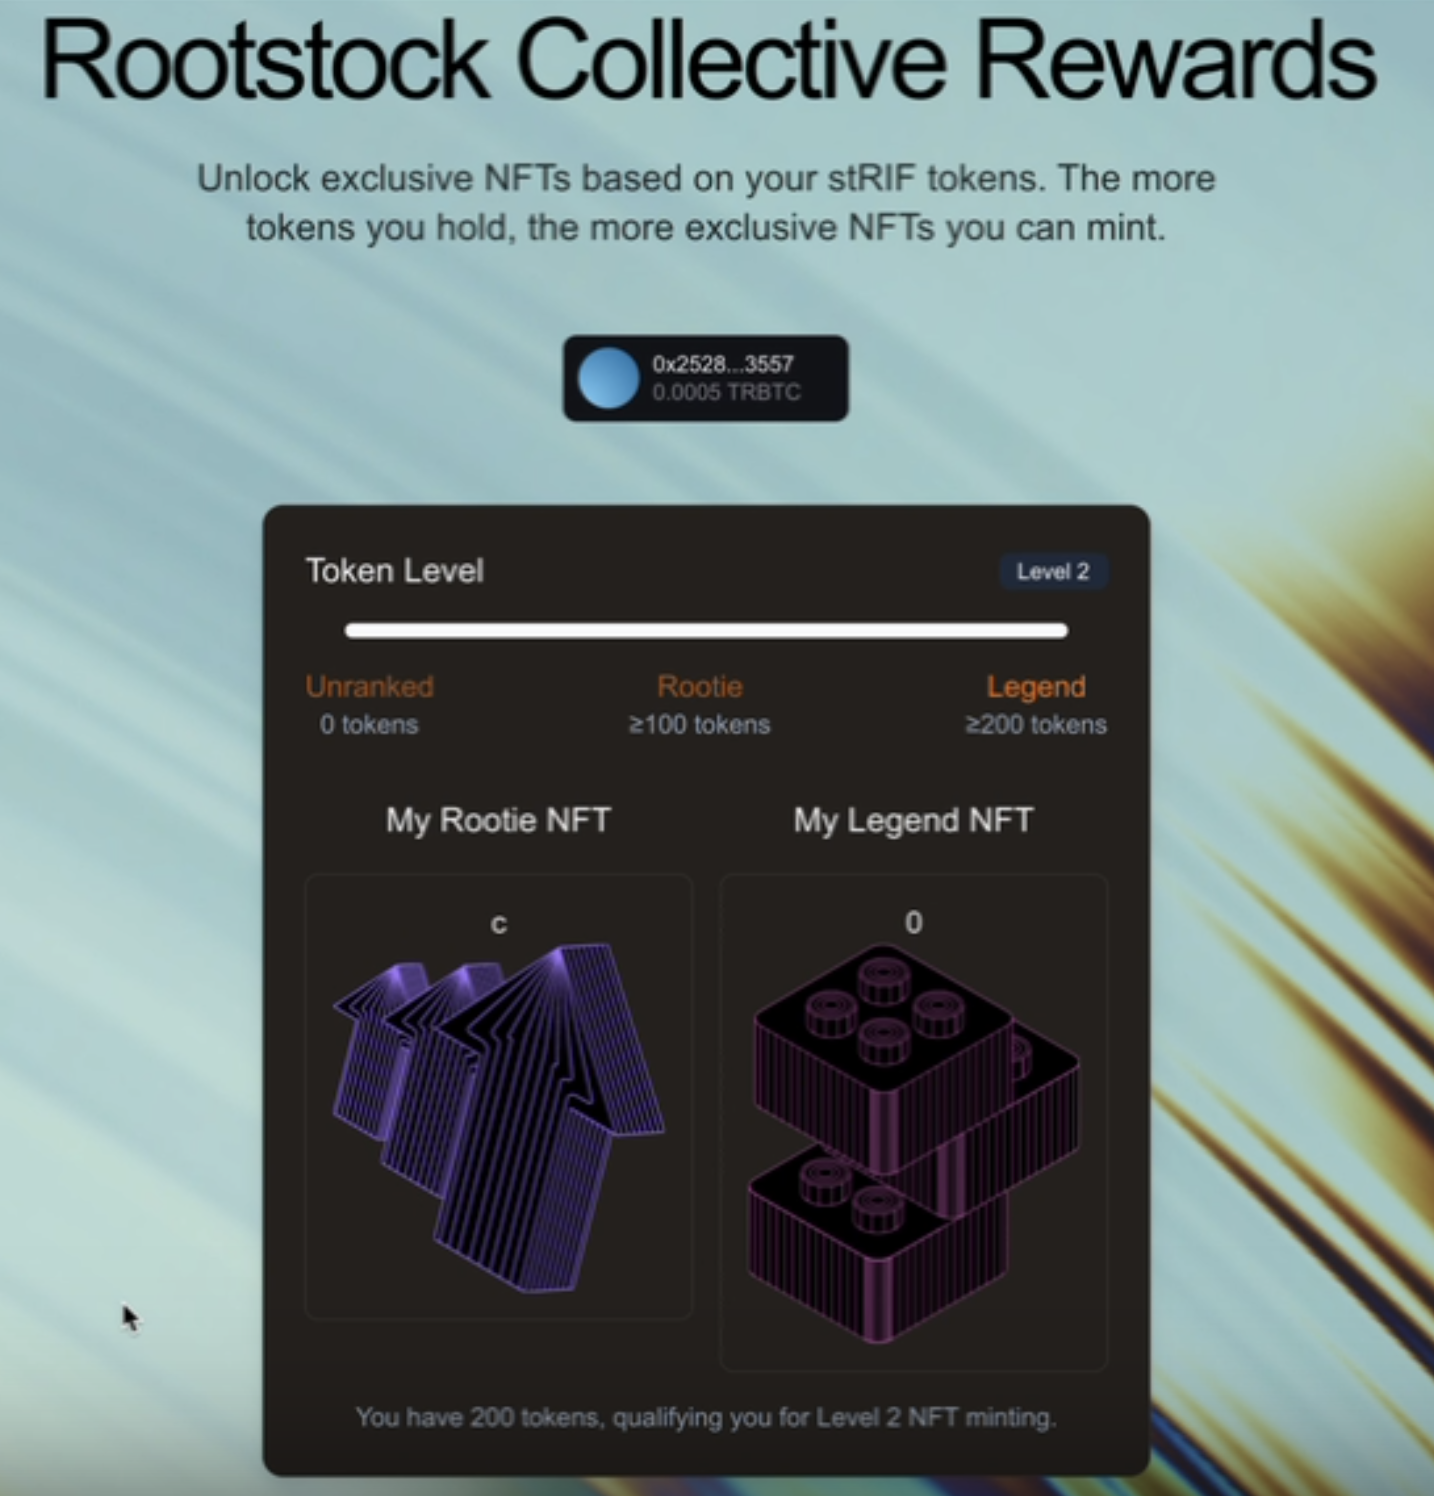
The minting process relies on a tiered membership system based on the amount of stRIF tokens a user holds. These tiers determine which NFTs a user can mint:
- Unranked: Holds fewer than 100 stRIF tokens (Not eligible for minting)
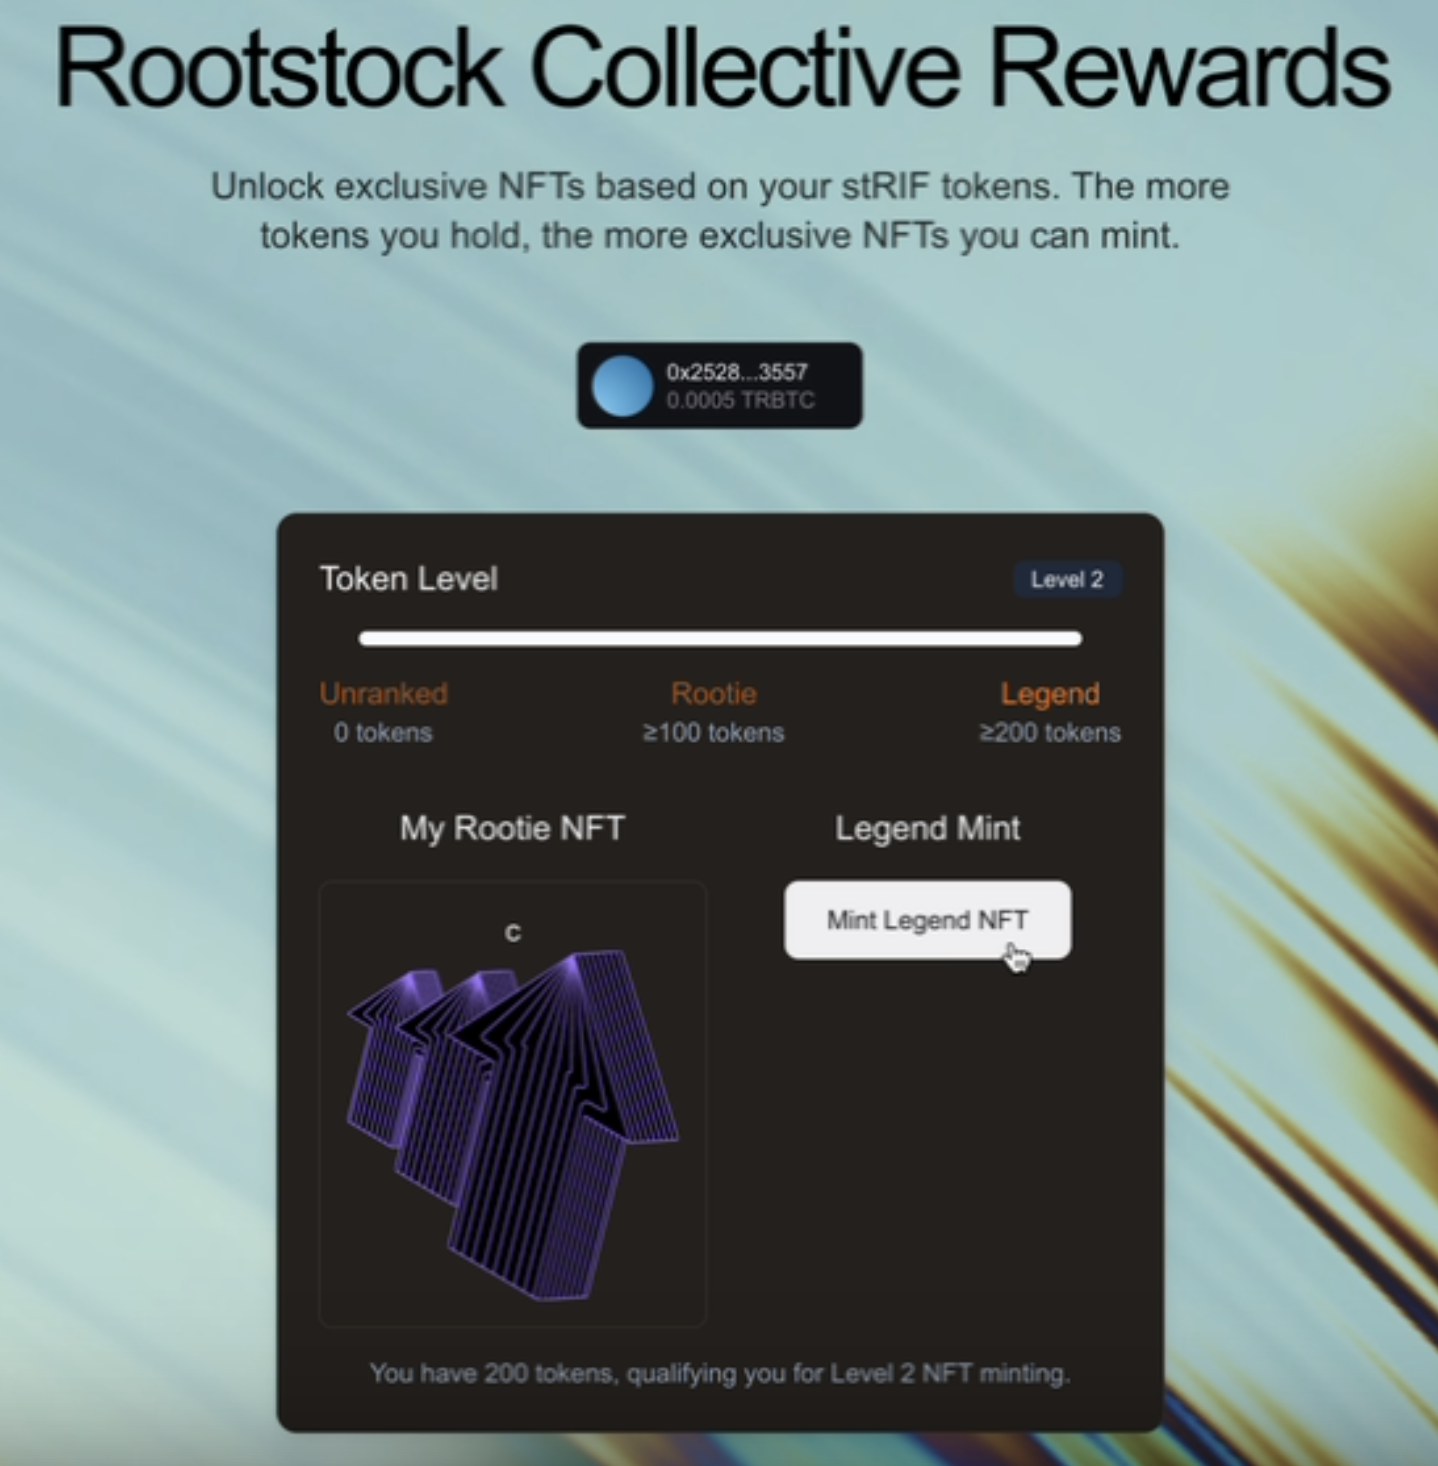
- Rootie Level (Level 1): Holds at least 100 stRIF tokens (Can mint a Rootie NFT)
- Legend Level (Level 2): Holds at least 200 stRIF tokens (Can mint a Legend NFT)
The logic for determining a user’s level is handled by the getLevel function in the MintSection component:
// Function to determine the user's level based on the amount of stRIF tokens they hold.
// Note: This function is written for learning purposes and could be optimized in a
// real-world scenario.
const getLevel = (amount: number) => {
    // If the amount is greater than or equal to LEVEL_2 threshold,
    //the user is at level 2
    if (amount >= LEVEL_THRESHOLDS.LEVEL_2.amount) return 2;

    // If the amount is greater than or equal to LEVEL_1 threshold,
    // the user is at level 1
    if (amount >= LEVEL_THRESHOLDS.LEVEL_1.amount) return 1;

    // If the amount does not meet any threshold, the user is unranked (level 0)
    return 0;
};

// The amount of tokens is passed as a parameter to the component.
const level = getLevel(tokenAmount);

// Determine the NFT collection based on the user's level.
// This is a simple conditional statement for demonstration purposes.
// In a real environment, a more scalable approach could be used.
const nftCollection = level === 1 ? "Rootie" : "Legend";
After defining the user's level, the dApp checks whether the user already owns the corresponding NFTs using two custom hooks. These hooks (useHasRootieNFT and useHasLegendNFT) verify if a user owns a Rootie NFT or a Legend NFT.
- How it works:
- Uses
useStateto store the state (hasNFT). - With
useEffect, they execute the query when the address changes. - Calls
balanceOf()from the Thirdweb SDK to check NFT ownership.
- Uses
 	// src/components/mint-section.tsx
 	const hasRootieNFT = useHasRootieNFT({ address });
  const hasLegendNFT = useHasLegendNFT({ address });

  // src/lib/hooks.ts
 import { useEffect, useState } from "react";
 import { balanceOf } from "thirdweb/extensions/erc721";
 import { Address } from "thirdweb";

 export function useHasNFT(contract: any, address?: Address): boolean {
  const [hasNFT, setHasNFT] = useState(false);

  useEffect(() => {
    if (!address) return setHasNFT(false);

    const checkBalance = async () => {
      try {
        const result = await balanceOf({ contract, owner: address as Address });
        setHasNFT(result > 0);
      } catch {
        setHasNFT(false);
      }
    };

    checkBalance();
  }, [address]);

  return hasNFT;
}
Once the user’s token amount is determined, we decide which NFTs they can mint. The frontend ensures that:
- Users without the required tokens see a Not Eligible warning.
- Users who meet the threshold but haven't minted yet see a Mint Button.
// src/components/mint-section.tsx
{/* Rootie NFT Mint Section */}
  {!hasRootieNFT && level >= 1 && (
    <>
      <h3 className="text-lg font-semibold">Rootie Mint</h3>
      <MintButton disabled={txInProgress} level={1} />
    </>
 )
Once a user clicks the mint button, the TransactionButton from Thirdweb handles the claiming process, this button:
- Calls
claimTo()to execute the minting transaction using Thirdweb’s extensions. - Displays a loading toast while waiting for the blockchain confirmation.
- Shows a success toast once the minting is complete.
- Provides a direct link to view the transaction on the Rootstock explorer.
// src/components/mint-section.tsx
<TransactionButton
  transaction={() =>
    claimTo({
      contract: level === 1 ? rootieContract : legendContract,
      to: address,
      quantity: BigInt(1),
    })
  }
  onTransactionSent={(result) => {
    setTxInProgress(true);
    toast.promise(
      async () =>
        await waitForReceipt({
          client: client,
          chain: rootstockTestnet,
          transactionHash: result.transactionHash,
        }),
      {
        loading: "Waiting for confirmation…",
        success: "NFT Minted Successfully!",
        error(error) {
          return extractErrorMessages(error).message;
        },
        finally: () => {
          setTxInProgress(false);
        },
      }
    );
  }}
  disabled={txInProgress}
>
  Mint {nftCollection} NFT
</TransactionButton>
Conditional rendering and NFT media
To check if a user has already minted an NFT, we fetch their owned NFTs using the getOwnedERC721s function. This function queries the blockchain for NFTs held by the user on the respective contracts.
// src/components/mint-section.tsx
const fetchOwnedNFTs = async () => {
  try {
    const ownedRooties = await getOwnedERC721s({
      contract: rootieContract,
      owner: address as string,
    });
    console.log("Owned Rootie NFTs:", ownedRooties);

    const ownedLegends = await getOwnedERC721s({
      contract: legendContract,
      owner: address as string,
    });
    console.log("Owned Legend NFTs:", ownedLegends);
  } catch (error) {
    console.error("Error fetching owned NFTs:", error);
  }
};

useEffect(() => {
  if (address) {
    fetchOwnedNFTs();
  }
}, [address]);
After a successful minting transaction, the frontend updates to reflect the user's ownership of the NFT. Instead of seeing the mint button, the user now sees their NFT displayed through the NFTProvider component.
The NFTProvider fetches and renders the NFT metadata, displaying its name and media (image, video, or animation). This ensures that once a user successfully mints the NFT, they can immediately see their newly acquired NFT within the interface.
// src/components/mint-section.tsx
{hasRootieNFT && (
    <>
      <h3 className="text-lg font-semibold">My Rootie NFT</h3>
      <div className="border p-4 rounded-lg">
        <NFTProvider contract={rootieContract} tokenId={2n}>
          <NFTName />
          <NFTMedia />
        </NFTProvider>
      </div>
    </>
  )}
We've successfully implemented a complete token-gated experience on Rootstock. From setting up the development environment to deploying smart contracts and integrating Web3 authentication using Thirdweb, we also learned how to leverage tokenization and token-gating via the RootstockCollective to create exclusive access and enhance community engagement.