Rootstock Attestation Service Starter Guide
Rootstock Attestation Service (RAS) is an open, decentralized infrastructure that enables the creation of attestations—both on-chain and off-chain—about any type of information or event. Inspired by Ethereum Attestation Service (EAS), RAS provides a common standard for issuing verifiable claims within Rootstock's smart contract ecosystem.
This guide will help you understand and get started with the Rootstock Attestation Service.
Supported on:
How EAS is integrated with Rootstock
The EAS essential contracts has been successfully deployed to Rootstock, this includes a robust indexer, and a user-friendly alternative explorer. The following sections will delve into the technical details of these implementations. See Rootstock Attestation Service (RAS) Is Now Live on Rootstock Explorer.
Getting Started
- 🧾 EAS contract: We deployed EAS contracts on Rootstock Mainnet and Testnet
- 📖 Learn the basics: Read the EAS documentation to understand what attestations are and how they work.
- 💻 Install the SDK: Use the EAS SDK to easily create and manage attestations in JavaScript/TypeScript projects.
- 🛠️ Set up a custom indexer: Build your own attestation indexer to efficiently filter, store, and serve attestation data in your application.
- 🔍 Query data via GraphQL: Access attestation records using GraphQL queries tied to RAS/EAS-compatible smart contracts and UI.
- 🌐 Use the Rootstock Attestation Explorer to create, view, and verify attestations.
RAS Contracts
The Rootstock Attestation Service (RAS) smart contracts have been deployed on both Rootstock Mainnet and Testnet, enabling developers to interact with attestations in a secure and standardized way. Below are the official contract addresses for the core components: the EAS contract, the EIP712 Proxy Indexer, and the Schema Registry. You can review the full contract code and deployment structure. See EAS Contracts on GitHub
Note: Since Rootstock is not integrated into the official EAS deployment package, you cannot import the contract addresses directly using
@ethereum-attestation-service/eas-contracts/deployments in your code. You will need to manually reference the addresses listed below.
🔗 Mainnet (Rootstock)
- 🧾 RAS Contract 0x54c0726E9D2D57Bc37aD52C7E219a3229E0ee963
- 🔁 Indexer (EIP712Proxy) 0x4c0Ac010c2eC50Fc1FF3e7E35dADA06A7F26073F
- 🗂️ Schema Registry 0xef29675d82Cc5967069D6D9c17F2719F67728F5b
🧪 Testnet (Rootstock Testnet)
- 🧾 EAS Contract 0xc300aeEadd60999933468738c9F5d7e9c0671e1C
- 🔁 Indexer (EIP712Proxy) 0x4352e5b2567551986E21eD65D5ad3052A09e3717
- 🗂️ Schema Registry 0x679c62956cD2801ABaBF80e9D430F18859eea2D5
Using the Indexer Service
This tool enables developers to quickly deploy a custom indexer for the Rootstock Attestation Service (RAS), fully compatible with the EAS architecture. It works on the Rootstock network where EAS contracts have been deployed, allowing you to index and query attestation data efficiently. Make sure to check the documentation for the installation steps.
See the GitHub Repository
Using Roostock RAS Explorer
The Rootstock Explorer is the central hub for the attestation ecosystem on Rootstock. It allows you to easily explore, create, and verify schemas and attestations. Designed for both technical and non-technical users, the explorer offers a simple and intuitive interface to interact with attestations on the Rootstock network.
What you can do
There are several main things you can do with the explorer site. You are able to:
- Explore schemas that have been made on that chain and their activity
- Inspect any attestation made to an address or that an address has made
- Make schemas and attestations in a no-code way using our UI tools
- Revoke attestations you have made
- Name schemas, add descriptions and/or context
- Publish offchain attestation to IPFS
- Timestamp offchain attestations onchain
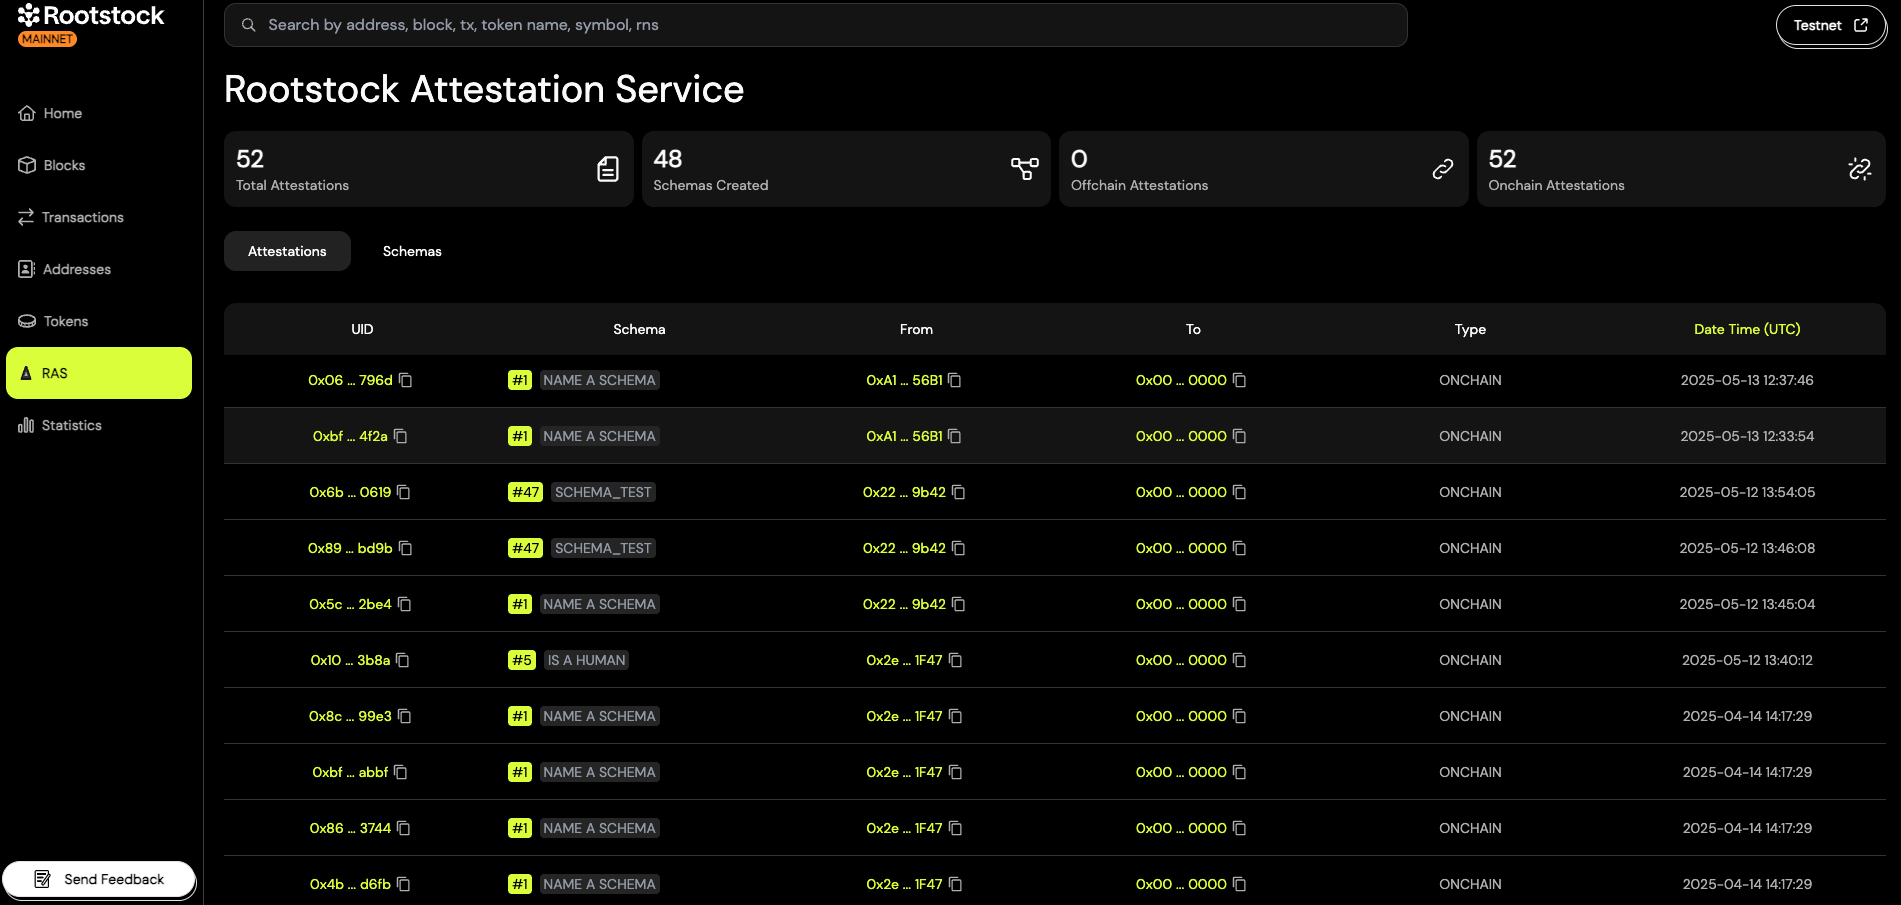
Attestations
In the main navigation, click on the "Attestations" tab.
Schemas
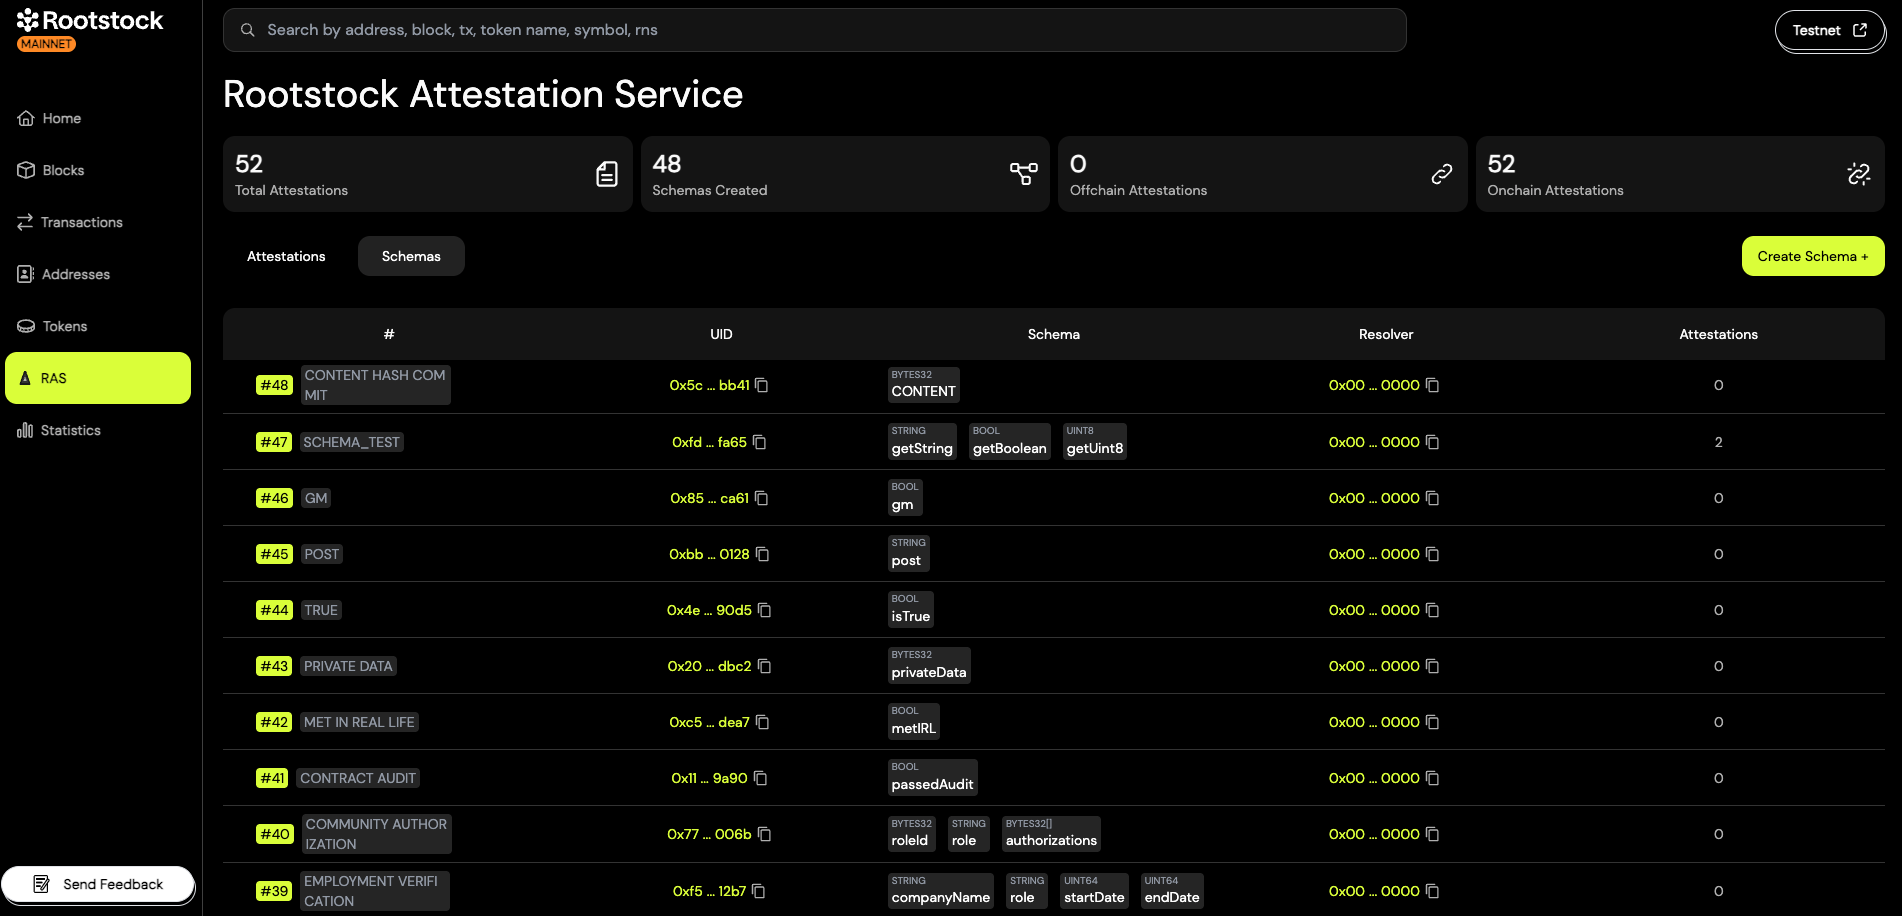 In the main navigation, click on the "Schemas" tab.
How to Create an Attestation
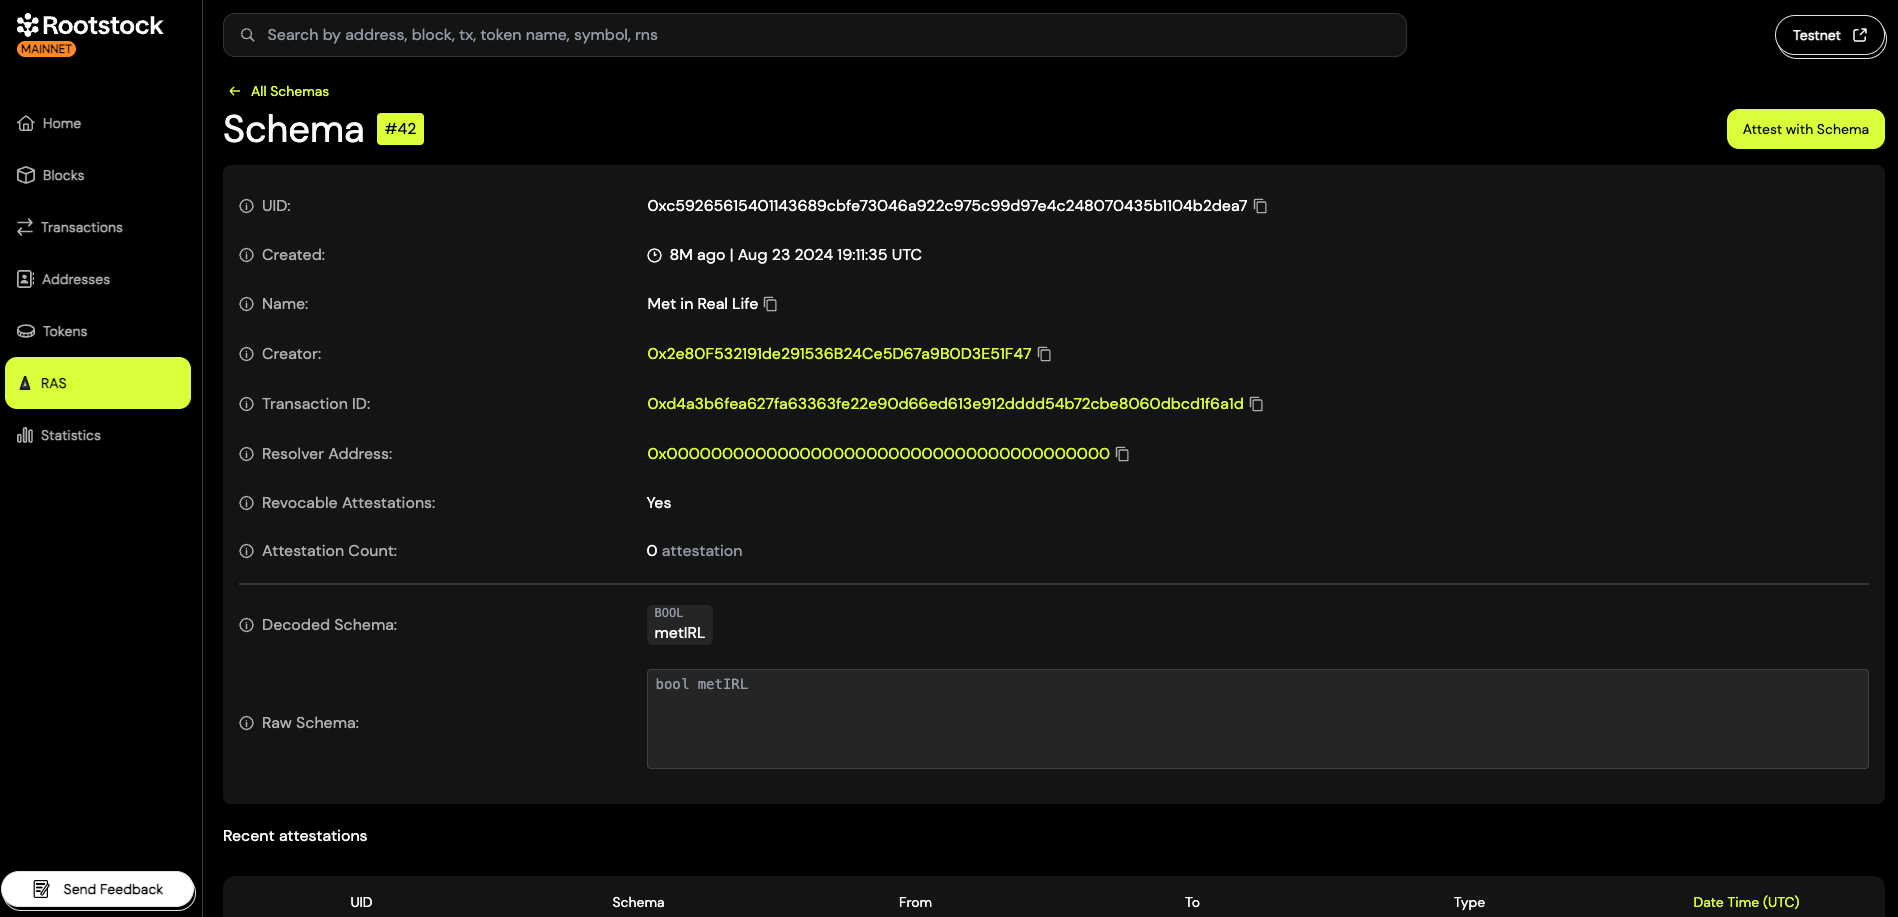
- Go to the detail view of the schema you want to use.
- Click on the "Attest with Schema" button.
You will then be guided through the process of filling out the required fields and submitting your attestation.

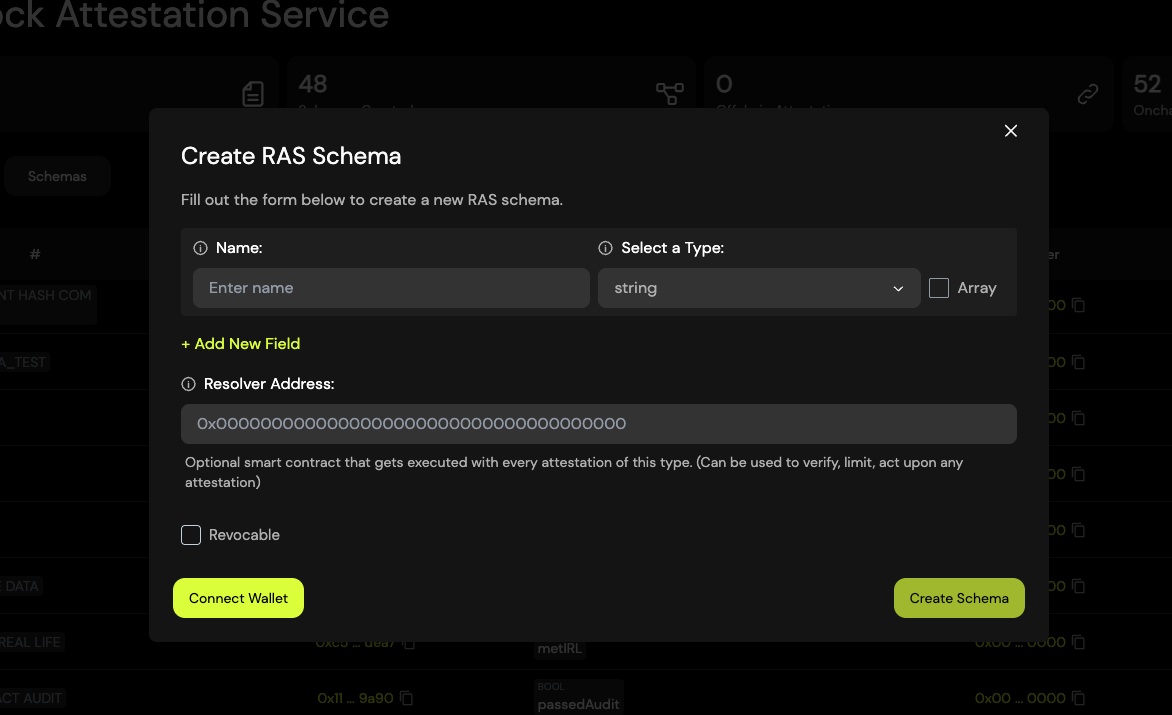
How to Create a Schema
- Navigate to the "Schemas" tab in the Rootstock Explorer.
- Click the "Create Schema +" button.
- A popup will appear where you can fill in the schema fields, including the schema definition and any additional metadata.
Creating a schema is an on-chain operation, so you'll need to have RBTC in your wallet to cover the transaction fees.
Naming Schema
As the creator of a schema, you have the option to give it a name. This name can help provide more context for others viewing or using the schema within the Rootstock Explorer.
Naming a schema is optional. You don’t need to name it unless you want to make it easier for others to understand its purpose in the Rootstock Explorer.
When you "name a schema", the creator is just attesting to it's name using a referenced attestation to the UID of the schema.
- First create your schema and make sure you have a UID of the schema and access to the creator address of the schema.
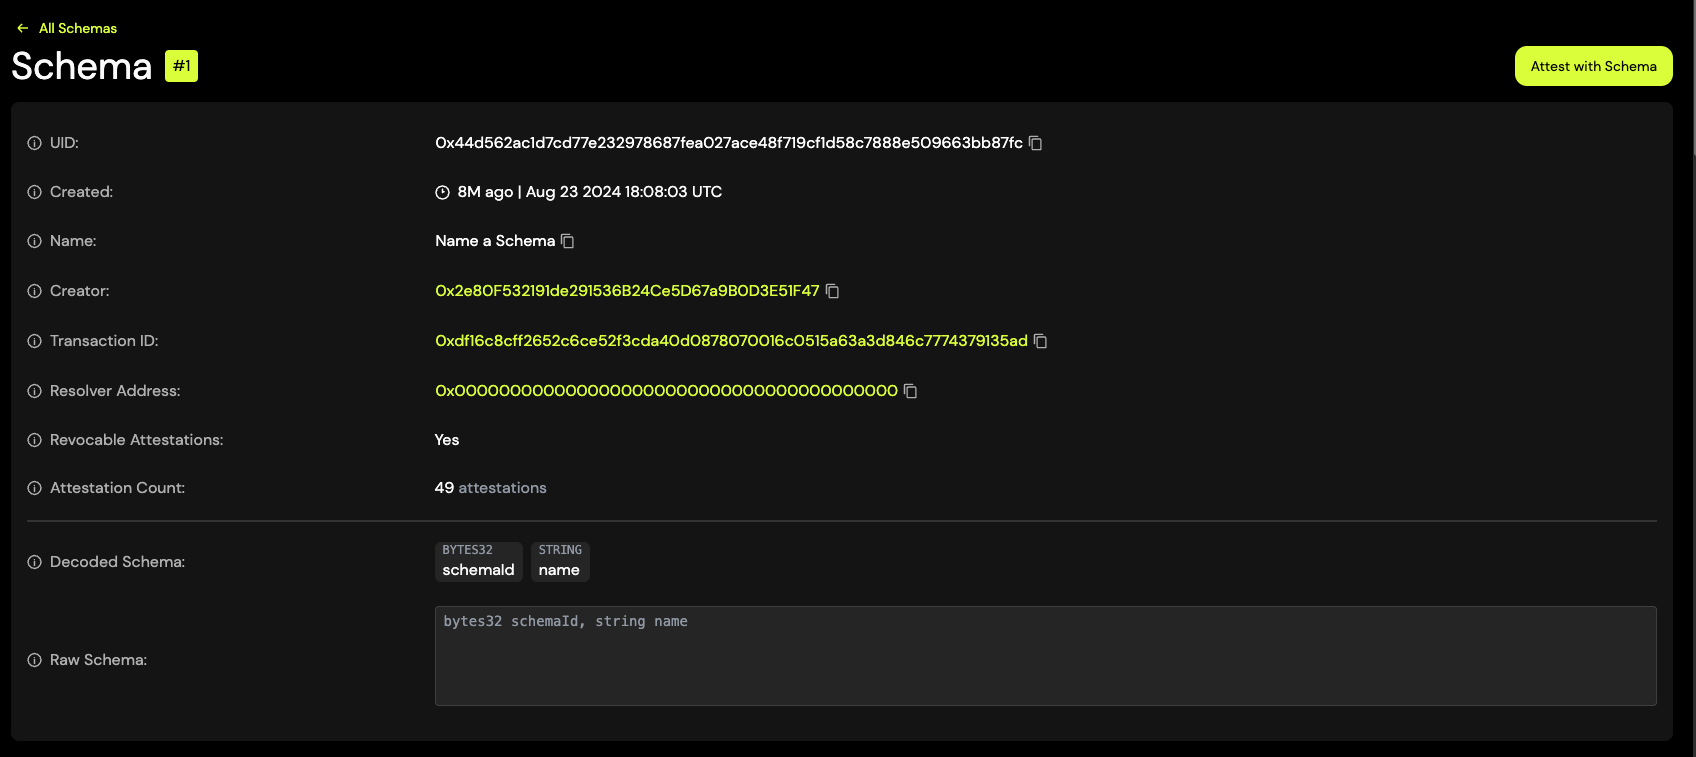
- Then you can use Schema #1, which has the Schema UID:
0x44d562ac1d7cd77e232978687fea027ace48f719cf1d58c7888e509663bb87fc- Here’s an example Name a Schema on Roostock Mainnet.
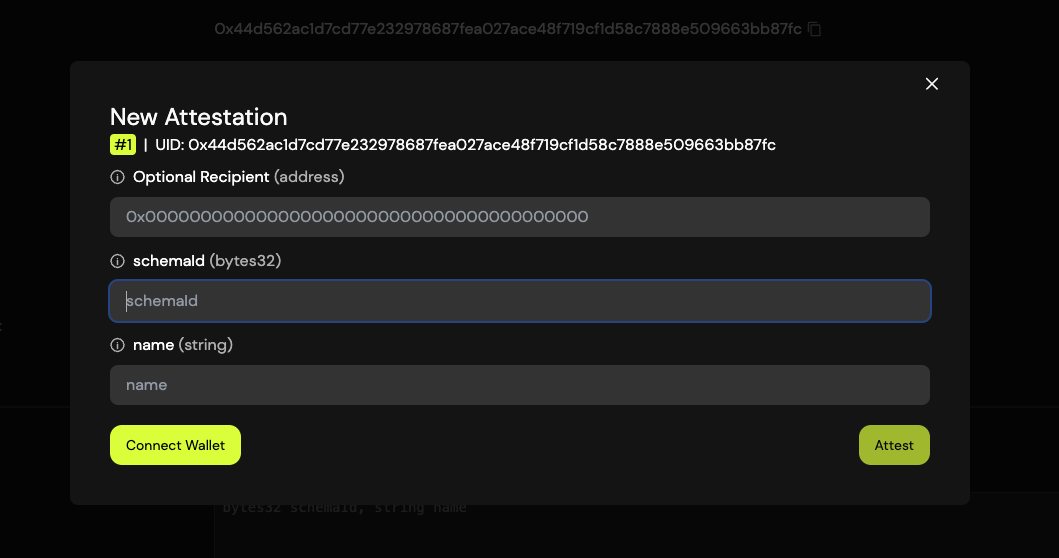
- Fill in the Schema Data:
- You do NOT need to add a Recipient for this attestation.
- Add the UID of the Schema you created that you want to name.
- Type in the Name of your schema. Keep it concise yet descriptive.
- Make the Attestation Onchain
- Nice work! You've successfully named a schema.
- Go to the schema detail view to name your schema: Name Schema #1
Click the "Attest with Schema" button.
In the attestation form:
- Do not fill in the "Recipient" field — leave it empty.
- In the schemaId field, enter the UID of the schema you want to name.
- In the name field, type the desired name you want to assign to the schema.
Submit the attestation to publish the name on-chain.
Using the EAS SDK with Rootstock
In this section, you'll learn how to use the Ethereum Attestation Service (EAS) SDK on the Rootstock network. We'll show how to configure the SDK to connect to Rootstock and interact with the EAS-compatible contracts deployed there.
Make an Attestation
Steps to Make an Attestation:
- Import and initialize the SDK with the Rootstock provider.
- Provide the Schema UID of the schema you want to use.
- Prepare the attestation data according to the schema definition.
- Submit the attestation on-chain using the SDK.
import { EAS, SchemaEncoder } from '@ethereum-attestation-service/eas-sdk';
import { ethers } from "ethers";

// Connect to Rootstock
const provider = new ethers.JsonRpcProvider("https://rpc.testnet.rootstock.io/API-KEY"); // RPC Api URL Testnet
const signer = new ethers.Wallet('YOUR PRIVATE KEY', provider);

//const EASContractAddress = '0x54c0726e9d2d57bc37ad52c7e219a3229e0ee963' // Mainnet (has to be in lowercase)
const EASContractAddress = '0xc300aeeadd60999933468738c9f5d7e9c0671e1c' // Testnet (has to be in lowercase)

// Initialize EAS
const eas = new EAS(EASContractAddress); // EAS contract on Rootstock Mainnet
eas.connect(signer);

// Define schema
const schemaUID = '0xf58b8b212ef75ee8cd7e8d803c37c03e0519890502d5e99ee2412aae1456cafe'; // This UID references to https://explorer.testnet.rootstock.io/ras/schema/0xf58b8b212ef75ee8cd7e8d803c37c03e0519890502d5e99ee2412aae1456cafe.
const encoder = new SchemaEncoder('string statement');
const encodedData = encoder.encodeData([
  { name: 'statement', value: 'Roostock Attestation!', type: 'string' }
]);

// Make attestation
const tx = await eas.attest({
  schema: schemaUID,
  data: {
    recipient: '0x0000000000000000000000000000000000000000', // optional
    expirationTime: BigInt(0),
    revocable: true, // Be aware that if your schema is not revocable, this MUST be false
    data: encodedData,
  },
});

const attestation = await tx.wait();

console.log("Transaction submitted:", attestation);
Getting an Attestation
The getAttestation function allows you to retrieve an on-chain attestation for a given UID. This function returns an attestation object containing information about the attestation, such as the schema, recipient, attester, and more.
Usage
import { EAS, NO_EXPIRATION } from "@ethereum-attestation-service/eas-sdk";

const eas = new EAS(EASContractAddress);
eas.connect(provider);

const uid =
  "0xff08bbf3d3e6e0992fc70ab9b9370416be59e87897c3d42b20549901d2cccc3e";

const attestation = await eas.getAttestation(uid);

console.log(attestation);
Example output:
{
    uid: '0x5134f511e0533f997e569dac711952dde21daf14b316f3cce23835defc82c065',
    schema: '0x27d06e3659317e9a4f8154d1e849eb53d43d91fb4f219884d1684f86d797804a',
    refUID: '0x0000000000000000000000000000000000000000000000000000000000000000',
    time: 1671219600,
    expirationTime: NO_EXPIRATION,
    revocationTime: 1671219636,
    recipient: '0xFD50b031E778fAb33DfD2Fc3Ca66a1EeF0652165',
    attester: '0x1e3de6aE412cA218FD2ae3379750388D414532dc',
    revocable: true,
    data: '0x0000000000000000000000000000000000000000000000000000000000000000'
}
GraphQL API
This API allows you to access various attestation and schema data and perform queries using the GraphQL.
To get started with the Easscan GraphQL API, you need to send an HTTP POST request to the endpoint with a JSON payload containing your GraphQL query.
Here's an example of how to make a request using curl:
curl --request POST \
    --header 'content-type: application/json' \
    --url 'http://localhost:4000/graphql' \
    --data '{"query":"query Attestations {\n  attestations(take: 25) {\n    id\n    attester\n    recipient\n    refUID\n    revocable\n    revocationTime\n    expirationTime\n    data\n  }\n}","variables":{}}'
Getting an Attestation
query Attestations {
 attestations(take: 25, orderBy: {time: desc}) {
   id
   attester
   recipient
   refUID
   revocable
   revocationTime
   expirationTime
   data
 }
}
Get a specific Attestation by UID
query Attestation {
 attestation(
   where: { id: "0xa4fb0ad1e13efbb38e466af0cb59822cae7f9ea26f26dd34ddb09c76ee9dbb12" }
 ) {
   id
   attester
   recipient
   refUID
   revocable
   revocationTime
   expirationTime
   data
 }
}