Rootstock Wagmi Starter Kit
The Rootstock Wagmi starter kit provides a foundation for building decentralized applications (dApps) on the Rootstock blockchain. It leverages the security of Bitcoin and the flexibility of Ethereum.
The kit uses Wagmi, a React Hooks library, to simplify smart contracts and blockchain network interactions and and Shadcn libraries.
This starter kit is designed to help developers jump-start their dApp development journey on Rootstock.
Prerequisites
- Node.js and Git: Ensure to have Node.js and Git installed on your system.
- See the Prerequisites section for how to download Node.js using NVM.
- Yarn: Install Yarn, a package manager for Node.js projects. You can do this by running the following command in your terminal:
npm install -g yarn - Basic Knowledge:
Learn how to write, test, secure, deploy and verify smart contracts on the Rootstock blockchain network. Enroll for the Rootstock Blockchain Developer Course.
Setup
1. Clone the Repository
First, you’ll need to clone the Rootstock Wagmi Starter Kit repository. Open your terminal and run the following commands:
git clone https://github.com/rsksmart/rsk-wagmi-starter-kit
cd rsk-wagmi-starter-kit
2. Get Project ID
Every dApp that relies on WalletConnect now needs to obtain a projectId from WalletConnect Cloud. This is free and only takes few minutes.
To get the key:
- Go to Walletconnect and sign up.
- Create a new project by clicking on Create Project.
- Add a Name and Link to your project, select a product (AppKit or WalletKit), select WalletKit.
- Now you will see the project ID, copy it.
3. Environment Setup
To set up your environment, follow these steps:
- Create a
.envfile and add environment variables.VITE_WC_PROJECT_ID=Your projectid from cloud Walletconnect
4. Install Dependencies
Before running the project, make sure to have the necessary dependencies installed. We recommend using the yarn package manager due to potential conflicts with npm packages. Run the following command to install dependencies:
yarn
5. Run the Project
Now that you’ve cloned the repository and installed dependencies, it’s time to run the project. Execute the following command:
yarn dev
This will start the Rootstock Wagmi Starter dApp locally, allowing you to develop and test your smart contracts. You can access the Vite server at http://localhost:5173.
Result
After successfully running your project using the command above, do the following:
- Click the “Connect Wallet” button to log in. Once connected, you can:
- Switch Networks: Easily switch between Mainnet and Testnet.
- View and Copy Your Address: Access your wallet address.
- Check Your tRBTC Balance: See your tRBTC balance.
- Disconnect: Log out from the project.
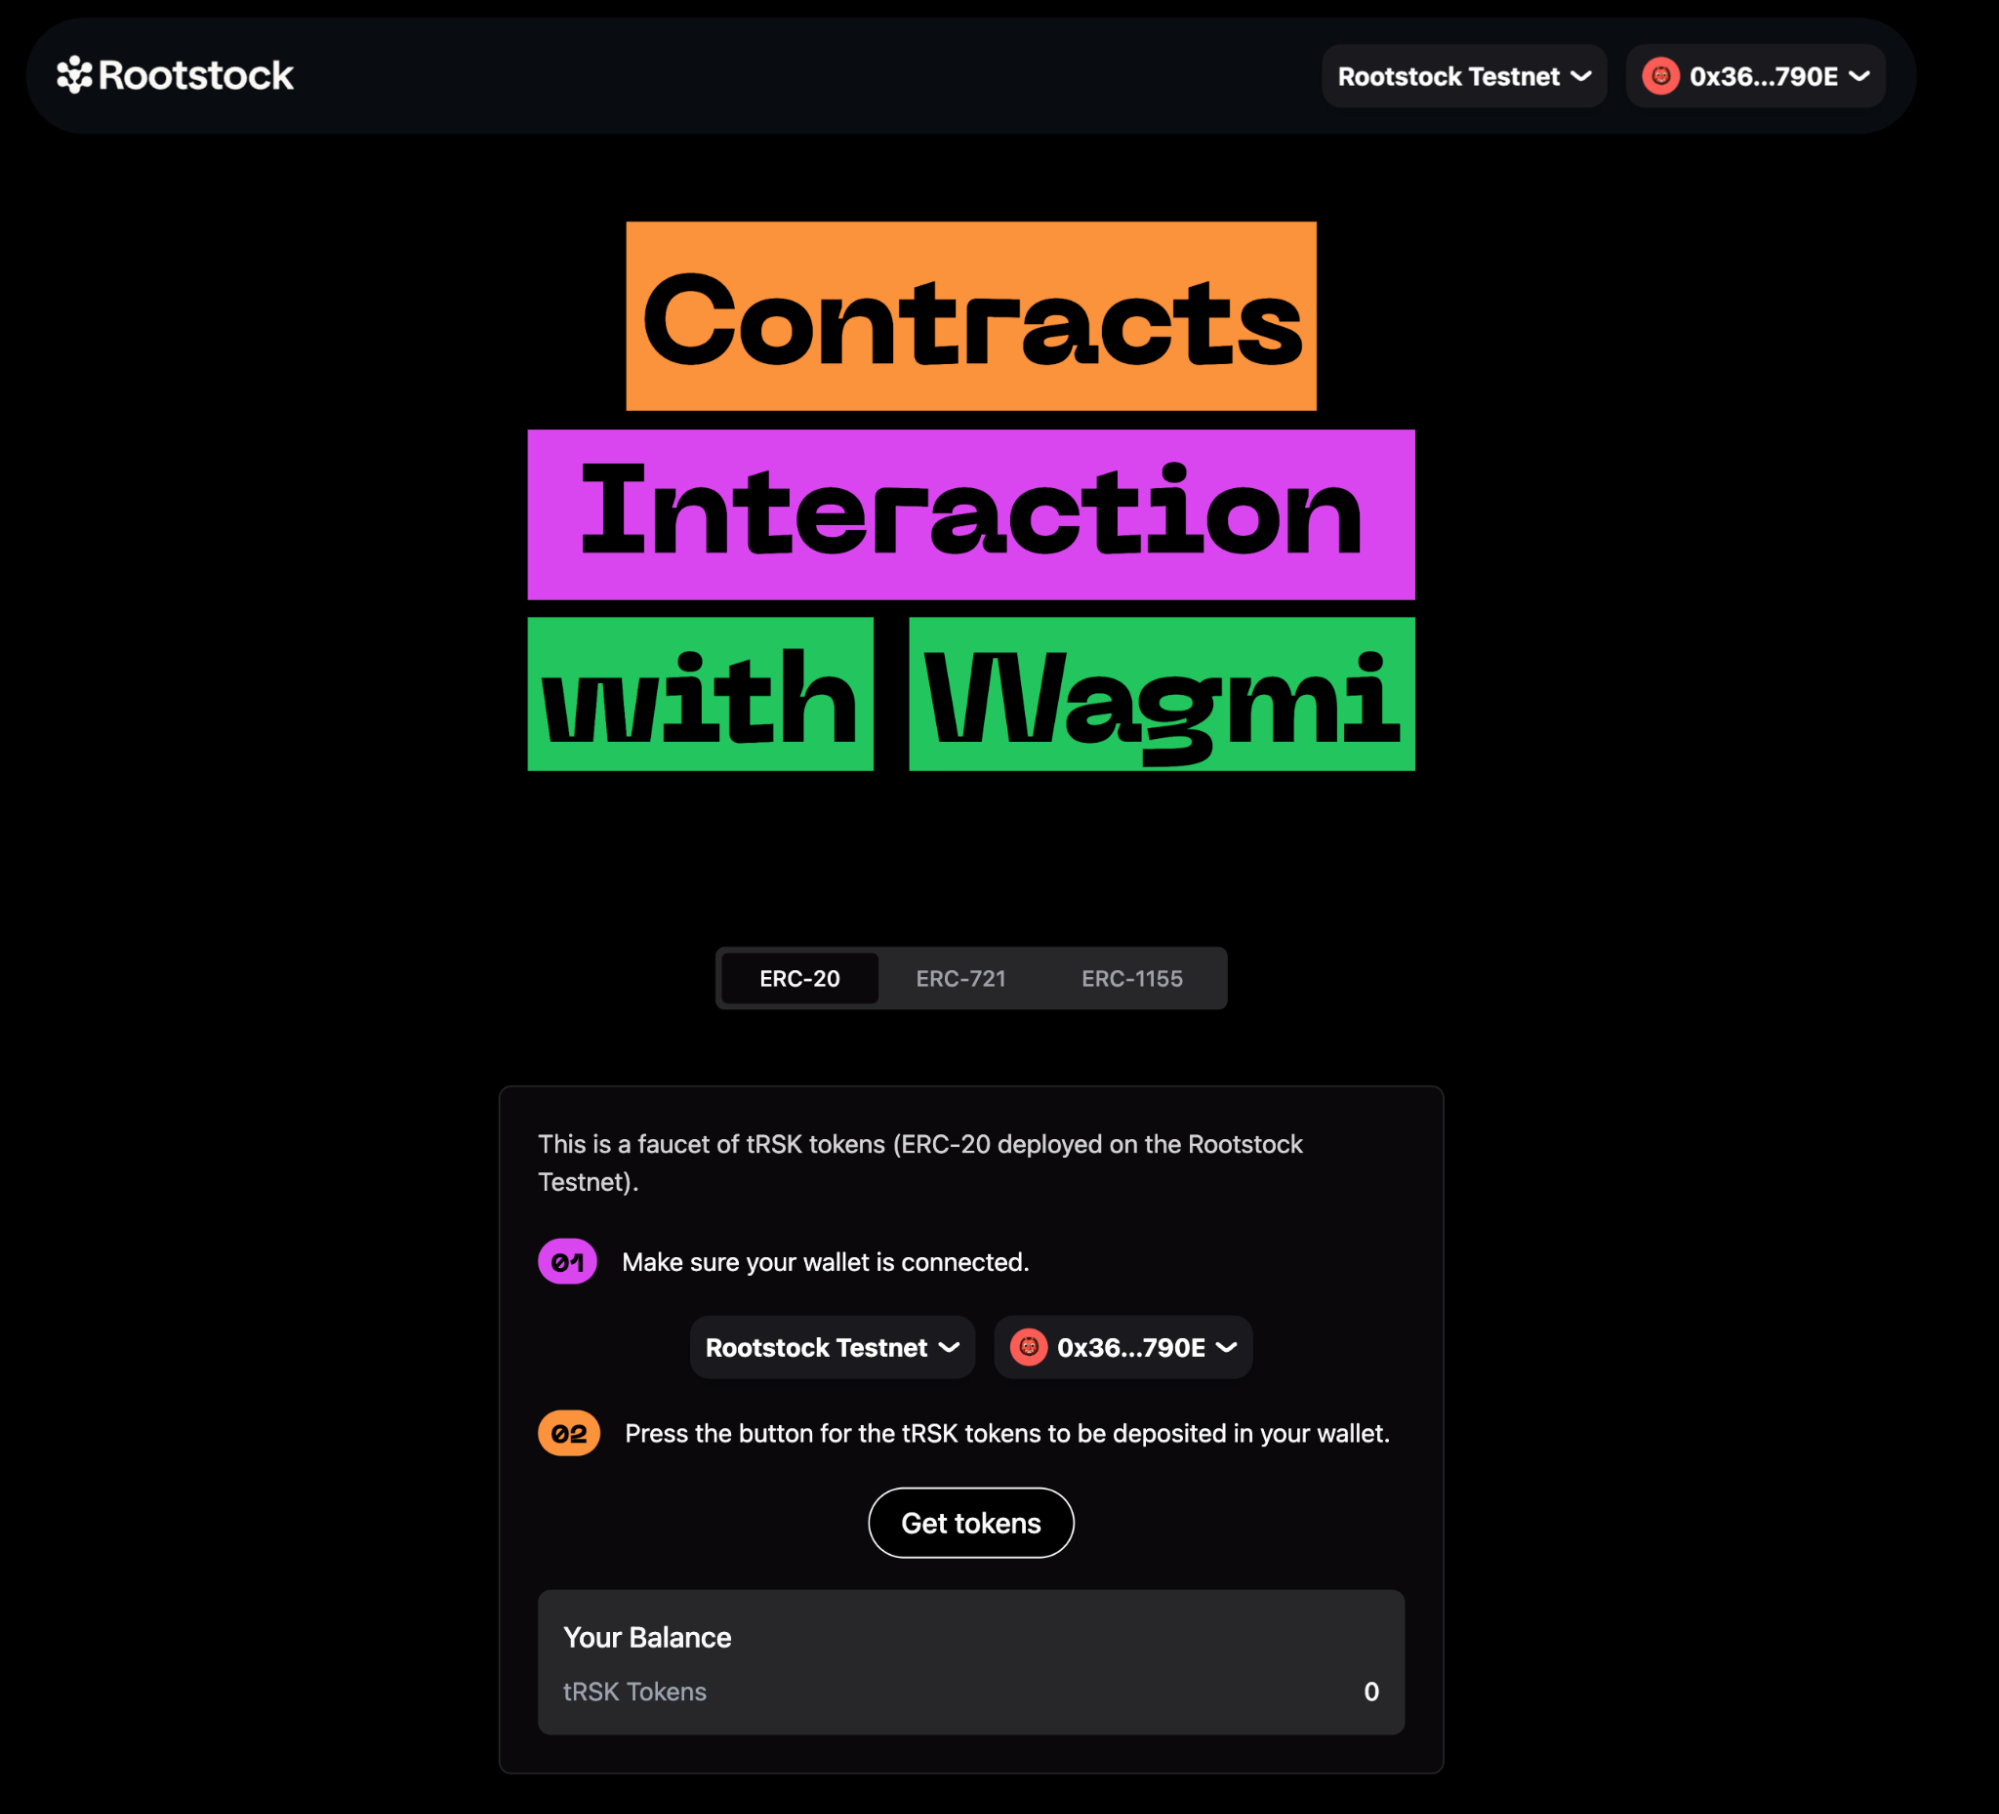
Test Project
To test the Wagmi project, follow these simple steps:
- Connect Your Wallet: Click the “Connect Wallet” button.
- Navigate to the Wagmi Section: Scroll down and find the card labeled “Contract Interaction with Wagmi Starter Kit.” Click on it.
- Explore the Tabs: In the Wagmi section, you’ll see three tabs: ERC-20, ERC-721, and ERC-1155. Click on any of these tabs to explore further.
Understanding the Codebase
Folder Structure
Public
Src
.env
.env.example
The src folder is organized to streamline the development process and make it easy to locate specific code or assets. Here's a detailed breakdown:
.src Folder Structure
- Assets: Contains the ABIs (Application Binary Interfaces) for ERC20, ERC721, and ERC1155.
- Components:
- AccountAbstraction: Contains code related to account abstraction.
- Home: Holds components specific to the homepage.
- Icons: Contains various icon components.
- Tokens: Includes components for different token types.
- UI: General UI components used across the application.
- Footers.tsx: Footer component.
- Navbar.tsx: Navbar component.
- Config:
- provider.tsx: Configuration for providers.
- rainbowkitConfig.ts: Configuration for RainbowKit.
- wagmiProviderConfig.ts: Configuration for WAGMI providers.
- Lib: Contains various utility folders for easy organization:
- Constants: Application constants.
- Functions: General functions used across the app.
- Types: Type definitions.
- Utils: Utility functions.
- Pages:
- index.ts: Main entry point.
- Etherspot.tsx: Page component for Etherspot.
- Home.tsx: Homepage component.
- Wagmi.tsx: Wagmi-related page component.
Code for ERC20, ERC721, and ERC1155 Tabs
The code responsible for the tabs corresponding to ERC20, ERC721, and ERC1155 can be found within the components folder:
- ERC20: Located in the
components/tokens/ERC20directory. - ERC721: Located in the
components/tokens/ERC721directory. - ERC1155: Located in the
components/tokens/ERC1155directory.
This structured approach ensures that code and assets are logically grouped, facilitating ease of navigation and maintainability.
Understanding the ERC20 Tab Code
The code interacts with a smart contract to mint tRSK tokens. Here's a detailed breakdown of how this is achieved:
- Smart Contract Reference:
- Address: The smart contract's address is specified by the
ERC20_ADDRESSconstant. - ABI: The contract's ABI (Application Binary Interface), which defines the contract functions and their parameters, is provided by the
abiconstant.
- Reading Contract Data:
const { data, isLoading, isError, refetch } = useReadContract({
    abi,
    address: ERC20_ADDRESS,
    functionName: "balanceOf",
    args: [address],
});
-
Writing to the Contract: The
useWriteContracthook from the wagmi library is used to interact with the contract's write functions (functions that modify the state). -
Minting Tokens: The
mintTokensfunction callswriteContractAsyncto mint tRSK tokens.
- Arguments:
- abi: Defines the contract functions and their parameters.
- address: The address of the deployed ERC-20 contract.
- functionName: The name of the function to call, which is "mint" in this case.
- args: An array containing the user's wallet address and the amount to mint (100 in this case).
const mintTokens = async () => {
  setLoading(true);
  try {
      const txHash = await writeContractAsync({
          abi,
          address: ERC20_ADDRESS,
          functionName: "mint",
          args: [address, 100],
      });
      await waitForTransactionReceipt(rainbowkitConfig, {
          confirmations: 1,
          hash: txHash,
      });
      setLoading(false);
      toast({
          title: "Successfully minted tRSK tokens",
          description: "Refresh the page to see changes",
      });
      refetch();
  } catch (e) {
      toast({
          title: "Error",
          description: "Failed to mint tRSK tokens",
          variant: "destructive",
      });
      setLoading(false);
      console.error(e);
  }
};
This sends a transaction to the blockchain to execute the "mint" function on the smart contract, thereby minting tRSK tokens and depositing them into the user's wallet.
Understanding the ERC721 Tab Code
This code defines a React component named ERC721Tab, which provides a user interface for interacting with an ERC-721 smart contract.
The Key Functions Within This Component:
useReadContract: This hook is used to read data from the ERC-721 contract. It fetches the balance of NFTs held by the connected user's address.
- Parameters:
abi: The ABI (Application Binary Interface) of the ERC-721 contract.address: The address of the ERC-721 contract.functionName: The name of the function to call on the contract (balanceOf).args: The arguments to pass to the contract function ([address]).
useWriteContract: This hook is used to write data to the ERC-721 contract, specifically to mint a new NFT.
Function:
writeContractAsync: Asynchronously writes to the contract by calling thesafeMintfunction of the ERC-721 contract.
mintNFT: This is an asynchronous function that handles the minting process of a new NFT.
- Steps:
- Sets the loading state to true.
- Attempts to call the
safeMintfunction on the ERC-721 contract usingwriteContractAsync. - Waits for the transaction to be confirmed using
waitForTransactionReceipt. - Displays a success toast message if the minting is successful.
- Refetches the user's NFT balance by calling
refetch. - Catches any errors, logs them, and displays an error toast message.
- Sets the loading state to false.
-
refetch: This function is part of theuseReadContracthook and is used to refresh the balance of NFTs after a successful minting operation. -
toast: This function is used to display toast notifications for success or error messages.
The rest of the component contains JSX to render the UI elements, including a button to mint the NFT, a balance display, and a link to view the minted NFTs on a block explorer.
Understanding the ERC1155 Tab Code
The code provided is a React component that interacts with a smart contract using the ERC-1155 standard. It allows users to mint tokens and check their balances.
The Key Functions Within This Component:
ERC1155TabComponent:
State Variables:
loading: Boolean to manage the loading state during token minting.value: Number to store the selected token type for minting.address: The user's wallet address obtained from theuseAccounthook.
useReadContractHooks: These hooks are used to read data from the smart contract.
useReadContractfor checking the balance of Type A tokens (with ID 1).useReadContractfor checking the balance of Type B tokens (with ID 2).
mintTokensFunction: An asynchronous function that handles the minting of tokens.
- Steps:
- Calls
writeContractAsyncto interact with the smart contract and mint tokens. - Waits for the transaction receipt using
waitForTransactionReceipt. - Displays success or error toasts based on the outcome.
- Refetches the balance data after minting.
- Calls
Join the Community
Building dApps can be challenging, but you’re not alone. Join the Rootstock Discord community for help, questions, and collaboration.